ADVERTISEMENT
Homemade Traditional Milk Butter
Introduction
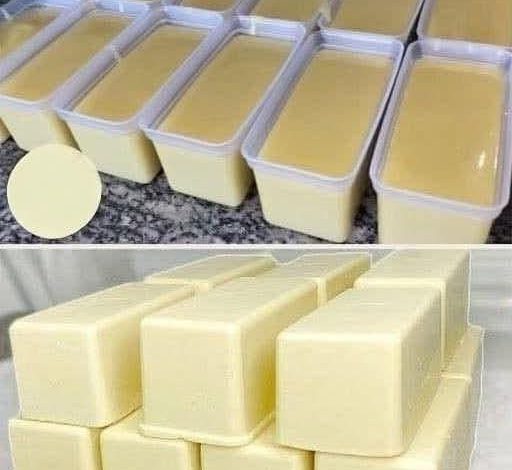
There is something truly satisfying about making your own Homemade Traditional Milk Butter from scratch. Smooth, rich, and naturally creamy, fresh butter carries a flavor and texture that store-bought versions simply cannot match. With its pale golden color and silky consistency, homemade butter transforms everyday meals into something special — whether spread over warm bread, melted into baked goods, or used in savory cooking.
Butter has been a kitchen essential for centuries, valued for its richness and versatility. While it may seem like a complex process, making butter at home requires only a few basic ingredients and simple steps. The result is pure, preservative-free butter with a clean dairy flavor and a beautiful texture that can be shaped into blocks or stored in containers for later use.
Ingredients
-
2 liters full-fat fresh cream (heavy cream, 35–40% fat)
-
5 g salt (optional, for salted butter)
-
1 liter very cold water (for washing the butter)
ADVERTISEMENT
Instructions
Step 1: Prepare the Cream
-
Pour the full-fat fresh cream into a large mixing bowl or stand mixer bowl.
-
Make sure the cream is cold but not frozen. This helps the fat separate properly.
Step 2: Whip the Cream
-
Using an electric mixer, beat the cream on medium-high speed.
-
First, it will turn into whipped cream. Continue beating.
-
After several minutes, the mixture will begin to separate into butter solids and liquid (buttermilk).
ADVERTISEMENT
-
Once the butter clumps together and the liquid clearly separates, stop mixing.
Step 3: Separate the Buttermilk
-
Strain the mixture through a fine sieve or cheesecloth.
-
Collect the liquid (this is fresh buttermilk, which can be used in baking).
-
The solid portion remaining is your raw butter.
Step 4: Wash the Butter
-
Place the butter in a bowl of very cold water.
ADVERTISEMENT
-
Gently knead it with clean hands or a spatula to release any remaining buttermilk.
-
Drain the cloudy water and repeat this process until the water runs clear.
Washing is essential to extend the shelf life of the butter.
Step 5: Add Salt (Optional)
If you prefer salted butter, knead in 5 g of salt evenly throughout the butter after washing.
Step 6: Shape and Store
-
Press the butter into molds or rectangular containers to form blocks.
-
Smooth the surface for a clean finish.
ADVERTISEMENT
-
Refrigerate for at least 2 hours to firm up before using.
Storage Tips
-
Store in an airtight container in the refrigerator for up to 2 weeks.
-
For longer storage, freeze for up to 3 months.
-
Always keep butter covered to prevent absorbing refrigerator odors.
Serving Suggestions
Spread over freshly baked bread, melt over vegetables, use in pastries, or incorporate into sauces for added richness. Homemade butter also makes an excellent base for flavored variations such as garlic butter or herb butter.
Conclusion
Making Homemade Traditional Milk Butter is a simple yet rewarding process that brings authentic flavor back into your kitchen. With only cream and a little effort, you can create fresh, creamy butter that enhances every dish it touches. Pure, natural, and incredibly delicious, homemade butter is a timeless staple worth preparing at home.