ADVERTISEMENT
Cheesy Beef Breadsticks
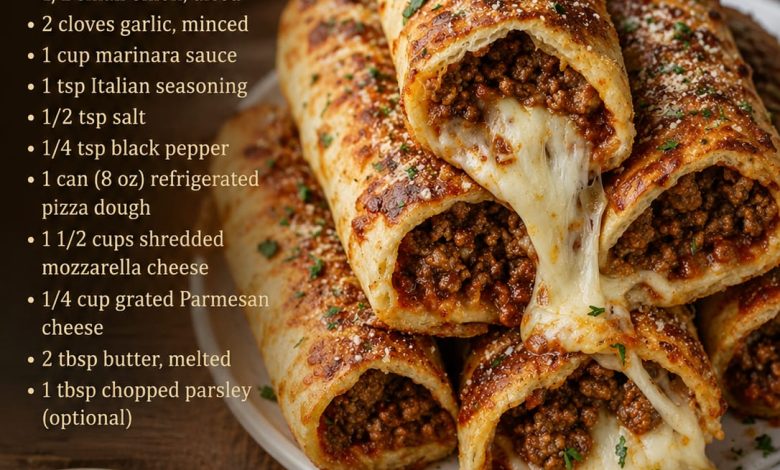
Cheesy Beef Breadsticks are the ultimate combination of golden baked dough, savory seasoned beef, rich marinara sauce, and plenty of melted cheese. Crispy on the outside and warm, hearty, and wonderfully cheesy inside, this deesviral recipe is perfect for home cooking, family dinners, game nights, or whenever you want a comforting homemade snack everyone can enjoy.
Ingredients
1 lb (450 g) ground beef
1/2 small onion, finely diced
2 cloves garlic, minced
1 cup marinara sauce
1 teaspoon Italian seasoning
1/2 teaspoon salt
1/4 teaspoon ground black pepper
1 can (8 oz) refrigerated pizza dough
1 1/2 cups shredded mozzarella cheese
1/4 cup grated Parmesan cheese
2 tablespoons unsalted butter, melted
1 tablespoon finely chopped fresh parsley, optional
For Serving
Warm marinara sauce for dipping
Extra grated Parmesan, optional
Fresh parsley for garnish, optional
Preparation
1. Prepare the Beef Filling
Place a large skillet over medium heat and add the ground beef. Break the meat apart with a wooden spoon or spatula and cook for about 3–4 minutes.
Add the finely diced onion and continue cooking until the beef is browned and the onion becomes soft and translucent.
ADVERTISEMENT
Drain any excess grease from the skillet so the filling doesn’t make the breadsticks soggy.
2. Add the Garlic and Seasonings
Add the minced garlic to the cooked beef and onion. Stir and cook for about 30–60 seconds, just until the garlic becomes fragrant.
Season the mixture with Italian seasoning, salt, and black pepper. Stir thoroughly so the seasonings are evenly distributed throughout the beef.
3. Add the Marinara Sauce
Pour the marinara sauce into the skillet and stir it into the seasoned beef.
Cook over medium-low heat for approximately 3–5 minutes, allowing the sauce to thicken slightly and coat the meat.
ADVERTISEMENT
The filling should be moist but not overly wet. A thick filling will be much easier to keep inside the breadsticks.
Remove the skillet from the heat and allow the beef mixture to cool slightly before assembling.
4. Prepare the Dough
Preheat your oven to 400°F (200°C). Line a large baking sheet with parchment paper or lightly grease it.
Unroll the refrigerated pizza dough onto a clean work surface. Gently stretch it into an even rectangle without making the dough too thin.
Cut the dough into equal rectangular portions. The exact size can vary depending on how large you want your breadsticks, but each piece needs enough room to hold the beef and cheese while still being sealed completely.
ADVERTISEMENT
5. Add the Cheese
Sprinkle a generous amount of shredded mozzarella down the center of each piece of dough.
Leave a border around the edges so you can easily seal the breadsticks later.
The mozzarella creates the delicious stretchy cheese center, so distribute it evenly among all the portions.
6. Add the Beef Filling
Spoon the cooled beef mixture over the mozzarella.
Avoid overfilling the dough. Too much filling can cause the breadsticks to open during baking and allow the cheese and sauce to escape.
ADVERTISEMENT
Add another small sprinkle of mozzarella over the beef if you want an especially cheesy center.
7. Shape the Breadsticks
Carefully bring the long sides of each piece of dough together over the filling.
Pinch the seam firmly to seal it, then close both ends. Roll gently to create a neat breadstick shape.
Place each breadstick seam-side down on the prepared baking sheet. Leaving the seam underneath helps prevent the breadsticks from opening as they bake.
8. Add the Garlic-Butter Style Topping
Brush the tops generously with melted butter.
Sprinkle grated Parmesan cheese over each breadstick. If desired, add a little extra Italian seasoning or chopped parsley for additional flavor and a beautiful homemade appearance.
9. Bake Until Golden
Transfer the baking sheet to the preheated oven and bake for approximately 15–20 minutes, or until the breadsticks are puffed and beautifully golden brown.
The exact baking time can vary depending on the thickness of the dough and the size of the breadsticks.
Look for a deep golden surface and fully cooked dough around the filling.
ADVERTISEMENT
10. Finish and Rest
Remove the breadsticks from the oven and immediately brush them with a little additional melted butter for a glossy, flavorful finish.
Sprinkle with extra Parmesan and freshly chopped parsley while they’re still warm.
Allow them to rest for about 5 minutes before serving. This short resting period lets the melted cheese and beef filling settle slightly while keeping everything wonderfully warm.
11. Serve
Arrange the Cheesy Beef Breadsticks on a large serving platter and serve with a bowl of warm marinara sauce for dipping.
When pulled apart, the center should reveal juicy seasoned beef surrounded by deliciously melted mozzarella, while the exterior remains golden and lightly crisp.
Tips for the Best Cheesy Beef Breadsticks
Make sure to drain excess grease from the cooked beef. Too much liquid can make the dough difficult to seal and may result in soggy breadsticks.
Let the beef filling cool slightly before placing it onto the dough. Very hot filling can soften the dough too quickly and make shaping difficult.
Don’t overfill the breadsticks. A balanced amount of beef and cheese gives you a generous center while keeping everything neatly enclosed.
For the best cheese pull, serve the breadsticks while they’re still warm. Mozzarella provides the classic stretchy texture shown in this comforting recipe.
You can also prepare the beef filling ahead of time and refrigerate it until you’re ready to assemble and bake the breadsticks.
Conclusion
These Cheesy Beef Breadsticks deliver everything you want in a comforting homemade snack: golden dough, flavorful beef, rich marinara, Parmesan, and plenty of gooey mozzarella in every bite. Serve them hot with extra marinara for dipping, and this deesviral recipe can easily become a favorite for family dinners, parties, or cozy evenings at home.