ADVERTISEMENT
Cherries in the Snow
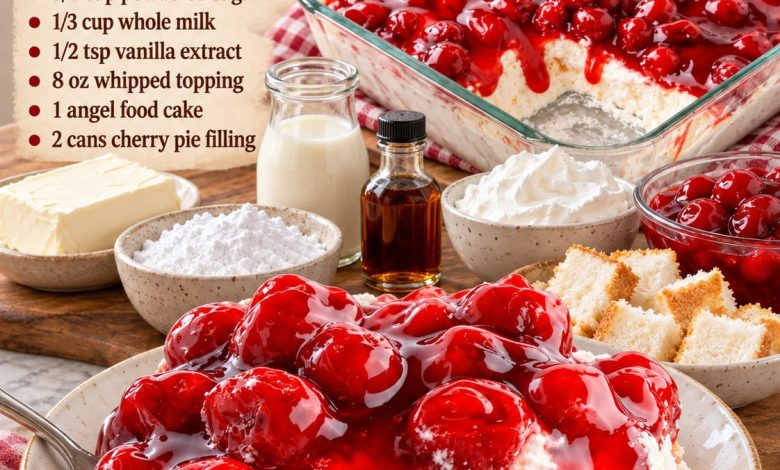
There is something truly magical about a homemade dessert that looks beautiful, tastes incredible, and requires absolutely no baking. Cherries in the Snow is one of those timeless, old-fashioned desserts that brings together fluffy angel food cake, a rich and creamy cheesecake-style filling, and a generous layer of glossy, sweet cherry pie filling. Every spoonful offers the perfect combination of light, airy cake, smooth vanilla cream, and juicy cherries.
This delightful dessert gets its charming name from the beautiful contrast between the snowy white cream filling and the bright red cherries scattered across the top. The presentation is elegant enough for special celebrations, yet the recipe itself is wonderfully simple, making it an excellent choice for both experienced home bakers and beginners.
What makes Cherries in the Snow especially irresistible is its wonderful balance of textures and flavors. The angel food cake is soft and delicate, the cream cheese mixture adds a velvety richness, and the cherry topping provides a sweet, slightly tangy finish. As the dessert chills, the layers settle together, allowing the cake to absorb some of the creamy filling while still maintaining its wonderfully light texture.
Whether you are preparing dessert for Christmas, Thanksgiving, Valentine’s Day, a summer potluck, a birthday celebration, or a cozy family dinner, this beautiful no-bake treat is sure to become a favorite. It is easy to prepare ahead of time, serves a crowd, and looks absolutely stunning when presented in a clear glass baking dish.
Ingredients
For the Cherries in the Snow Dessert:
ADVERTISEMENT
-
12 ounces cream cheese, softened to room temperature
-
3/4 cup powdered sugar, sifted
-
1/3 cup whole milk
-
1/2 teaspoon pure vanilla extract
-
8 ounces whipped topping, thawed
ADVERTISEMENT
-
1 prepared angel food cake, approximately 12 to 14 ounces
-
2 cans (21 ounces each) cherry pie filling
Optional Garnishes:
-
Extra whipped topping
-
Fresh cherries, if available
ADVERTISEMENT
-
White chocolate shavings
-
A light dusting of powdered sugar
-
Fresh mint leaves
Preparation Steps
Step 1: Prepare Your Ingredients
Before beginning, gather all the ingredients and arrange them on your kitchen counter.
Remove the cream cheese from the refrigerator approximately 30 to 45 minutes before preparing the dessert. Allowing the cream cheese to soften naturally is important because it helps create a smooth, creamy filling without lumps.
ADVERTISEMENT
Make sure the whipped topping is completely thawed in the refrigerator but still cold.
If you are using a store-bought angel food cake, remove it from its packaging and place it on a clean cutting board.
Choose a 9-by-13-inch glass baking dish for assembling the dessert. A clear dish is especially beautiful because it allows the layers of fluffy white cake, creamy filling, and vibrant red cherries to remain visible.
There is no need to grease the baking dish because this is a no-bake dessert.
Step 2: Cut the Angel Food Cake
Using a serrated knife, carefully cut the angel food cake into bite-sized cubes, approximately 1 inch in size.
Angel food cake has a delicate, airy texture, so use a gentle sawing motion rather than pressing down firmly with the knife.
This will help preserve the cake’s fluffy structure.
If you prefer a more rustic presentation, you can gently tear the cake into small pieces using your hands.
Place the cake cubes into a large mixing bowl and set them aside.
ADVERTISEMENT
Try to keep the pieces relatively uniform so that the creamy filling can coat them evenly.
Step 3: Beat the Cream Cheese
Place the softened cream cheese into a large mixing bowl.
Using an electric hand mixer or stand mixer fitted with the paddle attachment, beat the cream cheese on medium speed for approximately 2 to 3 minutes.
Continue mixing until the cream cheese becomes smooth, fluffy, and free of visible lumps.
Scrape down the sides and bottom of the bowl with a rubber spatula to ensure everything is evenly mixed.
This step is essential for creating the soft, velvety texture that makes the dessert so delicious.
If the cream cheese is still too firm, allow it to soften for a few additional minutes before continuing.
Step 4: Add the Powdered Sugar
Gradually add the sifted powdered sugar to the softened cream cheese.
Begin mixing on low speed to prevent the powdered sugar from scattering outside the bowl.
Once the sugar is incorporated, increase the mixer speed to medium and beat for another 1 to 2 minutes.
The mixture should become smooth, creamy, and slightly fluffy.
Powdered sugar is ideal for this recipe because it dissolves easily into the cream cheese, creating a silky filling without the grainy texture that regular granulated sugar can sometimes produce.
Step 5: Add the Milk and Vanilla
Slowly pour the whole milk into the cream cheese mixture while mixing on low speed.
Add the vanilla extract and continue beating until the ingredients are fully combined.
The milk helps loosen the cream cheese mixture, making it easier to fold in the whipped topping and coat the angel food cake.
Continue mixing until the filling is creamy and smooth.
The consistency should be thick enough to hold its shape but soft enough to spread easily.
If necessary, stop the mixer and scrape the sides of the bowl once more to ensure that no cream cheese remains unmixed.
Step 6: Fold in the Whipped Topping
Add the thawed whipped topping to the cream cheese mixture.
Using a large rubber spatula, gently fold the whipped topping into the filling.
Begin by scooping from the bottom of the bowl and folding the mixture over itself.
Rotate the bowl as you continue folding until the whipped topping is fully incorporated.
Avoid beating the mixture vigorously at this stage.
The goal is to preserve the light, airy texture of the whipped topping while combining it with the rich cream cheese mixture.
Once finished, the filling should look fluffy, smooth, and beautifully white.
Step 7: Combine the Cake and Creamy Filling
Add the prepared angel food cake cubes to the bowl containing the cream cheese mixture.
Using a large spatula, gently fold the cake pieces into the filling.
Work slowly to avoid crushing the delicate cake.
Continue folding until the cake pieces are evenly coated with the creamy mixture.
The cake should remain fluffy while becoming surrounded by the rich vanilla cream.
This combination creates the soft, cloudlike base that gives Cherries in the Snow its signature texture.
Step 8: Transfer the Mixture to the Baking Dish
Spoon the angel food cake and cream mixture into the prepared 9-by-13-inch glass baking dish.
Spread it evenly using a spatula.
Gently press the mixture into the corners of the dish to create a uniform layer, but avoid packing it down too firmly.
The dessert should remain light and airy.
Use the back of a spoon or an offset spatula to smooth the top.
A smooth, even surface will make it easier to spread the cherry topping and create a beautiful finished presentation.
Step 9: Prepare the Cherry Topping
Open both cans of cherry pie filling.
Transfer the filling into a medium mixing bowl and stir gently to distribute the cherries evenly throughout the thick, glossy sauce.
Be careful not to crush the cherries while stirring.
The filling should be rich, vibrant red, and thick enough to sit beautifully on top of the creamy cake layer.
If the canned filling has been stored in a warm location, you may refrigerate it briefly before assembling the dessert.
A cool cherry topping helps the creamy layer maintain its texture.
Step 10: Spread the Cherries Over the Cream Layer
Carefully spoon the cherry pie filling over the creamy angel food cake mixture.
Begin by placing small spoonfuls across the surface rather than pouring all the filling into one spot.
This helps prevent the cherry topping from sinking into the cream layer.
Using the back of a spoon, gently spread the cherries and sauce until the entire surface is covered.
Make sure the cherries are distributed evenly so that every serving receives a generous amount of fruit.
The contrast between the snowy white filling and the glossy red cherries creates the beautiful appearance that gives this dessert its name.
Step 11: Chill the Dessert
Cover the baking dish tightly with plastic wrap or a fitted lid.
Place it in the refrigerator for at least 4 hours.
For the best flavor and texture, allow the dessert to chill overnight.
During refrigeration, the cream cheese filling becomes slightly firmer, the angel food cake absorbs some of the creamy mixture, and the layers settle together.
This chilling period is important because it allows the dessert to develop its signature soft, spoonable texture.
Avoid skipping this step, even if the dessert looks ready to serve immediately after assembly.
Step 12: Garnish and Serve
Once the dessert has chilled thoroughly, remove it from the refrigerator.
Carefully uncover the baking dish.
For a simple, classic presentation, serve it exactly as it is, allowing the bright red cherry topping to remain the star of the dessert.
If you want to make it extra special, add a few small dollops of whipped topping around the edges.
You can also sprinkle a little white chocolate over the top or garnish with fresh mint leaves for an elegant finishing touch.
Using a large serving spoon or spatula, scoop generous portions into individual dessert bowls or plates.
Because this dessert is soft and creamy, the servings may not form perfectly firm squares, and that is part of its homemade charm.
Serve chilled and enjoy the delicious combination of fluffy cake, creamy filling, and sweet cherries.
Helpful Tips for the Best Cherries in the Snow
Use softened cream cheese. Room-temperature cream cheese blends much more smoothly with powdered sugar and milk. Cold cream cheese can leave small lumps in the filling, so allow enough time for it to soften before mixing.
Choose a fresh angel food cake. A soft, fluffy angel food cake creates the best texture. A dry or stale cake may absorb too much moisture and become overly dense.
Fold the whipped topping gently. Avoid overmixing once the whipped topping has been added. Gentle folding helps preserve the light, airy consistency of the filling.
Do not crush the cake pieces. The cake should remain in soft, bite-sized pieces rather than turning into crumbs. This gives the finished dessert its delicate texture.
Spread the cherry topping carefully. Adding the cherries in small spoonfuls helps maintain the separation between the creamy white base and the bright red fruit topping.
Allow enough chilling time. Refrigerating the dessert for at least 4 hours helps the filling firm up and allows the flavors to blend beautifully. Overnight chilling often produces an even better texture.
Keep the dessert cold until serving. Because the filling contains cream cheese and whipped topping, it should remain refrigerated until you are ready to enjoy it.
Delicious Variations
Strawberry in the Snow
For a beautiful variation, replace the cherry pie filling with strawberry pie filling.
The sweet strawberry topping pairs wonderfully with the creamy vanilla filling and soft angel food cake.
You can also add a few fresh strawberry slices just before serving for extra freshness.
Blueberry in the Snow
Substitute blueberry pie filling for the cherries.
The deep blue-purple fruit topping creates a beautiful contrast with the white cream layer and gives the dessert a delicious berry flavor.
This variation is especially lovely for summer gatherings and family celebrations.
Mixed Berry in the Snow
For a colorful dessert, use a combination of strawberry, blueberry, and raspberry pie fillings.
Gently swirl the fruit fillings together before spreading them over the cream layer.
The combination of berries adds a wonderful variety of sweet and slightly tart flavors.
Chocolate Cherry Delight
For a richer dessert, sprinkle mini chocolate chips between the creamy cake layer and the cherry topping.
You can also finish the dessert with a small amount of shaved dark chocolate.
Chocolate and cherries are a classic pairing that adds an indulgent twist to this traditional recipe.
Lemon Cherry in the Snow
Add 1 teaspoon of finely grated lemon zest to the cream cheese mixture.
The citrus flavor adds a refreshing brightness that complements the sweet cherries beautifully.
For a stronger lemon flavor, add a small amount of fresh lemon juice while adjusting the milk slightly to maintain the desired consistency.
What to Serve with Cherries in the Snow
Cherries in the Snow is delicious on its own, but it can also be served with a few simple accompaniments to create an extra-special dessert experience.
Freshly Brewed Coffee: A warm cup of coffee provides a wonderful contrast to the cool, creamy dessert.
Hot Tea: Vanilla tea, black tea, or a lightly flavored herbal tea pairs beautifully with the sweet cherry topping.
Vanilla Ice Cream: For an especially indulgent treat, serve a small scoop of vanilla ice cream alongside each portion.
Fresh Fruit: A few fresh strawberries, blueberries, or raspberries add color and freshness to the plate.
White Chocolate Shavings: A delicate sprinkle of white chocolate enhances the creamy vanilla flavor and creates a beautiful finishing touch.
This dessert is especially wonderful after a hearty holiday meal because its fluffy texture makes it feel lighter than many traditional baked desserts.
Make-Ahead Instructions
One of the biggest advantages of Cherries in the Snow is that it can be prepared in advance.
This makes it an excellent choice for holidays, potlucks, birthday parties, and family gatherings when you want to avoid last-minute dessert preparation.
You can assemble the entire dessert the evening before serving.
Simply prepare the cream cheese filling, fold in the angel food cake, spread the mixture into the baking dish, and add the cherry topping.
Cover tightly and refrigerate overnight.
By the following day, the filling will have firmed up slightly and the cake will have absorbed some of the creamy mixture.
For the freshest presentation, wait until just before serving to add any optional whipped cream decorations or fresh fruit garnishes.
Storage Instructions
Refrigerator Storage
Cover the dessert tightly with plastic wrap or transfer leftovers into airtight containers.
Store in the refrigerator for up to 3 to 4 days.
The cake will gradually soften as it absorbs moisture from the creamy filling, so the dessert is usually at its best during the first 1 to 2 days.
Freezer Storage
Freezing is not recommended for the best texture.
The cream cheese and whipped topping mixture may separate slightly after thawing, while the angel food cake can become excessively soft.
For the freshest flavor and appearance, prepare the dessert ahead of time and store it in the refrigerator rather than the freezer.
Serving Leftovers
Remove only the portions you plan to serve and return the remaining dessert to the refrigerator promptly.
Serve chilled for the best flavor and consistency.
Avoid leaving the dessert at room temperature for more than 2 hours.
Frequently Asked Questions
Can I use homemade angel food cake?
Absolutely. Homemade angel food cake works beautifully in this recipe.
Just make sure the cake has cooled completely before cutting it into cubes and mixing it with the creamy filling.
Can I make Cherries in the Snow the night before?
Yes. In fact, preparing this dessert the night before is one of the best ways to achieve its soft, creamy texture.
Overnight refrigeration allows the flavors to blend and helps the dessert set properly.
Can I use fresh cherries instead of canned cherry pie filling?
Yes, but fresh cherries need to be cooked into a thickened fruit topping first.
You can simmer pitted cherries with sugar, a little water, lemon juice, and cornstarch until the mixture becomes glossy and thick.
Allow the topping to cool completely before spreading it over the cream layer.
Can I substitute another fruit filling?
Definitely. Strawberry, blueberry, raspberry, and peach pie fillings all work wonderfully.
The creamy angel food cake base is versatile and complements many different fruit flavors.
Why is my cream cheese filling lumpy?
Lumps usually occur when the cream cheese is too cold before mixing.
For the smoothest filling, use softened cream cheese and beat it thoroughly before adding the remaining ingredients.
Can I make this dessert in individual cups?
Yes. Cherries in the Snow looks beautiful when served in small glass dessert cups.
Simply divide the creamy angel food cake mixture between the cups and spoon the cherry filling over each portion.
Cover and refrigerate until ready to serve.
This method is especially convenient for parties because everyone receives an individual serving.
Does this dessert need to be baked?
No. This is a completely no-bake dessert when prepared with a ready-made angel food cake.
The only preparation required is mixing, layering, and chilling.
Recipe Information
|
Detail |
Information |
|---|---|
|
Preparation Time |
20 minutes |
|
Cooking Time |
No baking required |
|
Chilling Time |
At least 4 hours |
|
Total Time |
Approximately 4 hours 20 minutes |
|
Servings |
12–15 |
|
Recipe Type |
No-Bake Dessert |
|
Best Served |
Chilled |
|
Difficulty |
Easy |
Conclusion
Cherries in the Snow is a beautiful reminder that some of the most memorable homemade desserts are also the simplest to prepare. With its fluffy angel food cake, rich vanilla cream cheese filling, and generous topping of glossy red cherries, this classic treat delivers a wonderful combination of flavors and textures in every delicious spoonful.
The soft cake creates a light, delicate foundation, while the creamy filling adds just the right amount of richness. The sweet and slightly tart cherry topping brings everything together, creating a dessert that is both comforting and refreshing.
What makes this recipe especially special is its timeless charm. It is the kind of dessert that reminds people of family celebrations, holiday dinners, church potlucks, and treasured recipes passed down through generations. Its bright red and snowy white layers make it a lovely addition to Christmas gatherings, but it is equally delicious during summer parties, birthdays, and everyday family meals.
Best of all, there is no need to turn on the oven or spend hours in the kitchen. With just a handful of simple ingredients and a little time in the refrigerator, you can create a homemade dessert that looks impressive and tastes absolutely wonderful.
Whether you are making it for the first time or bringing back a beloved family tradition, Cherries in the Snow is sure to become one of those recipes you return to again and again.
Sweet, creamy, fluffy, and filled with juicy cherries, this old-fashioned dessert is pure homemade comfort in every bite.
Would you enjoy this classic Cherries in the Snow dessert with extra cherries on top, or would you add a little whipped cream for an even creamier finish?