ADVERTISEMENT
No Bake Christmas Treats
Christmas is the perfect time to fill your home with delicious homemade sweets, festive colors, and the wonderful joy of sharing treats with family and friends. While traditional holiday baking is always special, there is something especially convenient about making beautiful Christmas desserts without spending hours in the kitchen or turning on the oven.
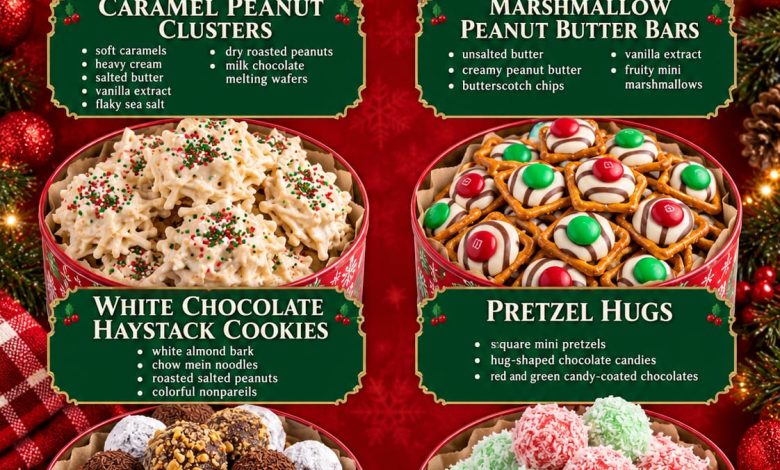
These No Bake Christmas Treats bring together six delightful holiday favorites that are simple to prepare, wonderfully delicious, and perfect for sharing. From rich chocolate-covered peanut clusters and chewy marshmallow peanut butter bars to festive white chocolate haystack cookies, colorful pretzel hugs, classic rum balls, and cheerful Christmas Jello balls, this collection offers something for every sweet tooth.
Each recipe combines familiar ingredients with comforting flavors and festive presentation. Some treats are rich and chocolatey, others are sweet and crunchy, and a few offer a colorful, playful touch that makes them especially appealing on Christmas dessert platters.
Whether you are preparing homemade gifts, organizing a Christmas cookie exchange, planning a holiday party, or simply looking for fun treats to make with your family, these recipes are wonderful additions to your holiday traditions.
Best of all, most of these desserts can be prepared ahead of time, making Christmas entertaining easier and more enjoyable.
ADVERTISEMENT
1. CARAMEL PEANUT CLUSTERS
Caramel Peanut Clusters are a wonderfully indulgent holiday candy that combines crunchy roasted peanuts, soft buttery caramel, and smooth milk chocolate. Every bite delivers the perfect balance of sweet, salty, creamy, and crunchy textures.
These homemade chocolate clusters are especially popular during the Christmas season because they look beautiful arranged in decorative tins or wrapped in festive candy boxes. They are also surprisingly easy to prepare, requiring only a few simple ingredients and a little patience while the chocolate sets.
Ingredients
-
11 ounces soft caramels, unwrapped
-
2 tablespoons heavy whipping cream
-
1 tablespoon salted butter
ADVERTISEMENT
-
1 teaspoon vanilla extract
-
1/4 teaspoon flaky sea salt, plus extra for garnish
-
2 cups dry roasted peanuts
-
12 ounces milk chocolate melting wafers
Preparation Steps
Step 1: Prepare the Baking Sheets
ADVERTISEMENT
Line two large baking sheets with parchment paper or silicone baking mats.
Make sure there is enough space between the clusters so they do not stick together while setting.
Set the prepared baking sheets aside.
Step 2: Prepare the Caramel Mixture
Place the unwrapped soft caramels into a microwave-safe bowl.
ADVERTISEMENT
Add the heavy whipping cream and salted butter.
Microwave in 20-second intervals, stirring thoroughly between each interval.
Continue heating until the caramels have melted completely and the mixture becomes smooth and glossy.
Avoid overheating the caramel, as it can become too thick or develop a burnt flavor.
Step 3: Add Vanilla and Sea Salt
Once the caramel is melted, stir in the vanilla extract and flaky sea salt.
Mix gently until the ingredients are evenly incorporated.
The vanilla enhances the buttery sweetness of the caramel, while the sea salt balances its richness.
Step 4: Combine the Caramel and Peanuts
ADVERTISEMENT
Add the dry roasted peanuts to the warm caramel mixture.
Using a sturdy spoon or spatula, stir until the peanuts are thoroughly coated.
The mixture should be thick enough to hold together when spooned onto the baking sheet.
If the caramel begins to firm up too quickly, warm it briefly until it becomes easier to work with.
Step 5: Form the Peanut Clusters
Using a tablespoon or small cookie scoop, drop portions of the caramel peanut mixture onto the prepared baking sheets.
Leave approximately 1 inch between each cluster.
Gently shape the clusters into small mounds.
Allow them to cool for approximately 15 to 20 minutes, or until the caramel becomes firm enough to handle.
Step 6: Melt the Milk Chocolate
Place the milk chocolate melting wafers into a clean microwave-safe bowl.
Microwave in 20-second intervals, stirring after each interval until smooth.
Be careful not to overheat the chocolate.
The melted chocolate should be glossy and fluid enough to coat the peanut clusters evenly.
Step 7: Coat the Clusters
Using a fork or dipping tool, carefully dip each caramel peanut cluster into the melted chocolate.
Turn gently to coat the entire cluster.
Lift it from the chocolate and allow any excess to drip back into the bowl.
Place the coated cluster onto the parchment-lined baking sheet.
Repeat with the remaining clusters.
Step 8: Add the Finishing Touch
While the chocolate is still soft, sprinkle a few flakes of sea salt over the top of each cluster.
This creates a delicious contrast between the sweet chocolate, buttery caramel, and salty peanuts.
Step 9: Allow the Chocolate to Set
Let the clusters rest at cool room temperature until the chocolate has hardened.
For faster setting, place the baking sheets in the refrigerator for approximately 15 to 20 minutes.
Once firm, carefully remove the clusters from the parchment paper.
Serving Suggestions
Arrange Caramel Peanut Clusters in decorative Christmas candy tins, small paper candy cups, or festive dessert trays.
They are wonderful served alongside hot chocolate, coffee, or other homemade Christmas candies.
Storage Tips
Store the clusters in an airtight container in a cool, dry location for up to 1 week, or refrigerate for up to 2 weeks.
Place parchment paper between layers to prevent sticking.
2. MARSHMALLOW PEANUT BUTTER BARS
Marshmallow Peanut Butter Bars are a delicious combination of creamy peanut butter, buttery butterscotch, and soft, colorful mini marshmallows. These sweet, chewy bars are a classic no-bake holiday treat that brings a beautiful mixture of textures and flavors to any Christmas dessert table.
Their golden color and festive marshmallow pieces make them especially attractive when cut into small squares and arranged on holiday platters.
Ingredients
-
1/2 cup unsalted butter
-
1 cup creamy peanut butter
-
11 ounces butterscotch chips
-
1 teaspoon vanilla extract
-
4 cups fruity mini marshmallows
Preparation Steps
Step 1: Prepare the Baking Dish
Line an 8-by-8-inch or 9-by-9-inch baking dish with parchment paper.
Leave a little parchment hanging over the sides to make it easier to lift the bars out after chilling.
Lightly grease the parchment if desired.
Step 2: Melt the Butter
Place a medium saucepan over low heat.
Add the unsalted butter and allow it to melt slowly.
Stir occasionally to prevent the butter from browning.
Step 3: Add the Peanut Butter
Add the creamy peanut butter to the melted butter.
Stir continuously until the mixture becomes smooth and fully combined.
Keep the heat low to prevent scorching.
Step 4: Melt the Butterscotch Chips
Add the butterscotch chips to the saucepan.
Continue stirring gently until the chips melt completely.
The mixture should become thick, smooth, and glossy.
Remove the saucepan from the heat once everything is melted.
Step 5: Add the Vanilla
Stir the vanilla extract into the warm peanut butter mixture.
Mix until evenly distributed.
Allow the mixture to cool for approximately 10 to 15 minutes, stirring occasionally.
It should remain pourable but no longer be hot enough to melt the marshmallows.
Step 6: Fold in the Marshmallows
Place the fruity mini marshmallows into a large mixing bowl.
Pour the cooled peanut butter mixture over them.
Using a spatula, gently fold everything together until the marshmallows are evenly coated.
Avoid overmixing so the marshmallows maintain their soft, fluffy texture and colorful appearance.
Step 7: Transfer to the Baking Dish
Spoon the mixture into the prepared baking dish.
Spread it evenly, gently pressing it into the corners.
Use a spatula to smooth the surface without compressing the marshmallows too firmly.
Step 8: Chill Until Firm
Cover the dish and refrigerate for approximately 2 hours, or until the mixture is firm enough to cut.
Step 9: Slice into Bars
Lift the chilled mixture from the baking dish using the parchment paper.
Place it on a cutting board.
Using a sharp knife, cut into small squares or rectangular bars.
For cleaner cuts, wipe the knife between slices.
Serving Suggestions
Serve these colorful bars on a Christmas dessert platter alongside cookies, chocolate candies, and other holiday treats.
They are also wonderful wrapped individually in festive cellophane for homemade gifts.
Storage Tips
Store in an airtight container in the refrigerator for up to 1 week.
Allow the bars to sit at room temperature for a few minutes before serving if you prefer a softer texture.
3. WHITE CHOCOLATE HAYSTACK COOKIES
White Chocolate Haystack Cookies are a wonderfully simple holiday treat made with crunchy chow mein noodles, creamy white chocolate, and salty roasted peanuts. Their unique texture creates a delightful contrast between sweet and savory flavors.
These no-bake cookies are especially popular during Christmas because they can be decorated with colorful holiday sprinkles and prepared in very little time.
Ingredients
-
16 ounces white almond bark
-
5 ounces crispy chow mein noodles
-
1 cup roasted salted peanuts
-
3 tablespoons red, green, and white nonpareil sprinkles
Preparation Steps
Step 1: Prepare the Baking Sheets
Line two large baking sheets with parchment paper.
Set them aside while preparing the ingredients.
Step 2: Prepare the Almond Bark
Break the white almond bark into smaller pieces.
Place the pieces into a large microwave-safe bowl.
Microwave in 20- to 30-second intervals, stirring thoroughly between each interval.
Continue until the almond bark is completely melted and smooth.
Avoid overheating, as white confectionery coating can become thick or grainy when exposed to excessive heat.
Step 3: Add the Chow Mein Noodles
Place the crispy chow mein noodles into a large mixing bowl.
Pour the melted almond bark over the noodles.
Using a spatula, gently stir until the noodles are coated.
Work carefully to avoid breaking the noodles into very small pieces.
Step 4: Add the Peanuts
Add the roasted salted peanuts to the coated noodles.
Fold gently until the peanuts are evenly distributed.
The combination should be thick, sticky, and easy to scoop.
Step 5: Shape the Haystack Cookies
Using two spoons, drop small mounds of the mixture onto the prepared baking sheets.
Each mound should resemble a small haystack with visible strands of crispy noodles.
Leave a little space between the cookies.
Step 6: Decorate with Christmas Sprinkles
While the white coating is still soft, sprinkle red, green, and white nonpareils over each cookie.
The colorful sprinkles add a cheerful Christmas appearance.
Step 7: Allow the Cookies to Set
Leave the cookies at cool room temperature until firm.
Alternatively, refrigerate them for approximately 15 to 20 minutes.
Once the coating has hardened, carefully remove the cookies from the parchment paper.
Serving Suggestions
White Chocolate Haystack Cookies look beautiful in festive cookie tins or arranged on holiday dessert trays.
They are especially delicious alongside hot cocoa or freshly brewed coffee.
Storage Tips
Store in an airtight container at cool room temperature for up to 1 week, or refrigerate for up to 2 weeks.
Keep the cookies away from excessive heat to prevent the coating from softening.
4. PRETZEL HUGS
Pretzel Hugs are one of the easiest and most charming Christmas candies you can make. These festive little treats combine crunchy square pretzels, creamy hug-shaped chocolate candies, and colorful red and green candy-coated chocolates.
The combination of sweet chocolate and salty pretzels creates a wonderfully satisfying flavor, while the bright holiday colors make them perfect for Christmas parties and homemade gift boxes.
This recipe is nearly no-bake: the candies need only a few minutes of gentle oven heat to soften the chocolate without baking the pretzels.
Ingredients
-
60 square mini pretzels
-
60 hug-shaped chocolate candies, unwrapped
-
60 red and green candy-coated chocolates
Preparation Steps
Step 1: Prepare the Baking Sheet
Line a large baking sheet with parchment paper.
Preheat your oven to 200°F (95°C).
The low temperature is important because the chocolate only needs to soften slightly.
Step 2: Arrange the Pretzels
Place the square mini pretzels in a single layer on the prepared baking sheet.
Leave a little space between each pretzel.
Try to use pretzels that are whole and unbroken for the neatest presentation.
Step 3: Add the Chocolate Hugs
Unwrap the hug-shaped chocolate candies.
Place one chocolate candy in the center of each pretzel.
Make sure the candies sit upright and are centered.
Step 4: Warm the Chocolate
Place the baking sheet in the preheated oven for approximately 3 to 5 minutes.
Watch the candies carefully.
The chocolate should become soft and glossy while maintaining most of its original shape.
Do not allow it to melt completely.
Step 5: Add the Candy-Coated Chocolates
Remove the baking sheet from the oven.
Immediately place one red or green candy-coated chocolate in the center of each softened chocolate hug.
Press down gently so the chocolate spreads slightly across the pretzel.
The candy-coated chocolate should remain visible on top.
Step 6: Cool Until Firm
Allow the Pretzel Hugs to cool at room temperature.
For faster setting, refrigerate the baking sheet for approximately 15 to 20 minutes.
Once the chocolate has hardened, carefully remove the treats from the parchment paper.
Serving Suggestions
Arrange Pretzel Hugs in small decorative bowls, Christmas cookie tins, or festive candy bags.
They are especially popular for classroom celebrations, holiday parties, and Christmas dessert platters.
Storage Tips
Store in an airtight container at cool room temperature for up to 2 weeks.
Keep away from direct sunlight and warm temperatures.
5. RUM BALLS
Rum Balls are a classic holiday confection known for their rich chocolate flavor, tender crumbly texture, and distinctive hint of dark rum. Made with vanilla wafer crumbs, finely ground walnuts, cocoa powder, and powdered sugar, these no-bake treats are wonderfully easy to prepare.
They are especially popular during Christmas because they can be made ahead of time and become even more flavorful after resting in the refrigerator.
These contain alcohol and are intended for adults. Because they are not baked, the alcohol remains in the finished treats.
Ingredients
-
2 1/2 cups finely crushed vanilla wafer crumbs
-
1 cup finely ground walnuts
-
1 cup powdered sugar
-
1/4 cup unsweetened cocoa powder
-
1 teaspoon vanilla extract
-
3 tablespoons light corn syrup
-
1/3 cup dark rum
Optional Coatings:
-
Additional powdered sugar
-
Unsweetened cocoa powder
-
Chocolate sprinkles
-
Finely chopped walnuts
-
Red and green holiday sprinkles
Preparation Steps
Step 1: Prepare the Vanilla Wafer Crumbs
Place the vanilla wafer cookies into a food processor.
Pulse until they become fine, even crumbs.
If you do not have a food processor, place the cookies in a sealed plastic bag and crush them using a rolling pin.
Transfer the crumbs to a large mixing bowl.
Step 2: Grind the Walnuts
Place the walnuts into a food processor.
Pulse until finely ground.
Avoid processing too long, as the walnuts may begin releasing their natural oils and turn into nut butter.
Add the ground walnuts to the bowl containing the vanilla wafer crumbs.
Step 3: Combine the Dry Ingredients
Add the powdered sugar and unsweetened cocoa powder.
Stir thoroughly until the ingredients are evenly distributed.
The mixture should have a uniform chocolate color.
Step 4: Prepare the Liquid Mixture
In a separate small bowl, combine the dark rum, light corn syrup, and vanilla extract.
Whisk until smooth.
Step 5: Form the Rum Ball Mixture
Pour the liquid ingredients into the dry mixture.
Using a sturdy spoon or spatula, stir until the ingredients begin to come together.
Continue mixing until the mixture forms a thick, slightly sticky dough.
If it seems too dry to hold together, add a small amount of additional corn syrup.
If it is too sticky, add a little more vanilla wafer crumbs.
Step 6: Chill the Mixture
Cover the bowl and refrigerate for approximately 20 to 30 minutes.
This makes the mixture easier to shape.
Step 7: Roll into Balls
Using a small cookie scoop or tablespoon, portion the mixture into evenly sized pieces.
Roll each portion between your palms to form a smooth ball approximately 1 inch in diameter.
Place the balls on a parchment-lined tray.
Step 8: Coat the Rum Balls
Place your chosen coatings into separate shallow bowls.
Roll the balls in powdered sugar, cocoa powder, chocolate sprinkles, chopped walnuts, or festive holiday sprinkles.
You can use different coatings to create a beautiful assortment of colors and textures.
Step 9: Refrigerate Before Serving
Transfer the finished rum balls to an airtight container.
Refrigerate for at least 2 hours before serving.
For the best flavor, allow them to rest overnight.
Serving Suggestions
Arrange Rum Balls in small paper candy cups and serve on an adults-only Christmas dessert platter.
They also make thoughtful homemade holiday gifts when packaged and labeled appropriately.
Storage Tips
Store in an airtight container in the refrigerator for up to 2 weeks.
Keep clearly labeled and out of reach of children.
6. CHRISTMAS JELLO BALLS
Christmas Jello Balls are cheerful, colorful no-bake holiday treats that bring a festive combination of fruity flavor, creamy texture, and sweet coconut to the Christmas dessert table.
Made with strawberry and lime gelatin mixes, shredded coconut, and thick Greek yogurt, these little treats are easy to prepare and especially attractive when arranged together in red and green holiday colors.
The coconut coating gives them a beautiful snowy appearance, making them a fun addition to Christmas candy trays.
Ingredients
-
1 package (3 ounces) strawberry-flavored gelatin mix
-
1 package (3 ounces) lime-flavored gelatin mix
-
3 cups sweetened shredded coconut, divided
-
1 cup thick plain Greek yogurt, divided
Optional Garnishes:
-
Additional shredded coconut
-
Red and green sanding sugar
-
Festive mini paper candy cups
Preparation Steps
Step 1: Prepare the Ingredients
Line a large tray or baking sheet with parchment paper.
Set out two medium mixing bowls.
Divide the Greek yogurt into two equal portions of 1/2 cup each.
Divide 2 cups of the shredded coconut into two equal portions, reserving the remaining cup for coating.
Step 2: Prepare the Strawberry Mixture
Add the strawberry gelatin powder to the first mixing bowl.
Add 1 cup of sweetened shredded coconut.
Stir until the gelatin powder is evenly distributed.
Add 1/2 cup of thick Greek yogurt.
Mix thoroughly until the ingredients form a thick, sticky mixture.
The mixture should have a bright pink or red color.
Step 3: Prepare the Lime Mixture
In the second mixing bowl, combine the lime gelatin powder with 1 cup of shredded coconut.
Stir well.
Add the remaining 1/2 cup of Greek yogurt.
Mix until the ingredients form a thick, evenly colored green mixture.
Step 4: Chill the Mixtures
Cover both bowls and refrigerate for approximately 30 to 45 minutes.
The coconut will absorb some of the moisture from the yogurt, making the mixtures easier to shape.
If the mixtures remain too soft, stir in a little additional shredded coconut.
Step 5: Shape the Christmas Balls
Using a small cookie scoop or tablespoon, portion the strawberry mixture into small pieces.
Roll each portion gently between your palms to form a ball.
Repeat with the lime mixture.
Try to make all the balls approximately the same size for an attractive presentation.
Step 6: Coat with Coconut
Place the reserved shredded coconut into a shallow bowl.
Roll each strawberry and lime ball in the coconut until evenly coated.
The white coconut coating creates a beautiful snowy appearance while allowing the festive red and green colors to show through.
Step 7: Refrigerate Until Firm
Arrange the coated balls on the prepared parchment-lined tray.
Refrigerate for at least 1 to 2 hours.
The treats should become firmer and easier to handle, although they will remain softer than traditional candy.
Because gelatin powder can vary in how it behaves when mixed directly with yogurt, these are best served chilled rather than left at room temperature.
Step 8: Serve and Enjoy
Transfer the chilled Christmas Jello Balls into small paper candy cups or arrange them on a festive serving platter.
Alternate the red and green balls to create a beautiful Christmas presentation.
Serve cold for the best texture.
Serving Suggestions
Christmas Jello Balls are wonderful served alongside chocolate clusters, marshmallow bars, and other festive treats.
Their bright colors make them especially attractive on holiday dessert tables.
Storage Tips
Store in an airtight container in the refrigerator for up to 3 days.
Keep the balls chilled until serving, as the yogurt-based mixture can soften at room temperature.
How to Create a Beautiful No Bake Christmas Treat Platter
One of the most enjoyable ways to serve these six holiday treats is to arrange them together on a large festive dessert platter.
Choose a wooden serving board, decorative Christmas tray, or large white platter that allows the colors and textures of the different candies to stand out.
Place the larger treats, such as Marshmallow Peanut Butter Bars and White Chocolate Haystack Cookies, around the edges.
Arrange Caramel Peanut Clusters and Pretzel Hugs in small groups between them.
Use small paper candy cups for the Rum Balls and Christmas Jello Balls to keep the different coatings and flavors separate.
For a beautiful finishing touch, decorate the serving area with Christmas napkins, decorative ribbons, or food-safe holiday decorations.
If serving guests, clearly identify the treats containing peanuts, walnuts, dairy, and alcohol so everyone can choose appropriately.
Make-Ahead Christmas Preparation Guide
Preparing several Christmas treats at once becomes much easier when you organize the recipes over a few days.
Three to Five Days Before Christmas
Prepare the Rum Balls and Caramel Peanut Clusters.
Store the Rum Balls in the refrigerator and keep the peanut clusters in an airtight container.
Two to Three Days Before Christmas
Prepare the White Chocolate Haystack Cookies, Marshmallow Peanut Butter Bars, and Pretzel Hugs.
Allow each treat to set completely before transferring it to storage containers.
One Day Before Christmas
Prepare the Christmas Jello Balls and refrigerate until firm.
Check that all other treats are properly stored and ready for serving.
On Christmas Day
Arrange the treats on festive platters shortly before guests arrive.
Keep the yogurt-based Jello Balls refrigerated until serving time.
Add decorative garnishes and enjoy sharing your homemade Christmas sweets.
Helpful Tips for Making No Bake Christmas Treats
Use good-quality chocolate. Smooth melting chocolate creates a beautiful coating and helps candies set properly.
Avoid overheating chocolate and caramel. Gentle heating prevents scorching and keeps the mixtures smooth.
Prepare your baking sheets in advance. Parchment paper makes it much easier to remove candies once they have set.
Work in small batches. If you are making several different treats, completing one recipe at a time helps keep the process organized.
Allow enough setting time. Even no-bake recipes often need refrigeration or cooling before they can be handled.
Store different treats separately. This prevents flavors, moisture, and coatings from transferring between candies.
Use festive packaging. Decorative tins, clear treat bags, and holiday ribbons can turn simple homemade sweets into thoughtful Christmas gifts.
Frequently Asked Questions
Can I make these Christmas treats ahead of time?
Yes. Most of these recipes are excellent for preparing in advance.
Chocolate clusters, haystack cookies, and pretzel candies can be made several days before serving.
The yogurt-based Christmas Jello Balls are best prepared closer to the serving date.
Do all these recipes require refrigeration?
No. Some chocolate-based candies can be stored at cool room temperature, while treats containing yogurt or other perishable ingredients require refrigeration.
Always follow the individual storage instructions.
Can I use different types of chocolate?
Yes. Milk chocolate, dark chocolate, and white chocolate can be used in several of these recipes.
Choose chocolate that melts smoothly and sets firmly.
Can I make these treats for Christmas gift boxes?
Absolutely. Caramel Peanut Clusters, White Chocolate Haystack Cookies, Pretzel Hugs, and Marshmallow Peanut Butter Bars are especially suitable for gift boxes.
Avoid including yogurt-based treats in unrefrigerated gift packages.
Can children help prepare these recipes?
Many of these treats are fun for children to help assemble under adult supervision.
Children can help arrange pretzels, add candy decorations, sprinkle toppings, and roll coconut-coated treats.
Adults should handle hot melted chocolate, caramel, and other heated ingredients.
Rum Balls contain alcohol and should be prepared and served separately for adults.
Can I make Rum Balls without alcohol?
Yes. For an alcohol-free variation, replace the dark rum with a mixture of milk and a small amount of rum-flavored extract labeled alcohol-free.
Add the liquid gradually until the mixture reaches a consistency that can be rolled into balls.
How should I package homemade Christmas candies?
Use airtight decorative tins, small candy boxes, or food-safe treat bags.
Separate layers with parchment paper to prevent sticking.
Include storage instructions and allergen information when giving treats as gifts.
Recipe Collection Information
| Recipe | Approximate Preparation and Setting Time |
|---|---|
| Caramel Peanut Clusters | 45–60 minutes |
| Marshmallow Peanut Butter Bars | 2 hours 20 minutes |
| White Chocolate Haystack Cookies | 30–40 minutes |
| Pretzel Hugs | 25–35 minutes |
| Rum Balls | 2 hours 45 minutes |
| Christmas Jello Balls | 2–3 hours |
Times are estimates and include chilling or setting where applicable. Yield depends on portion size.
Conclusion
No Bake Christmas Treats are a wonderful way to celebrate the holiday season with homemade sweets that are delicious, festive, and easy to share. From rich chocolate candies to colorful marshmallow bars and coconut-covered holiday treats, these six recipes bring a delightful variety of flavors and textures to the Christmas table.
Caramel Peanut Clusters offer the perfect combination of buttery caramel, crunchy peanuts, and smooth chocolate. Marshmallow Peanut Butter Bars deliver a sweet, chewy texture with delicious peanut butter and butterscotch flavors. White Chocolate Haystack Cookies add a satisfying crunch, while Pretzel Hugs bring a playful combination of salty pretzels and creamy chocolate.
Classic Rum Balls provide a rich, traditional holiday treat for adults, and Christmas Jello Balls complete the collection with their cheerful red and green colors and snowy coconut coating.
What makes these recipes especially special is that they do not require complicated baking techniques or hours of preparation. With simple ingredients, a little creativity, and some time to cool or chill, you can prepare a beautiful assortment of homemade Christmas sweets that everyone will be excited to see.
Whether you are filling holiday gift boxes, preparing treats for a Christmas party, organizing a family dessert table, or simply enjoying a cozy afternoon making sweets at home, these recipes are a wonderful way to create lasting holiday memories.
May your Christmas season be filled with sweet treats, warm memories, joyful gatherings, and the simple happiness of sharing homemade food with the people you love.
Which of these six No Bake Christmas Treats would you make first: Caramel Peanut Clusters, Marshmallow Peanut Butter Bars, White Chocolate Haystack Cookies, Pretzel Hugs, Rum Balls, or Christmas Jello Balls?