ADVERTISEMENT
Homemade Ice Cream – 3 Delicious Flavors: Vanilla, Chocolate & Matcha
Introduction
Nothing compares to the rich, creamy taste of homemade ice cream, especially when it’s prepared with fresh ingredients and a little love. Whether you’re craving the timeless sweetness of vanilla, the deep richness of chocolate, or the refreshing earthy flavor of matcha, these three homemade ice cream recipes are perfect for satisfying your sweet tooth.
At deesviral, we believe that some of the most delicious desserts can be made right in your own kitchen. Homemade ice cream allows you to control the ingredients, customize the sweetness, and enjoy a wonderfully smooth texture without relying on store-bought desserts.
These three flavors use a traditional custard-style base made with egg yolks, milk, and heavy cream. The result is a rich, velvety dessert that tastes luxurious yet feels comforting and homemade.
Perfect for summer afternoons, family gatherings, birthday celebrations, or a simple after-dinner treat, these ice cream recipes are sure to become favorites.
1. Homemade Vanilla Ice Cream
Introduction
Classic vanilla ice cream is one of those desserts that never goes out of style. Its delicate sweetness, creamy texture, and fragrant vanilla flavor make it the perfect treat to enjoy on its own or alongside warm brownies, homemade pies, and freshly baked cakes.
This homemade version combines rich heavy cream, whole milk, egg yolks, and vanilla extract to create a beautifully smooth frozen dessert.
ADVERTISEMENT
Ingredients
- 3 large egg yolks
- 1/4 cup granulated sugar (50 g)
- 1/2 cup full-fat milk (120 ml)
- 1 1/4 cups heavy cream (300 ml)
- A few drops of fresh lemon juice
- 1/2 teaspoon pure vanilla extract
Preparation Instructions
Step 1: Prepare the Egg Mixture
Place the egg yolks in a medium mixing bowl. Add the granulated sugar and whisk continuously for approximately 2–3 minutes until the mixture becomes pale yellow, thick, and slightly fluffy.
This process helps dissolve the sugar and creates a smooth foundation for the ice cream.
Step 2: Heat the Milk and Cream
In a medium saucepan, combine the full-fat milk and heavy cream.
ADVERTISEMENT
Place the saucepan over medium-low heat and warm the mixture gently until steam begins to rise from the surface.
Avoid allowing the mixture to boil, as excessive heat can affect the texture.
Step 3: Temper the Egg Yolks
Slowly pour a small amount of the warm milk mixture into the beaten egg yolks while whisking constantly.
Continue adding the warm liquid gradually until the egg mixture becomes warm.
ADVERTISEMENT
This technique prevents the eggs from scrambling.
Step 4: Cook the Custard
Pour the tempered egg mixture back into the saucepan.
Cook over low heat, stirring constantly with a wooden spoon or silicone spatula.
Continue cooking until the custard reaches approximately 170–175°F (77–79°C), thickens slightly, and coats the back of a spoon.
ADVERTISEMENT
Do not let it boil.
Step 5: Add the Vanilla
Remove the saucepan from the heat.
Stir in the vanilla extract and a few drops of lemon juice.
The lemon juice adds a subtle brightness without making the ice cream taste sour.
Step 6: Cool the Mixture
Strain the custard through a fine-mesh sieve into a clean bowl.
Allow it to cool briefly, then cover and refrigerate for at least 4 hours, preferably overnight.
Step 7: Freeze the Ice Cream
ADVERTISEMENT
Pour the chilled mixture into an ice cream maker and churn according to the manufacturer’s instructions, usually 20–30 minutes.
Transfer the soft ice cream into a freezer-safe container, cover tightly, and freeze for another 4–6 hours until firm.
Step 8: Serve and Enjoy
Allow the ice cream to soften at room temperature for approximately 5 minutes before scooping.
Serve in chilled bowls or waffle cones.
Serving Suggestions
Homemade vanilla ice cream tastes wonderful with warm apple pie, chocolate sauce, caramel drizzle, fresh strawberries, or crushed cookies.
Conclusion
This homemade vanilla ice cream is proof that simple ingredients can create something truly special. Every spoonful delivers a delicate vanilla flavor and a wonderfully creamy texture.
It’s a timeless dessert that everyone can enjoy, whether served at a celebration or enjoyed as a quiet treat at home.
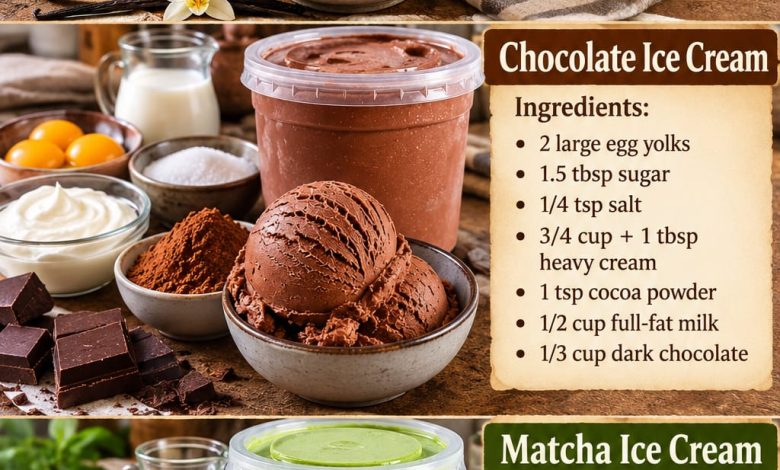
🍫 2. Homemade Chocolate Ice Cream
Introduction
If you’re a chocolate lover, this homemade chocolate ice cream is a dream come true. Rich, smooth, and packed with deep chocolate flavor, it delivers a delicious combination of creamy custard and melted dark chocolate.
Unlike ordinary chocolate-flavored frozen desserts, this recipe uses both cocoa powder and real dark chocolate to create a fuller, more satisfying chocolate experience.
Ingredients
- 2 large egg yolks
- 1 1/2 tablespoons granulated sugar (19 g)
- 1/4 teaspoon salt
- 3/4 cup plus 1 tablespoon heavy cream (195 ml)
- 1 teaspoon unsweetened cocoa powder
- 1/2 cup full-fat milk (120 ml)
- 1/3 cup chopped dark chocolate (approximately 55–60 g)
Preparation Instructions
Step 1: Prepare the Chocolate
Finely chop the dark chocolate into small pieces.
Place the chocolate in a heatproof bowl and set it aside.
Smaller pieces melt more evenly and blend smoothly into the custard.
Step 2: Whisk the Egg Yolks
In a separate bowl, combine the egg yolks and granulated sugar.
Whisk until the mixture becomes smooth, pale, and slightly thickened.
Step 3: Heat the Dairy Mixture
In a saucepan, combine the full-fat milk, heavy cream, cocoa powder, and salt.
Whisk thoroughly to dissolve the cocoa powder and distribute it evenly.
Warm the mixture over medium-low heat until steaming, but do not boil.
Step 4: Temper the Eggs
Slowly add a few tablespoons of the warm chocolate milk mixture to the beaten egg yolks while whisking continuously.
Gradually incorporate more warm liquid until the eggs are tempered.
Step 5: Cook the Chocolate Custard
Return the tempered mixture to the saucepan.
Cook over low heat while stirring continuously until the custard thickens slightly and reaches 170–175°F (77–79°C).
The custard should lightly coat the back of a spoon.
Step 6: Melt the Dark Chocolate
Remove the saucepan from the heat.
Pour the hot custard over the chopped dark chocolate.
Allow it to sit for approximately 1 minute, then whisk gently until the chocolate melts completely.
The mixture should become smooth, glossy, and evenly chocolate-colored.
Step 7: Chill Thoroughly
Strain the chocolate custard through a fine-mesh sieve.
Cover and refrigerate for at least 4 hours or overnight.
Proper chilling helps the ice cream develop a smoother consistency.
Step 8: Churn and Freeze
Pour the chilled chocolate mixture into an ice cream maker.
Churn for approximately 20–30 minutes, following the manufacturer’s instructions.
Transfer the ice cream to a freezer-safe container and freeze for another 4–6 hours until scoopable and firm.
Step 9: Serve
Remove the ice cream from the freezer a few minutes before serving.
Scoop into dessert bowls and garnish with chocolate shavings, crushed cookies, or a drizzle of chocolate sauce.
Serving Suggestions
This chocolate ice cream pairs beautifully with brownies, toasted almonds, fresh raspberries, chocolate chips, or homemade whipped cream.
Conclusion
Homemade chocolate ice cream is a wonderful dessert for anyone who appreciates rich chocolate flavor and a luxurious creamy texture.
The combination of cocoa powder, melted dark chocolate, and a homemade custard base creates a frozen treat that’s perfect for celebrations, family desserts, or satisfying a chocolate craving.
🍵 3. Homemade Matcha Ice Cream
Introduction
For something a little different, homemade matcha ice cream offers a beautiful balance of creamy sweetness and delicate green tea flavor.
Made with finely ground matcha powder, rich cream, milk, and egg yolks, this frozen dessert has a distinctive green color and a smooth, refreshing taste.
Matcha ice cream is especially popular among those who enjoy desserts that are flavorful without being overly sweet.
Ingredients
- 2 large egg yolks
- 2 teaspoons matcha green tea powder (approximately 4 g)
- 1/4 teaspoon salt
- 3/4 cup plus 2 tablespoons heavy cream (210 ml)
- 3 1/2 tablespoons granulated sugar (44 g)
- 1/4 cup plus 1 tablespoon full-fat milk (75 ml)
- A few drops of fresh lemon juice
Preparation Instructions
Step 1: Prepare the Matcha Powder
Sift the matcha powder into a small bowl to remove any lumps.
Add 1–2 tablespoons of the measured milk and whisk until a smooth green paste forms.
This step helps prevent clumps of matcha in the finished ice cream.
Step 2: Whisk the Egg Yolks
In a mixing bowl, combine the egg yolks and granulated sugar.
Whisk for approximately 2 minutes until the mixture becomes pale and slightly thick.
Step 3: Warm the Cream and Milk
Pour the remaining milk and heavy cream into a medium saucepan.
Add the salt and warm gently over medium-low heat.
Stir occasionally until the mixture begins to steam.
Avoid boiling.
Step 4: Temper the Egg Mixture
Gradually pour a small amount of the warm cream mixture into the egg yolks while whisking constantly.
Continue slowly until the eggs are warmed.
Step 5: Cook the Custard
Return the tempered mixture to the saucepan.
Cook over low heat, stirring continuously, until it reaches 170–175°F (77–79°C) and lightly coats the back of a spoon.
Remove from the heat immediately.
Step 6: Incorporate the Matcha
Strain the warm custard into a clean bowl.
Add the prepared matcha paste and whisk until completely combined.
For an especially smooth consistency, briefly blend the mixture with an immersion blender.
Add a few drops of lemon juice and stir gently.
Step 7: Chill the Mixture
Allow the matcha custard to cool slightly.
Cover and refrigerate for at least 4 hours or overnight.
The mixture should be thoroughly cold before freezing.
Step 8: Churn the Ice Cream
Pour the chilled custard into an ice cream maker.
Churn according to the manufacturer’s instructions, generally for 20–30 minutes.
The mixture should develop a thick, creamy, soft-serve consistency.
Step 9: Freeze Until Firm
Transfer the churned ice cream into a freezer-safe container.
Smooth the surface, cover tightly, and freeze for approximately 4–6 hours.
Step 10: Serve and Enjoy
Let the matcha ice cream soften for a few minutes before scooping.
Serve in small dessert bowls and garnish with a light dusting of matcha powder if desired.
Serving Suggestions
Matcha ice cream pairs beautifully with fresh strawberries, white chocolate, toasted coconut, vanilla wafers, or sweet red bean paste.
Conclusion
Homemade matcha ice cream is an elegant and refreshing alternative to traditional frozen desserts.
Its beautiful green color, smooth texture, and delicate green tea flavor make it an excellent choice for anyone looking to try something unique.
Whether enjoyed on a warm afternoon or served as a special dessert after dinner, this homemade treat offers a delightful combination of sweetness and flavor.
Helpful Tips for Perfect Homemade Ice Cream
1. Use High-Quality Ingredients
Fresh heavy cream, full-fat milk, and good-quality flavorings help produce a rich and creamy texture.
2. Never Boil the Custard
Cooking the egg mixture too quickly can cause curdling. Always use gentle heat and stir continuously.
3. Chill Before Churning
A thoroughly chilled custard freezes more efficiently and produces a smoother result.
4. Choose the Right Container
Store homemade ice cream in a shallow, airtight, freezer-safe container to help maintain freshness and reduce ice crystal formation.
5. Allow Time for Freezing
Freshly churned ice cream is usually soft. Several hours in the freezer will help it develop a firmer, scoopable consistency.
6. Adjust the Sweetness Carefully
These recipes follow the ingredient quantities shown, but sweetness can be adjusted to taste. Keep in mind that changing the sugar content can also affect the final texture.
7. Storage
For the best flavor and texture, enjoy homemade ice cream within approximately 1–2 weeks when stored consistently frozen at 0°F (-18°C).
Final Conclusion
Making ice cream at home is a rewarding experience that transforms everyday ingredients into something truly delicious.
From the comforting sweetness of classic vanilla to the indulgent richness of chocolate and the refreshing elegance of matcha, these three flavors offer something for every dessert lover.
Each recipe starts with a creamy custard base and uses simple preparation techniques to create a smooth, flavorful frozen dessert.
Whether you’re preparing a special treat for your family, hosting friends, or simply experimenting with homemade desserts, these recipes are a wonderful addition to your collection.