ADVERTISEMENT
Bubble Waffles – Soft, Fluffy, and Golden Homemade Mini Waffles
Introduction
There is something truly special about homemade bubble waffles. With their beautiful golden-brown exterior, soft and fluffy centers, and delicate sweetness, these adorable little treats are perfect for breakfast, afternoon snacks, family gatherings, or a comforting homemade dessert.
Unlike traditional waffles, bubble waffles are made using a special waffle maker that creates small, rounded pockets of batter. As the batter cooks, each little bubble becomes beautifully golden on the outside while remaining tender and airy inside.
The result is a delightful combination of textures that makes every bite enjoyable. They can be eaten plain, dusted with powdered sugar, drizzled with honey, or served with fresh fruit and chocolate sauce.
At deesviral, we love sharing homemade recipes that turn simple ingredients into delicious family favorites. These bubble waffles are a wonderful example of how everyday pantry staples can create something impressive without complicated preparation.
Made with eggs, milk, flour, cornstarch, and a touch of sweetness, this recipe is easy to prepare at home and requires only a few basic steps.
Whether you are preparing a weekend breakfast for your family or looking for a fun dessert to share with friends, these homemade bubble waffles are sure to bring smiles to the table.
ADVERTISEMENT
Recipe Information
Recipe Name: Bubble Waffles
Preparation Time: 10 minutes
Cooking Time: 15–20 minutes, depending on the waffle maker
Total Time: Approximately 25–30 minutes
Servings: 2–3 small servings
ADVERTISEMENT
Difficulty: Easy
Cooking Method: Electric bubble waffle maker
Ingredients
To prepare these delicious homemade bubble waffles, gather the following ingredients:
- 1 large egg, at room temperature
- 3 tablespoons plus 1 teaspoon milk (approximately 50 ml)
- 2 tablespoons neutral vegetable oil (30 ml)
- 1 1/2 to 2 tablespoons powdered sugar (approximately 12–16 g)
- 1/2 cup plus 1 tablespoon cake flour (approximately 70 g)
- 1 tablespoon cornstarch (approximately 8 g)
- 1/2 teaspoon baking powder (approximately 2 g)
Optional Ingredients for Extra Flavor
- 1/2 teaspoon vanilla extract
- A small pinch of salt
- A little melted butter for brushing the waffle maker
- Powdered sugar for serving
- Honey, maple syrup, or chocolate sauce for drizzling
These optional ingredients can add additional flavor, but the original recipe works beautifully with the seven main ingredients.
Preparation Instructions
Step 1: Prepare Your Ingredients
Before beginning, measure all the ingredients carefully.
ADVERTISEMENT
Allow the egg and milk to come close to room temperature. This helps the ingredients combine more smoothly and creates a consistent batter.
Sift the cake flour, cornstarch, and baking powder into a separate bowl.
Sifting helps remove lumps and distributes the baking powder evenly throughout the flour mixture.
Step 2: Beat the Egg and Sugar
Crack the egg into a medium mixing bowl.
Add the powdered sugar and whisk continuously for approximately 2–3 minutes.
ADVERTISEMENT
Continue mixing until the egg becomes slightly pale, smooth, and lightly foamy.
This step incorporates a little air into the mixture, which helps give the finished waffles a tender texture.
For a sweeter waffle, use the full 2 tablespoons of powdered sugar.
If you prefer a lighter sweetness, use 1 1/2 tablespoons.
Step 3: Add the Milk and Oil
Pour the milk into the beaten egg mixture.
Add the neutral vegetable oil and whisk gently until the ingredients are well combined.
The oil helps keep the waffles soft and moist, while the milk creates a smooth batter.
If using vanilla extract, add it at this stage.
Continue whisking until the mixture looks uniform.
ADVERTISEMENT
Step 4: Combine the Dry Ingredients
Gradually add the sifted cake flour, cornstarch, and baking powder to the wet ingredients.
Use a whisk or silicone spatula to fold everything together gently.
Mix just until the flour disappears and the batter becomes smooth.
Avoid excessive mixing because overworking the batter can develop too much gluten, making the waffles tougher.
The finished batter should be thick enough to coat a spoon but still pourable.
If it appears unusually thick, add a teaspoon of milk at a time until it reaches the desired consistency.
Step 5: Allow the Batter to Rest
Cover the mixing bowl with a clean kitchen towel or plastic wrap.
Allow the batter to rest at room temperature for approximately 5–10 minutes.
This short resting period gives the flour time to absorb moisture and helps create a more even texture.
While the batter rests, prepare the waffle maker.
Step 6: Preheat the Bubble Waffle Maker
Plug in your bubble waffle maker and allow it to preheat according to the manufacturer’s instructions.
A properly heated waffle maker is important for creating evenly cooked waffles with a beautiful golden color.
If the cooking plates are not completely nonstick, lightly brush them with a small amount of neutral oil or melted butter.
Avoid using too much oil, as excess grease can make the waffles heavy.
Step 7: Fill the Waffle Molds
Once the waffle maker is hot, carefully spoon or pour the batter into the rounded molds.
Fill each cavity approximately three-quarters full, or follow your appliance’s filling instructions.
The batter will expand slightly as it cooks because of the baking powder.
Avoid overfilling the molds, as the batter may overflow when the lid is closed.
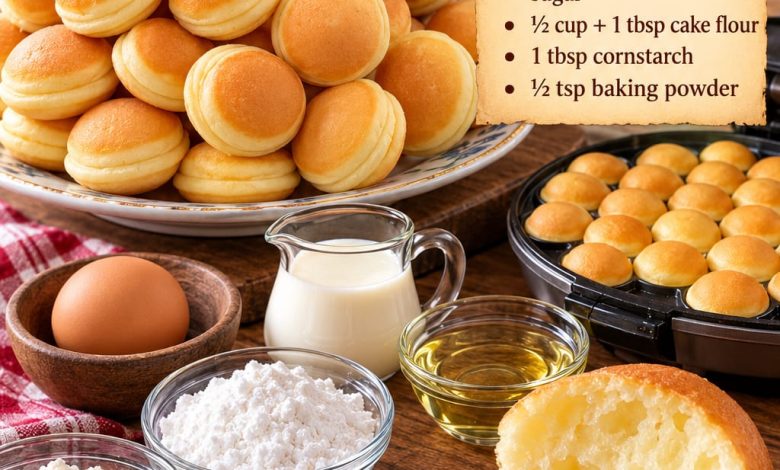
For individual round waffles like those shown in the picture, use a mini bubble waffle or cake-pop-style appliance with separate round cavities.
Step 8: Cook Until Golden Brown
Close the waffle maker gently.
Cook for approximately 3–5 minutes, depending on the size and heating strength of your appliance.
Avoid opening the waffle maker too early, as the waffles may stick or tear before they are fully cooked.
Once ready, the waffles should have a lightly golden exterior and a soft, fluffy center.
If your appliance requires turning during cooking, follow its instructions to ensure even browning.
Step 9: Remove the Waffles Carefully
Open the waffle maker and carefully remove the cooked waffles using a silicone or wooden utensil.
Avoid using sharp metal tools that could damage the nonstick surface.
Transfer the waffles to a wire cooling rack.
Allow them to rest for approximately 1–2 minutes.
This helps excess steam escape and prevents the bottoms from becoming soggy.
Step 10: Repeat With the Remaining Batter
Continue cooking the remaining batter in small batches.
If necessary, lightly grease the waffle maker between batches.
Try to keep the amount of batter consistent so that all the waffles cook evenly.
As each batch finishes, transfer the waffles to the cooling rack.
For serving warm, you can keep them in a low oven at approximately 200°F (95°C) for a short period while preparing the remaining batches.
Step 11: Serve and Enjoy
Arrange the freshly cooked bubble waffles on a serving plate.
Dust lightly with powdered sugar or drizzle with your favorite topping.
Serve while still warm for the best flavor and texture.
The golden exterior and fluffy center make these homemade waffles delicious even without additional toppings.
Delicious Serving Ideas
One of the best things about homemade bubble waffles is how easily they can be customized.
Classic Powdered Sugar Bubble Waffles
Sprinkle the warm waffles with a light dusting of powdered sugar for a simple, traditional presentation.
Chocolate Bubble Waffles
Drizzle with melted chocolate or chocolate hazelnut spread. Add a few chocolate chips for extra indulgence.
Strawberry and Cream Bubble Waffles
Serve with sliced fresh strawberries and a generous spoonful of whipped cream.
The freshness of the berries balances the sweetness of the waffles beautifully.
Honey Butter Bubble Waffles
Brush the warm waffles lightly with melted butter and drizzle with honey.
This combination creates a comforting, homemade flavor.
Ice Cream Bubble Waffles
Serve a few warm bubble waffles alongside a scoop of vanilla or chocolate ice cream.
Finish with caramel sauce or crushed cookies for a delicious dessert.
Helpful Tips for Perfect Bubble Waffles
1. Use Cake Flour for a Tender Texture
Cake flour contains less protein than all-purpose flour, which helps create a softer and more delicate waffle.
If cake flour is unavailable, all-purpose flour can be used, although the finished texture may be slightly different.
2. Do Not Overmix the Batter
Mixing too much can make the waffles dense or chewy.
Stop stirring once the ingredients are fully combined.
3. Preheat the Waffle Maker Properly
A fully preheated appliance helps the waffles cook evenly and develop an attractive golden exterior.
4. Avoid Overfilling
Adding too much batter can cause overflow and uneven cooking.
Start with a smaller amount and adjust according to the size of your molds.
5. Keep the Waffles Warm
If preparing several batches, place the cooked waffles on a wire rack in a low oven.
Avoid stacking them while hot because trapped steam can soften their surfaces.
6. Experiment With Flavors
You can add a small amount of cinnamon, vanilla, lemon zest, or finely grated orange zest to create different flavor combinations.
7. Serve Fresh Whenever Possible
Bubble waffles taste best shortly after cooking, when their exterior is lightly golden and their centers are soft.
Storage and Reheating Instructions
Refrigeration
Allow the waffles to cool completely before storing.
Place them in an airtight container and refrigerate for up to 3–4 days.
Separate layers with parchment paper to prevent sticking.
Freezing
For longer storage, arrange the cooled waffles in a single layer on a baking sheet.
Freeze until firm, then transfer them to a freezer-safe container or resealable bag.
Store frozen for up to 2 months for the best quality.
Reheating
To reheat, place the waffles in a toaster oven or preheated oven at 350°F (175°C) for approximately 5–8 minutes, or until warmed through.
Frozen waffles may require a little longer.
Avoid overheating, as this can dry out their soft centers.
Frequently Asked Questions
Why Are My Bubble Waffles Dense?
Dense waffles can result from overmixing the batter, using too much flour, or cooking at an insufficient temperature.
Measure ingredients carefully and mix gently.
Can I Make the Batter Ahead of Time?
Yes. The batter can be prepared a few hours in advance and stored covered in the refrigerator.
For the best rise, however, cooking soon after mixing is preferable because baking powder begins reacting once it becomes wet.
Can I Make Bubble Waffles Without a Special Waffle Maker?
You can cook the batter in a regular waffle maker or as small pancakes in a nonstick skillet.
However, the shape and texture will differ from traditional bubble waffles.
Can I Replace the Milk?
Yes. Unsweetened oat milk, soy milk, or almond milk can be used as alternatives.
The flavor and texture may change slightly.
How Do I Know When the Waffles Are Ready?
The waffles should appear lightly golden brown and release easily from the cooking plates.
Their centers should be set rather than wet or sticky.
Conclusion
Homemade bubble waffles are a delightful reminder that some of the best treats are made with simple ingredients and a little creativity.
With their golden-brown exterior, soft and airy centers, and gentle sweetness, these adorable mini waffles are perfect for breakfast, dessert, or a delicious afternoon snack.
The recipe requires only a handful of everyday ingredients, making it an excellent choice for anyone who enjoys easy homemade baking.
Whether you serve them plain, sprinkle them with powdered sugar, drizzle them with chocolate, or pair them with fresh fruit and ice cream, there are countless ways to enjoy these little golden treats.
They’re especially wonderful for family breakfasts, weekend brunches, children’s parties, and cozy afternoons when you’re craving something freshly made.
Once you experience the delicious flavor and comforting texture of homemade bubble waffles, you may find yourself making them again and again.