ADVERTISEMENT
Homemade Dinner Rolls
Introduction
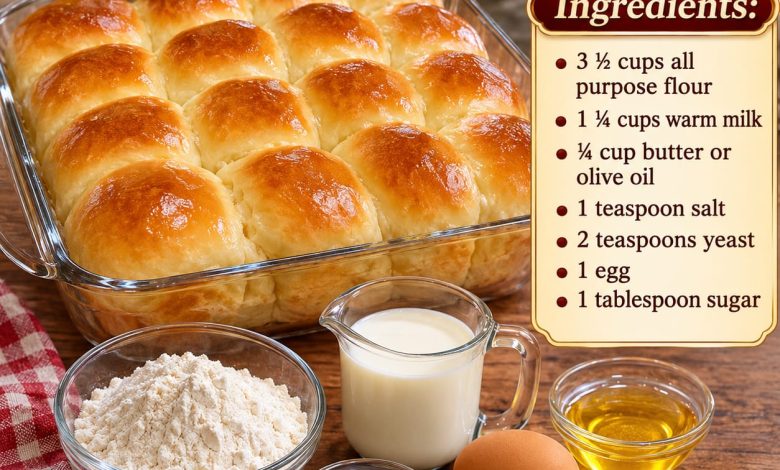
There’s nothing quite like the wonderful aroma of freshly baked homemade dinner rolls filling your kitchen. Soft, fluffy, buttery, and beautifully golden brown, these classic dinner rolls are the perfect addition to any family meal.
Whether you’re preparing a special holiday dinner, hosting a family gathering, or simply looking for a delicious homemade bread recipe, these rolls are guaranteed to bring warmth and comfort to your table.
Made with simple ingredients like all-purpose flour, warm milk, yeast, butter, and eggs, these homemade rolls have a wonderfully tender texture and a rich, comforting flavor. Their golden tops and pillowy centers make them irresistible, especially when served warm with a little melted butter.
Although homemade bread may seem complicated, this recipe is surprisingly easy to follow. With a little patience and a few basic baking techniques, you can create bakery-quality dinner rolls right in your own kitchen.
Ingredients
For the Homemade Dinner Rolls
3½ cups all-purpose flour (approximately 420–440 g), plus extra if needed
ADVERTISEMENT
1¼ cups warm milk (300 ml)
¼ cup unsalted butter, melted, or olive oil (60 ml)
1 teaspoon salt
2 teaspoons instant yeast or active dry yeast
1 large egg
ADVERTISEMENT
1 tablespoon granulated sugar
Optional Butter Topping
2 tablespoons melted butter
A pinch of flaky sea salt
Fresh chopped parsley, if desired
Preparation Steps
Step 1: Prepare the Warm Milk
Begin by gently warming the milk in a small saucepan or microwave-safe bowl.
ADVERTISEMENT
The milk should be warm but not hot, ideally between 105°F and 110°F (40–43°C).
If the milk is too hot, it can damage the yeast and prevent the dough from rising properly.
Pour the warm milk into a large mixing bowl.
Step 2: Activate the Yeast
Add the granulated sugar and yeast to the warm milk.
Stir gently until the sugar begins to dissolve.
ADVERTISEMENT
If using active dry yeast, allow the mixture to rest for approximately 5–10 minutes, until it becomes foamy on the surface.
This indicates that the yeast is active and ready to help the dough rise.
If using instant yeast, you can skip the waiting period and continue directly with the recipe.
Step 3: Add the Egg and Butter
Add the large egg and melted butter or olive oil to the milk mixture.
Make sure the melted butter has cooled slightly before adding it.
Whisk everything together until smooth and well combined.
The egg adds richness and structure, while the butter helps create the soft, tender texture that makes homemade dinner rolls so delicious.
Step 4: Add the Flour and Salt
In a separate bowl, combine the all-purpose flour and salt.
Gradually add the flour mixture to the wet ingredients, stirring with a wooden spoon or sturdy spatula.
ADVERTISEMENT
Continue mixing until a soft, slightly sticky dough begins to form.
The dough should come together into a rough ball while remaining tender and flexible.
Avoid adding too much extra flour, as this can make the finished rolls dense instead of fluffy.
Step 5: Knead the Dough
Transfer the dough to a lightly floured work surface.
Knead by hand for approximately 8–10 minutes, gently stretching and folding the dough until it becomes smooth and elastic.
If the dough sticks excessively to your hands, sprinkle a very small amount of flour over the surface.
You can also knead the dough using a stand mixer fitted with a dough hook for approximately 6–8 minutes on low to medium-low speed.
The finished dough should feel soft, smooth, and slightly tacky without being overly sticky.
Step 6: Let the Dough Rise
Lightly grease a large mixing bowl with butter or olive oil.
Place the kneaded dough inside and turn it once to coat the surface lightly.
Cover the bowl with a clean kitchen towel or plastic wrap.
Allow the dough to rise in a warm, draft-free place for approximately 1–1½ hours, or until doubled in size.
The exact rising time will depend on the temperature of your kitchen.
A warm environment helps the yeast work efficiently and creates a light, airy dough.
Step 7: Divide the Dough
Once the dough has doubled in size, gently press it down to release excess gas.
Transfer it to a clean work surface.
Divide the dough into 15 equal portions for medium-sized dinner rolls.
For the most consistent results, use a kitchen scale to ensure each portion is approximately the same size.
Equal portions help the rolls bake evenly and create a beautiful presentation.
Step 8: Shape the Dinner Rolls
Take one portion of dough and gently stretch the edges toward the center.
Pinch the edges together underneath, then roll the dough between your palms or against the countertop to create a smooth, round ball.
Repeat with the remaining dough portions.
Try to keep the tops smooth and slightly tight, as this helps the rolls rise into beautiful rounded shapes.
Step 9: Arrange the Rolls in the Baking Dish
Lightly grease a 9×13-inch baking dish with butter or nonstick cooking spray.
Arrange the shaped dough balls in the prepared dish, placing them in three rows of five.
Leave a small amount of space between the rolls so they have room to expand during the second rise.
As they bake, the rolls will rise and gently touch one another, creating soft, pull-apart sides.
Step 10: Allow the Second Rise
Cover the baking dish loosely with a clean kitchen towel or lightly greased plastic wrap.
Allow the shaped rolls to rise for approximately 30–45 minutes, or until noticeably puffy.
During the final 15 minutes of rising, preheat your oven to 375°F (190°C).
The second rise is important because it helps create the soft, fluffy interior that makes these dinner rolls so delicious.
Step 11: Bake Until Golden Brown
Remove the covering from the baking dish.
Place the rolls on the center rack of the preheated oven.
Bake for approximately 18–25 minutes, or until the tops are beautifully golden brown.
The rolls should be lightly browned on top and fully baked in the center.
If the tops begin browning too quickly, loosely cover the dish with aluminum foil during the final few minutes.
For accuracy, the internal temperature of the rolls should reach approximately 190°F (88°C).
Step 12: Brush with Melted Butter
As soon as the rolls come out of the oven, brush the warm tops generously with melted butter.
This adds a beautiful glossy finish and enhances their rich, buttery flavor.
For a little extra flavor, sprinkle a tiny pinch of flaky sea salt or chopped fresh parsley over the tops.
The butter will soak gently into the warm crust, making the rolls even softer and more delicious.
Step 13: Cool Slightly and Serve
Allow the dinner rolls to cool in the baking dish for approximately 5–10 minutes.
Serve them warm, pulling them apart gently to reveal their soft, fluffy centers.
Enjoy with butter, honey, jam, or your favorite savory meal.
Tips for Perfect Homemade Dinner Rolls
1. Use the correct milk temperature.
Warm milk helps activate the yeast, but milk that is too hot can prevent the dough from rising. Aim for approximately 105–110°F.
2. Measure the flour carefully.
Too much flour can make the rolls heavy and dry. Spoon the flour into your measuring cup and level it off, rather than packing it tightly.
3. Don’t skip kneading.
Kneading develops the gluten structure needed for soft, elastic dough and fluffy baked rolls.
4. Allow enough rising time.
Let the dough double in size during the first rise. Rushing this step can produce dense rolls.
5. Shape the rolls evenly.
Uniformly sized dough balls bake at the same rate and create a beautiful, professional appearance.
6. Avoid overbaking.
Remove the rolls when they are golden brown and fully cooked. Overbaking can dry out their tender centers.
7. Brush with butter while warm.
Adding melted butter immediately after baking creates soft, shiny tops and a delicious buttery flavor.
Delicious Homemade Dinner Roll Variations
Garlic Butter Dinner Rolls
Mix 2 tablespoons of melted butter with 1 minced garlic clove and a little chopped parsley.
Brush the mixture over the rolls immediately after baking.
These savory rolls pair beautifully with pasta, soups, and roasted meats.
Honey Butter Dinner Rolls
Combine 2 tablespoons of softened butter with 1 tablespoon of honey.
Brush over the warm rolls for a lightly sweet, golden finish.
Cheesy Dinner Rolls
Add ½ cup of finely shredded cheddar or Parmesan cheese to the dough during mixing.
The cheese adds a delicious savory flavor and makes the rolls especially satisfying.
Herb Dinner Rolls
Mix 1 teaspoon of dried Italian herbs into the flour before preparing the dough.
You can also sprinkle fresh rosemary or thyme over the tops before baking.
Whole Wheat Dinner Rolls
Replace 1 cup of all-purpose flour with whole wheat flour for a heartier version.
You may need a little additional milk because whole wheat flour absorbs more liquid.
What to Serve with Homemade Dinner Rolls
These soft, buttery rolls are incredibly versatile and complement many classic homemade meals.
They pair especially well with roasted turkey, baked ham, creamy mashed potatoes, beef stew, chicken soup, pot roast, roasted chicken, and hearty casseroles.
For holiday celebrations, serve them in a bread basket lined with a clean kitchen towel to help keep them warm.
They’re also delicious sliced in half and filled with leftover turkey, ham, or cheese for easy sandwiches.
Make-Ahead Instructions
Homemade dinner rolls are a wonderful choice for busy holidays because you can prepare the dough in advance.
After kneading the dough, place it in a lightly greased bowl, cover tightly, and refrigerate overnight.
The next day, remove the dough from the refrigerator, allow it to rest briefly, and divide it into portions.
Shape the rolls, arrange them in the baking dish, and allow them to rise until puffy.
Because the dough is cold, the final rise may take longer than usual.
Bake as directed until golden brown.
This method allows you to enjoy freshly baked rolls without preparing the entire recipe on the day of your gathering.
Storage and Reheating Instructions
Room Temperature
Allow the rolls to cool completely before storing.
Place them in an airtight container or resealable food-storage bag.
Store at room temperature for up to 2–3 days.
Refrigerator
Refrigeration can make bread become stale more quickly, so room-temperature storage or freezing is generally preferable.
Freezer
Wrap completely cooled rolls individually or place them in a freezer-safe bag.
Freeze for up to 3 months.
Thaw at room temperature before reheating.
Reheating
Preheat your oven to 300°F (150°C).
Wrap the rolls loosely in aluminum foil and warm for approximately 8–10 minutes.
Brush with a little melted butter before serving if desired.
Why You’ll Love This Recipe
Homemade Dinner Rolls are a timeless favorite because they combine simple ingredients with delicious homemade flavor.
The warm milk and yeast help create a light, fluffy texture, while the egg and butter give the dough richness and tenderness.
The golden tops are soft and buttery, and the centers pull apart beautifully.
Another wonderful feature is how versatile these rolls are. They work equally well for casual family dinners and elegant holiday meals.
You can also customize them with garlic, herbs, cheese, or honey to create different flavors.
Best of all, baking homemade bread creates a warm and welcoming atmosphere that makes any meal feel special.
Conclusion
Homemade Dinner Rolls are the perfect addition to any comforting family meal. With their beautiful golden-brown tops, soft fluffy centers, and rich buttery flavor, these classic rolls are sure to become a favorite in your kitchen.
Whether you’re serving them alongside Thanksgiving turkey, Christmas dinner, a hearty homemade stew, or a simple weeknight meal, they bring a delicious touch of homemade warmth to the table.
With just a handful of everyday ingredients and a little patience, you can create fresh, bakery-style rolls that taste even better when shared with family and friends.