ADVERTISEMENT
Chocolate Lace Cups with Cherry Cream
Introduction
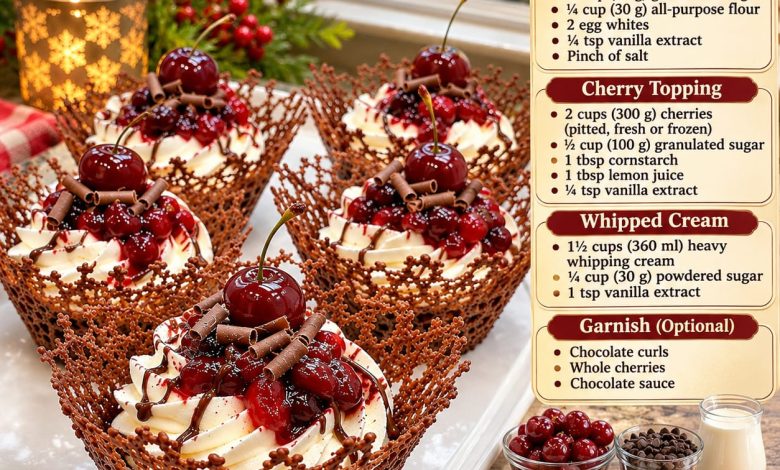
If you’re looking for an elegant, delicious, and impressive dessert to serve during the holidays, these Chocolate Lace Cups with Cherry Cream are a wonderful choice. Combining delicate chocolate lace baskets, fluffy vanilla whipped cream, and a rich homemade cherry topping, this dessert is as beautiful as it is delicious.
Each bite offers a delightful contrast of textures and flavors. The crisp chocolate lace provides a delicate crunch, the whipped cream adds a smooth and airy sweetness, and the juicy cherries bring a refreshing fruity flavor that perfectly balances the richness of the chocolate.
These beautiful individual desserts are perfect for Christmas celebrations, Valentine’s Day, dinner parties, birthdays, or any occasion when you want to create something special.
Although they look like a dessert from an elegant bakery, they can be prepared at home with a little patience and a few simple ingredients.
Ingredients
For the Chocolate Lace Cups
4 oz (115 g) semisweet chocolate, melted
ADVERTISEMENT
¼ cup (30 g) unsalted butter
¼ cup (30 g) granulated sugar
¼ cup (30 g) all-purpose flour
2 large egg whites
¼ teaspoon vanilla extract
ADVERTISEMENT
Pinch of salt
For the Homemade Cherry Topping
2 cups (300 g) fresh or frozen cherries, pitted
½ cup (100 g) granulated sugar
1 tablespoon cornstarch
1 tablespoon fresh lemon juice
ADVERTISEMENT
¼ teaspoon vanilla extract
For the Vanilla Whipped Cream
1½ cups (360 ml) cold heavy whipping cream
¼ cup (30 g) powdered sugar
1 teaspoon vanilla extract
Optional Garnishes
Chocolate curls
ADVERTISEMENT
Whole fresh cherries
Chocolate sauce
Extra powdered sugar
Preparation Steps
Step 1: Prepare the Cherry Topping
Begin by washing and pitting the fresh cherries. If using frozen cherries, they can be added directly to the saucepan.
Place the cherries in a medium saucepan along with the granulated sugar and fresh lemon juice.
Cook over medium heat for approximately 5–7 minutes, stirring occasionally, until the cherries begin releasing their natural juices.
In a small bowl, mix the cornstarch with 1 tablespoon of cold water until smooth.
Pour the cornstarch mixture into the saucepan and stir continuously.
Continue cooking for another 2–3 minutes, until the cherry mixture thickens into a glossy, spoonable sauce.
ADVERTISEMENT
Remove the saucepan from the heat and stir in the vanilla extract.
Transfer the cherry topping to a bowl and allow it to cool completely.
Refrigerate until ready to assemble the desserts.
Step 2: Prepare the Chocolate Lace Batter
Preheat your oven to 350°F (175°C).
Line two baking sheets with silicone baking mats or good-quality parchment paper.
In a small saucepan, melt the unsalted butter over low heat.
Remove from the heat and allow it to cool slightly.
In a mixing bowl, whisk together the egg whites, granulated sugar, vanilla extract, and salt until combined. Do not whip the egg whites into stiff peaks.
Add the melted butter and whisk until smooth.
Gradually stir in the all-purpose flour until no dry lumps remain.
Finally, fold in the melted semisweet chocolate until the batter becomes smooth and evenly colored.
The finished mixture should be soft and spreadable, allowing you to create thin decorative patterns.
Step 3: Create the Chocolate Lace Pattern
Transfer the chocolate batter into a piping bag fitted with a very small round tip.
Alternatively, use a sturdy plastic food-storage bag with a tiny corner snipped off.
On the prepared baking sheet, pipe thin, overlapping lines into circles approximately 5–6 inches wide.
Create a delicate crisscross or web-like pattern, leaving small openings between the chocolate lines.
Make sure the lines connect in several places so the lace holds together after baking.
Avoid making the lines too thick, as thinner patterns create a more delicate appearance.
Work in small batches because the lace must be shaped while still warm and flexible.
Step 4: Bake the Chocolate Lace
Place one baking sheet in the preheated oven.
Bake for approximately 5–8 minutes, depending on the thickness of the piped chocolate pattern.
The lace should appear set and slightly firm around the edges but remain flexible enough to shape.
Keep a close eye on it because thin chocolate batter can burn quickly.
Remove the baking sheet from the oven and allow the lace to rest for only a few seconds.
Do not let it cool completely before shaping.
Step 5: Shape the Chocolate Lace Cups
Prepare several small inverted bowls, muffin cups, or heat-resistant molds before removing the lace from the oven.
While the baked lace is still warm and flexible, carefully lift each circle using a thin spatula.
Gently drape it over an inverted small bowl or mold.
Press the sides lightly to create a beautiful basket shape.
Allow the chocolate lace to cool completely on the mold until firm.
Carefully remove each finished cup and transfer it to a tray.
Repeat with the remaining batter.
Important: The chocolate lace may become brittle as it cools. If a baked piece becomes too firm before shaping, briefly return it to the warm oven to soften it.
Because the batter contains flour and egg whites, these lace cups must be baked rather than simply chilled like ordinary tempered-chocolate decorations.
Step 6: Prepare the Vanilla Whipped Cream
Place a large mixing bowl and the beaters of an electric mixer in the refrigerator for approximately 10–15 minutes.
Chilling the equipment helps the cream whip more easily.
Pour the cold heavy whipping cream into the chilled bowl.
Add the powdered sugar and vanilla extract.
Using an electric mixer, beat on medium speed until the cream begins to thicken.
Increase the speed slightly and continue beating until medium-stiff peaks form.
The whipped cream should be thick enough to hold its shape when piped but still smooth and creamy.
Avoid overwhipping, as the cream can become grainy.
Step 7: Fill the Chocolate Lace Cups
Place the completely cooled chocolate lace cups on a clean serving tray.
Transfer the whipped cream into a piping bag fitted with a large star tip.
Pipe generous swirls of whipped cream into each chocolate cup.
Start at the bottom and work upward in a circular motion to create beautiful decorative peaks.
Leave a little space at the top for the cherry topping.
Step 8: Add the Cherry Topping
Remove the chilled cherry topping from the refrigerator.
Stir gently to loosen the sauce.
Spoon a small amount of the cherry mixture over the whipped cream in each chocolate lace cup.
Make sure every serving receives several juicy cherries and a little glossy cherry sauce.
Avoid adding too much liquid because excess moisture can soften the delicate chocolate cups.
Step 9: Decorate the Desserts
Finish each chocolate lace cup with a few chocolate curls.
Add one whole cherry on top for an elegant presentation.
If desired, drizzle a little chocolate sauce over the whipped cream and cherries.
For a festive Christmas appearance, arrange the desserts on a white serving platter and lightly dust the surrounding plate with powdered sugar.
Step 10: Serve and Enjoy
Serve the Chocolate Lace Cups with Cherry Cream shortly after assembling.
The crisp chocolate baskets, fluffy whipped cream, and sweet-tart cherry topping create a wonderful combination of textures.
These desserts are best enjoyed fresh, while the chocolate lace remains delicate and crunchy.
Tips for Perfect Chocolate Lace Cups
1. Use good-quality chocolate.
Choose semisweet chocolate with a rich flavor and smooth melting consistency.
2. Keep the lace patterns thin.
Thin, connected chocolate lines create the most beautiful lace effect. Avoid large gaps that could cause the baskets to break.
3. Shape the cups while warm.
The baked lace becomes brittle as it cools, so shape each piece immediately after removing it from the oven.
4. Prepare the molds ahead of time.
Have your inverted bowls or muffin molds ready before baking so you can work quickly.
5. Cool the cherry topping completely.
Warm cherry sauce can melt the whipped cream and soften the chocolate baskets.
6. Use cold heavy cream.
Cold cream whips more easily and produces a light, fluffy filling.
7. Assemble shortly before serving.
For the crispiest texture, keep the chocolate cups separate from the whipped cream and cherry topping until you’re ready to serve.
Delicious Variations
Strawberry Chocolate Lace Cups
Replace the cherries with fresh strawberries and prepare a strawberry sauce using the same method.
The combination of chocolate, whipped cream, and strawberries makes a beautiful Valentine’s Day dessert.
Raspberry Chocolate Lace Cups
Use fresh or frozen raspberries instead of cherries.
Their slightly tart flavor complements the sweet whipped cream and rich chocolate beautifully.
White Chocolate Lace Cups
For a different presentation, try making a white chocolate lace variation using a recipe formulated for white chocolate, since its sugar and fat content differ from semisweet chocolate.
Fill the cups with vanilla whipped cream and a mixed berry topping.
Chocolate Mousse Lace Cups
Replace the vanilla whipped cream with a thick chocolate mousse.
Top with cherries and chocolate curls for an extra-rich dessert.
Black Forest-Inspired Lace Cups
Add a thin layer of chocolate cake crumbs beneath the whipped cream.
Top with cherry sauce and chocolate shavings for a dessert inspired by classic Black Forest cake.
Make-Ahead Instructions
These beautiful desserts are ideal for entertaining because several components can be prepared in advance.
Chocolate Lace Cups: Prepare the cups up to 1–2 days ahead and store them in a cool, dry place in an airtight container.
Cherry Topping: Make the cherry topping up to 3 days in advance and refrigerate it in a covered container.
Whipped Cream: For the best texture, prepare the whipped cream on the day of serving. Keep it refrigerated until needed.
Final Assembly: Assemble the desserts shortly before serving to preserve the delicate chocolate lace texture.
Storage Instructions
Filled Chocolate Lace Cups are best eaten on the day they are assembled.
If necessary, refrigerate assembled desserts in a covered container for a few hours, but keep in mind that the chocolate lace may soften as it absorbs moisture from the cream and cherries.
Store leftover cherry topping separately in the refrigerator for up to 3–4 days.
The whipped cream should always remain refrigerated until serving.
Perfect Occasions for Chocolate Lace Cups
These elegant individual desserts are wonderful for Christmas dinner parties, New Year’s celebrations, Valentine’s Day, birthdays, anniversaries, wedding showers, and special family gatherings.
Their beautiful chocolate lace design makes them an impressive addition to a dessert table.
You can also prepare smaller cups for a buffet-style presentation or create larger baskets for a more dramatic plated dessert.
The combination of dark chocolate, white whipped cream, and deep red cherries creates a naturally festive appearance that looks especially beautiful during the holiday season.
Why You’ll Love This Recipe
Chocolate Lace Cups with Cherry Cream offer everything you could want in a special homemade dessert.
The chocolate baskets provide a delicate crunch, while the whipped cream creates a soft, creamy contrast.
The homemade cherry topping adds fruity sweetness and a refreshing touch of tartness.
Another wonderful feature is the individual presentation. Each guest receives a beautifully decorated dessert that feels personal and elegant.
Although the chocolate lace requires a little care and patience, the finished result is worth the effort.
These desserts are a lovely way to turn simple ingredients into something memorable.
Conclusion
Chocolate Lace Cups with Cherry Cream are a beautiful combination of rich chocolate, fluffy vanilla cream, and sweet, juicy cherries. Their delicate lace design and elegant presentation make them perfect for holidays, celebrations, and special occasions.
Every bite brings together crisp chocolate, smooth whipped cream, and a delicious homemade cherry topping.
Whether you’re preparing them for Christmas dinner, a romantic celebration, or a family gathering, these stunning individual desserts are sure to leave a lasting impression.