ADVERTISEMENT
Homemade Flatbreads – 4 Easy Recipes
Nothing compares to the wonderful taste and aroma of freshly made homemade bread. Soft, warm, and beautifully golden, homemade flatbreads are perfect for wrapping your favorite fillings, serving alongside comforting meals, or enjoying with delicious dips and sauces.
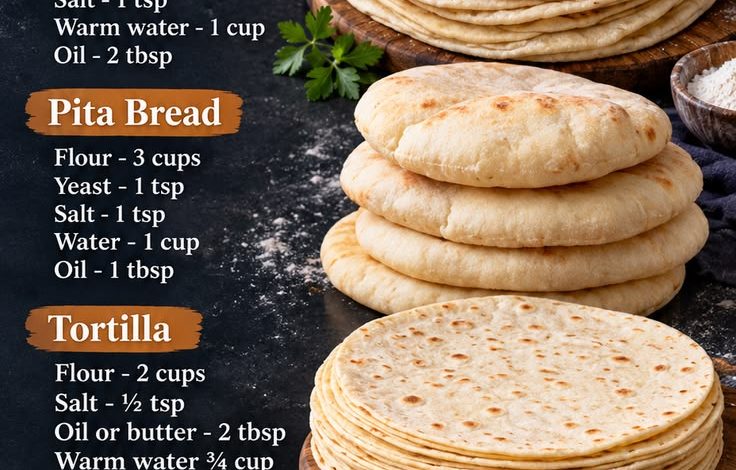
This collection features four easy homemade flatbread recipes: soft Shawarma Bread, fluffy Pita Bread, tender Flour Tortillas, and delicious homemade Naan. Each recipe uses simple pantry ingredients and offers its own unique texture and flavor.
At deesviral, we love sharing easy homemade recipes that make everyday cooking more enjoyable. Whether you’re preparing sandwiches for lunch, serving homemade bread with dinner, or planning a family gathering, these flatbreads are versatile, affordable, and incredibly satisfying.
From soft and flexible wraps to beautifully puffed pita pockets and buttery naan, these recipes will help you create delicious bakery-style bread in your own kitchen.
1. Homemade Shawarma Bread (Soft Wrap Bread) 🌯
Homemade Shawarma Bread is a soft, flexible flatbread that is perfect for wrapping grilled chicken, seasoned beef, vegetables, and creamy sauces. Unlike thick bread, shawarma wraps are thin, tender, and easy to fold without breaking.
This homemade version is made with flour, yeast, warm water, and a little oil to create a smooth, elastic dough. The bread cooks quickly in a hot skillet and develops delicate golden spots while remaining soft enough to roll around your favorite fillings.
ADVERTISEMENT
Ingredients
3 cups (375 g) all-purpose flour
1 teaspoon instant yeast
1 tablespoon granulated sugar
1 teaspoon salt
1 cup (240 ml) warm water, approximately
ADVERTISEMENT
2 tablespoons olive oil or vegetable oil
Extra flour for rolling
Instructions
Step 1: Combine the Dry Ingredients
In a large mixing bowl, combine the flour, instant yeast, sugar, and salt.
Stir until all the dry ingredients are evenly distributed.
ADVERTISEMENT
Step 2: Add the Water and Oil
Pour in the warm water and olive oil.
Mix with a wooden spoon until a rough dough begins to form.
If the dough feels too dry, add a little more water, one tablespoon at a time.
Step 3: Knead the Dough
ADVERTISEMENT
Transfer the dough to a lightly floured work surface.
Knead for approximately 8–10 minutes, until smooth, soft, and elastic.
The dough should feel slightly tacky but not excessively sticky.
Step 4: Allow the Dough to Rise
Place the dough in a lightly oiled bowl.
Cover with a clean kitchen towel or plastic wrap.
Let it rest in a warm place for approximately 45–60 minutes, or until noticeably puffy and nearly doubled in size.
Step 5: Divide the Dough
Gently press the air out of the risen dough.
ADVERTISEMENT
Divide it into 8 equal pieces.
Roll each piece into a smooth ball.
Cover the dough balls and let them rest for 10 minutes.
Step 6: Roll the Flatbreads
Using a rolling pin, roll each dough ball into a thin circle approximately 8 inches wide.
Try to keep the thickness even so the bread cooks uniformly.
Step 7: Heat the Skillet
Place a large dry skillet over medium-high heat.
Allow it to become hot before adding the first flatbread.
Step 8: Cook the Shawarma Bread
Place one rolled flatbread into the hot skillet.
Cook for approximately 45–60 seconds, until bubbles appear and light golden spots form underneath.
Flip and cook the other side for another 30–60 seconds.
Avoid overcooking because the bread may become dry and difficult to fold.
Step 9: Keep the Bread Soft
Transfer the cooked bread to a clean kitchen towel.
Cover immediately to trap a little steam and keep it soft.
Repeat with the remaining dough.
Serving Suggestions
Homemade Shawarma Bread is perfect for chicken shawarma, beef wraps, falafel sandwiches, grilled vegetables, and homemade kebabs.
It also tastes wonderful with garlic sauce, hummus, or tzatziki.
2. Homemade Pita Bread 🫓
Homemade Pita Bread is soft, fluffy, and famous for its delicious pocket that forms when the dough puffs during cooking. This classic flatbread is wonderful for stuffing with grilled meats, fresh vegetables, and creamy sauces.
The secret to beautiful pita bread is a properly rested dough and a very hot cooking surface. When the dough enters the hot oven, steam forms inside and helps create the signature pocket.
Ingredients
3 cups (375 g) all-purpose flour
1 teaspoon instant yeast
1 teaspoon salt
1 cup (240 ml) warm water, approximately
1 tablespoon olive oil
Extra flour for rolling
Instructions
Step 1: Prepare the Dough
In a large mixing bowl, combine the flour, instant yeast, and salt.
Add the warm water and olive oil.
Stir until a soft dough begins to form.
Step 2: Knead Until Smooth
Transfer the dough to a lightly floured surface.
Knead for approximately 8–10 minutes, until smooth and elastic.
Add a little additional water if necessary to create a soft dough.
Step 3: Let the Dough Rise
Place the dough in a lightly oiled bowl.
Cover and allow it to rise for approximately 1 hour, or until doubled in size.
Step 4: Divide the Dough
Gently deflate the dough.
Divide it into 8 equal portions.
Shape each portion into a smooth ball.
Cover and rest for approximately 10–15 minutes.
Step 5: Roll the Pita Bread
Roll each dough ball into a circle approximately 6–7 inches wide and about ¼ inch thick.
Keep the thickness as even as possible.
Uneven dough may prevent the pita from puffing properly.
Step 6: Preheat the Oven
Place a baking stone or heavy baking sheet inside the oven.
Preheat to 475°F (245°C) for at least 20 minutes.
The cooking surface needs to be thoroughly heated to encourage the pita to puff.
Step 7: Bake the Pita Bread
Carefully place two or three dough circles onto the hot baking surface.
Bake for approximately 3–5 minutes.
The pita bread should puff into a balloon-like shape as steam develops inside.
Remove once lightly golden and fully cooked.
Step 8: Keep the Pita Soft
Transfer the baked pita bread to a clean towel.
Cover while the remaining pieces bake.
This helps keep the bread tender and prevents it from drying out.
Tips for Perfect Pita Bread
Use a very hot oven and baking surface.
Roll the dough evenly to encourage the formation of pockets.
Avoid adding too much extra flour during rolling.
Cover freshly baked pita bread to maintain softness.
Not every pita will form a full pocket, but the bread will still be delicious.
Serving Suggestions
Use homemade pita bread for gyros, falafel sandwiches, chicken pita pockets, hummus, grilled vegetables, or Mediterranean-inspired meals.
3. Homemade Flour Tortillas 🌮
Homemade Flour Tortillas are soft, flexible, and incredibly delicious. Made with just four basic ingredients, these tortillas are perfect for tacos, burritos, quesadillas, wraps, and homemade sandwiches.
Unlike yeast-based flatbreads, tortillas do not require rising time, making them a convenient choice for quick meals. They cook in minutes and develop beautiful golden spots while remaining tender and easy to fold.
Ingredients
2 cups (250 g) all-purpose flour
½ teaspoon salt
2 tablespoons vegetable oil or melted butter
¾ cup (180 ml) warm water, approximately
Extra flour for rolling
Instructions
Step 1: Combine the Dry Ingredients
In a large mixing bowl, combine the flour and salt.
Stir until evenly mixed.
Step 2: Add the Oil
Pour in the vegetable oil or melted butter.
Mix with your fingertips or a fork until the flour becomes slightly crumbly.
Step 3: Add the Warm Water
Gradually pour in the warm water while mixing.
Continue until a soft dough forms.
You may need slightly more or less water depending on the flour.
Step 4: Knead the Dough
Transfer the dough to a lightly floured surface.
Knead for approximately 5–7 minutes, until smooth and elastic.
The dough should be soft and easy to handle.
Step 5: Rest the Dough
Cover the dough with a clean kitchen towel.
Allow it to rest for approximately 20–30 minutes.
This resting period relaxes the gluten and makes rolling the tortillas easier.
Step 6: Divide into Portions
Divide the rested dough into 8 equal pieces.
Roll each piece into a smooth ball.
Keep the dough balls covered to prevent them from drying out.
Step 7: Roll the Tortillas
Using a rolling pin, roll each dough ball into a thin circle approximately 7–8 inches wide.
Try to keep the tortillas as thin and even as possible.
Step 8: Heat the Skillet
Place a dry skillet or cast-iron pan over medium-high heat.
Allow it to become hot.
Step 9: Cook the Tortillas
Place one tortilla into the skillet.
Cook for approximately 30–45 seconds, until bubbles appear and light brown spots develop underneath.
Flip and cook the other side for another 20–40 seconds.
Avoid overcooking, as this may make the tortillas stiff.
Step 10: Keep Warm and Soft
Transfer each cooked tortilla to a clean kitchen towel.
Cover immediately and stack the tortillas as you cook them.
The trapped steam helps keep them soft and flexible.
Tips for Perfect Homemade Tortillas
Use warm water to help create a soft, pliable dough.
Allow the dough to rest before rolling.
Roll the tortillas thinly for the best texture.
Use a hot skillet for quick cooking and golden spots.
Keep cooked tortillas covered to prevent drying.
Serving Suggestions
Use these homemade tortillas for tacos, burritos, quesadillas, fajitas, breakfast wraps, and grilled chicken sandwiches.
They are also wonderful served warm with melted butter.
4. Homemade Naan Bread 🧄
Homemade Naan Bread is soft, fluffy, slightly chewy, and beautifully golden with delicious toasted spots. Traditionally served with curries and flavorful sauces, naan is a wonderful bread that can also be enjoyed with garlic butter, grilled meats, and vegetables.
The addition of yogurt gives naan its signature tenderness and subtle tangy flavor. Cooking the dough in a hot skillet creates beautiful browned patches while keeping the inside soft and airy.
Ingredients
3 cups (375 g) all-purpose flour
½ cup (120 g) plain yogurt
1 teaspoon instant yeast
1 tablespoon granulated sugar
1 teaspoon salt
½–¾ cup (120–180 ml) warm water, as needed
Optional Garlic Butter Topping
3 tablespoons unsalted butter, melted
2 garlic cloves, finely minced
2 tablespoons freshly chopped cilantro or parsley
A pinch of salt
Instructions
Step 1: Combine the Dry Ingredients
In a large mixing bowl, combine the flour, instant yeast, sugar, and salt.
Stir well until evenly mixed.
Step 2: Add the Yogurt
Add the plain yogurt to the flour mixture.
Mix gently to distribute the yogurt throughout the flour.
Step 3: Add the Warm Water
Gradually add the warm water while stirring.
Begin with ½ cup and add more as necessary.
Mix until a soft, slightly sticky dough forms.
Step 4: Knead the Dough
Transfer the dough to a lightly floured surface.
Knead for approximately 8–10 minutes, until smooth and elastic.
The dough should be soft and slightly tacky but manageable.
Step 5: Allow the Dough to Rise
Place the dough in a lightly greased bowl.
Cover with a clean towel or plastic wrap.
Allow it to rise in a warm place for approximately 60–90 minutes, or until doubled in size.
Step 6: Divide the Dough
Gently press down the risen dough.
Divide it into 8 equal portions.
Roll each portion into a smooth ball.
Cover and rest for approximately 10 minutes.
Step 7: Shape the Naan
Roll each dough ball into an oval or teardrop shape approximately ¼ inch thick.
Naan does not need to be perfectly round.
Its slightly irregular shape adds to its rustic, homemade appearance.
Step 8: Heat the Skillet
Place a cast-iron skillet or heavy-bottomed pan over medium-high heat.
Allow the skillet to become very hot.
Step 9: Cook the Naan Bread
Place one rolled naan into the hot skillet.
Cook for approximately 1–2 minutes, until bubbles form on the surface and golden-brown spots appear underneath.
Flip and cook for another 1–2 minutes, until fully cooked and lightly charred in spots.
Repeat with the remaining dough.
Step 10: Prepare the Garlic Butter
In a small saucepan, melt the butter over low heat.
Add the minced garlic and cook gently for approximately 30 seconds, until fragrant.
Remove from the heat and stir in the chopped cilantro or parsley.
Add a small pinch of salt.
Step 11: Brush the Naan
While the naan is still warm, brush the surface generously with the garlic butter mixture.
The warm bread absorbs the butter, creating a rich garlic flavor.
Step 12: Serve Warm
Stack the freshly cooked naan on a serving plate.
Cover loosely with a clean towel to keep it warm and soft.
Serve immediately with your favorite dishes.
Tips for Perfect Homemade Naan
Use plain, unsweetened yogurt for the best flavor.
Keep the dough soft rather than overly firm.
Allow enough rising time for a fluffy texture.
Cook the naan in a hot skillet to create golden spots.
Brush with garlic butter while warm for maximum flavor.
Serving Suggestions
Homemade naan pairs wonderfully with chicken curry, butter chicken, lentil dishes, grilled meats, roasted vegetables, and creamy dips.
It also makes a delicious base for homemade flatbread pizza.
General Tips for Making Perfect Homemade Flatbreads
Measure the flour correctly: Spoon flour into the measuring cup and level it off rather than packing it tightly.
Use warm water: Warm water helps activate yeast and creates a soft dough. Avoid water that is too hot, as it can damage the yeast.
Knead until smooth: Proper kneading develops the dough’s structure and helps create a soft, elastic texture.
Allow the dough to rest: Resting relaxes the gluten, making the dough easier to roll and shape.
Use a hot cooking surface: A properly heated skillet or oven helps flatbreads cook quickly and develop golden spots.
Avoid overcooking: Cooking too long can cause flatbreads to become dry and stiff.
Keep cooked bread covered: Covering freshly cooked flatbreads with a clean towel helps maintain softness.
Serve fresh when possible: Homemade flatbreads taste especially delicious while warm.
How to Store Homemade Flatbreads
Room Temperature: Allow cooked flatbreads to cool completely. Store them in an airtight bag or container for up to 1–2 days.
Refrigerator: Keep the bread tightly wrapped for up to 4–5 days.
Freezer: Place parchment paper between individual flatbreads and store them in a freezer-safe bag for up to 2 months for the best quality.
Reheating: Warm flatbreads in a dry skillet for approximately 20–30 seconds per side, or until soft and heated through.
You can also wrap several flatbreads in aluminum foil and warm them in a 300°F (150°C) oven for approximately 8–10 minutes.
Recipe Information
| Flatbread | Prep & Rest Time | Cook Time | Yield |
|---|---|---|---|
| Shawarma Bread | 70–85 minutes | 10–15 minutes | 8 wraps |
| Pita Bread | 80–90 minutes | 12–20 minutes | 8 pitas |
| Flour Tortillas | 35–45 minutes | 8–12 minutes | 8 tortillas |
| Naan Bread | 85–115 minutes | 15–20 minutes | 8 naan |
Course: Bread, Side Dish, Wraps
Cooking Methods: Stovetop and Oven
Difficulty: Easy to Intermediate
Why You’ll Love These Homemade Flatbreads
These four homemade flatbread recipes are easy to prepare, affordable, and incredibly versatile.
Shawarma Bread is soft and flexible, making it perfect for wrapping delicious savory fillings.
Pita Bread is fluffy and tender, with a pocket that’s ideal for sandwiches.
Flour Tortillas are quick to prepare and wonderful for tacos, burritos, and quesadillas.
Homemade Naan is soft, buttery, and perfect for serving alongside flavorful curries and comforting meals.
Each recipe uses simple pantry ingredients and can be customized to suit your family’s favorite dishes.
Conclusion
Homemade flatbreads are a wonderful way to add fresh, comforting flavor to everyday meals. Whether you’re making soft shawarma wraps, fluffy pita pockets, tender flour tortillas, or buttery garlic naan, these easy recipes bring delicious homemade bread straight to your kitchen.
With simple ingredients and clear instructions, you can enjoy fresh flatbreads whenever you want.
Which homemade flatbread would you make first: Shawarma Bread, Pita Bread, Flour Tortillas, or Garlic Naan?