ADVERTISEMENT
Caramel Apple Dessert Cups
Introduction
There is something truly irresistible about the comforting combination of tender cinnamon apples, buttery cookie crumbs, smooth vanilla pudding, and rich salted caramel sauce. These Caramel Apple Dessert Cups bring all those delicious flavors together in a beautiful, individually portioned dessert that is as enjoyable to prepare as it is to eat.
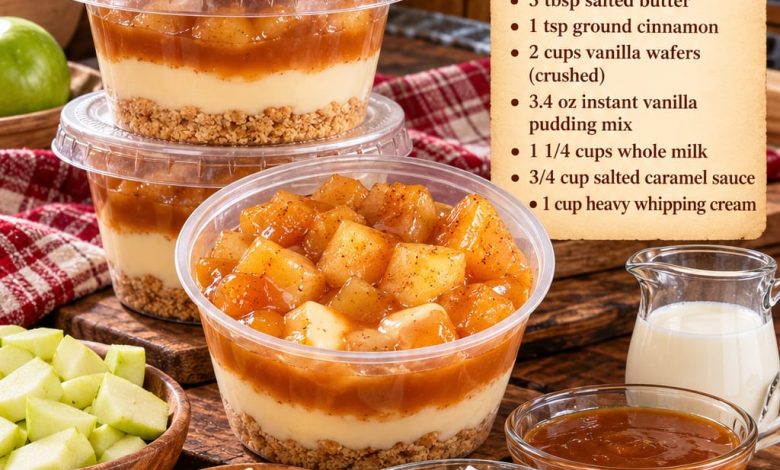
Inspired by the classic flavors of homemade caramel apple pie, this recipe transforms familiar ingredients into a creamy, layered treat that requires no oven baking. Each cup begins with a golden, buttery vanilla wafer crust, followed by a thick layer of silky vanilla cream and a generous topping of warm cinnamon-spiced apples coated in luscious salted caramel.
The contrast between the lightly crunchy cookie base, delicate vanilla filling, and soft caramelized apples creates a wonderful combination of textures. Every spoonful offers just the right balance of sweetness, creaminess, and fruity freshness, with a hint of warm cinnamon that makes the dessert especially comforting.
These dessert cups are perfect for family gatherings, birthday celebrations, holiday dessert tables, autumn parties, weekend treats, and even small special occasions when you want to serve something homemade and memorable.
Another wonderful feature of this recipe is its convenient individual presentation. Instead of slicing and serving a large dessert, each person receives a beautifully layered cup filled with creamy vanilla goodness and delicious caramel apples.
ADVERTISEMENT
Whether you are preparing a dessert for guests or simply looking for a sweet treat to enjoy at home, these Caramel Apple Dessert Cups are sure to become a favorite.
Ingredients
For the Caramelized Apple Filling
3 cups Granny Smith apples, peeled and chopped into small cubes
1/3 cup light brown sugar, packed
3 tablespoons salted butter
1 teaspoon ground cinnamon
ADVERTISEMENT
For the Buttery Vanilla Wafer Crust
2 cups vanilla wafers, finely crushed
For the Creamy Vanilla Pudding Filling
1 package (3.4 ounces) instant vanilla pudding mix
1 1/4 cups cold whole milk
1 cup cold heavy whipping cream
For the Caramel Layer
3/4 cup salted caramel sauce
ADVERTISEMENT
Optional Garnishes
Extra crushed vanilla wafers
A small drizzle of salted caramel sauce
A light sprinkle of ground cinnamon
Freshly whipped cream
Thin apple slices, added just before serving
ADVERTISEMENT
Preparation Steps
Step 1: Prepare the Apples
Begin by washing the Granny Smith apples thoroughly under cool running water.
Using a vegetable peeler or a sharp paring knife, carefully remove the apple skins.
Cut each apple into quarters and remove the core, seeds, and any tough center pieces.
Place the apple quarters on a cutting board and chop them into small, evenly sized cubes.
Try to keep the apple pieces approximately the same size so they cook evenly and fit comfortably into the individual dessert cups.
Granny Smith apples are especially suitable for this recipe because their naturally tart flavor balances the sweetness of the brown sugar, caramel sauce, and vanilla pudding.
Their firm texture also helps them maintain their shape during cooking instead of turning completely soft.
Once the apples are chopped, set them aside while preparing the caramelized filling.
Step 2: Melt the Butter and Brown Sugar
Place a medium-sized skillet or saucepan over medium heat.
ADVERTISEMENT
Add the salted butter and allow it to melt slowly, stirring occasionally.
Once the butter is completely melted, sprinkle the light brown sugar evenly into the pan.
Stir gently with a wooden spoon or heat-resistant spatula until the sugar begins to dissolve into the butter.
Continue cooking for approximately 1–2 minutes, allowing the mixture to become glossy and slightly bubbly.
The butter and brown sugar will form a sweet, rich coating that gives the apples their beautiful caramel-like flavor.
Be careful not to cook the mixture over excessively high heat because the sugar can burn quickly.
Step 3: Cook the Cinnamon Apples
Add the chopped Granny Smith apples to the warm butter and brown sugar mixture.
Stir gently until every apple cube is coated with the sweet, buttery mixture.
Sprinkle the ground cinnamon over the apples and continue stirring until the spice is evenly distributed.
Reduce the heat to medium-low and cook for approximately 8–12 minutes, stirring occasionally.
As the apples cook, they will gradually soften and release some of their natural juices.
The brown sugar and butter will combine with those juices to create a delicious cinnamon-flavored syrup that lightly coats the apple pieces.
Continue cooking until the apples are tender but still hold their shape.
The filling should look glossy, golden, and slightly thickened, with plenty of visible apple pieces.
Avoid overcooking the apples because a soft but structured texture is important for creating attractive dessert layers.
Step 4: Cool the Apple Filling
Once the cinnamon apples are tender and beautifully coated, remove the skillet from the heat.
Transfer the apple filling to a shallow bowl or plate.
Allow the mixture to cool completely before assembling the dessert cups.
This step is especially important because warm apples can soften the vanilla cream and cause the layers to blend together.
For faster cooling, spread the apples into a thin layer and place them in the refrigerator once the initial heat has escaped.
While the apples cool, begin preparing the buttery cookie base and creamy vanilla filling.
Step 5: Crush the Vanilla Wafers
Place the vanilla wafer cookies in a large resealable food-storage bag.
Seal the bag tightly, removing as much excess air as possible.
Using a rolling pin, gently crush the cookies until they become fine crumbs.
For a more interesting texture, leave a few slightly larger crumb pieces mixed throughout the finer crumbs.
Alternatively, place the vanilla wafers in a food processor and pulse until they reach the desired consistency.
Transfer the crushed cookies to a medium bowl.
Because vanilla wafers already contain sweetness and a mild vanilla flavor, they make a wonderful base for these dessert cups without requiring additional sugar.
The cookie crumbs will form the bottom layer, providing a delicate crunch that contrasts beautifully with the smooth vanilla filling.
Step 6: Prepare the Vanilla Pudding
In a large mixing bowl, combine the instant vanilla pudding mix with the cold whole milk.
Using a whisk or electric hand mixer, beat the mixture for approximately 2 minutes, following the pudding package instructions as needed.
The pudding should begin to thicken and develop a smooth, creamy consistency.
Allow it to rest for approximately 3–5 minutes so it can continue setting.
The reduced amount of milk creates a thicker filling, which is especially helpful when making layered desserts.
The pudding should be firm enough to hold its shape while remaining soft and creamy.
Set the prepared pudding aside while whipping the cream.
Step 7: Whip the Heavy Cream
Pour the cold heavy whipping cream into a clean mixing bowl.
For the best results, use a chilled bowl and chilled beaters.
Using an electric hand mixer, beat the cream on medium speed until it begins to thicken.
Gradually increase the speed and continue whipping until medium-stiff peaks form.
The whipped cream should look light, airy, and smooth, holding its shape when the beaters are lifted.
Be careful not to overwhip because the cream can become grainy and eventually separate.
Freshly whipped cream adds a delicate texture to the vanilla pudding, making the finished filling lighter and more luxurious.
Step 8: Make the Creamy Vanilla Filling
Add approximately one-third of the whipped cream to the prepared vanilla pudding.
Using a spatula, gently fold the cream into the pudding to loosen its texture.
Once the first portion is incorporated, add the remaining whipped cream in two additions.
Continue folding gently until the filling becomes smooth, airy, and evenly combined.
Avoid vigorous stirring because it can deflate the whipped cream and make the filling heavier.
The finished vanilla cream should have a thick, silky consistency that is easy to spoon or pipe into the dessert cups.
Cover the bowl and place it in the refrigerator while preparing the containers.
Step 9: Prepare the Individual Dessert Cups
Arrange 8–10 small, clear dessert cups on a clean work surface.
Clear plastic or glass cups work especially well because they allow the beautiful layers to remain visible.
Make sure the containers are clean, dry, and suitable for food.
For a neat presentation, choose cups with straight or slightly rounded sides.
If preparing the dessert for a party or gathering, individual cups with fitted lids are especially convenient because they can be stored, transported, and served easily.
Keep the crushed vanilla wafers, prepared vanilla cream, cooled apple filling, and salted caramel sauce within reach before beginning the assembly process.
Step 10: Create the Vanilla Wafer Crust
Spoon approximately 2–3 tablespoons of crushed vanilla wafer crumbs into the bottom of each dessert cup.
Use the back of a spoon to gently press the crumbs into an even layer.
Do not compact the crumbs too firmly because the base should remain tender and easy to scoop with a spoon.
The natural texture of the crushed cookies will provide a pleasant contrast to the soft pudding layer.
For an especially neat appearance, gently wipe away any crumbs that stick to the sides of the cups before adding the next layer.
Step 11: Add the Creamy Vanilla Layer
Remove the prepared vanilla pudding mixture from the refrigerator.
Spoon a generous portion of the creamy filling over the crushed wafer base in each dessert cup.
For a cleaner presentation, transfer the vanilla cream to a piping bag or a large resealable bag with one corner cut off.
Pipe the filling gently over the crumbs, creating a thick, even layer.
The vanilla filling should occupy approximately one-third to one-half of the cup, depending on the size of the container.
Smooth the surface lightly with the back of a spoon.
Try to keep the layers clearly separated so the finished dessert displays a beautiful contrast between the golden cookie base and pale vanilla cream.
Step 12: Add the Salted Caramel Sauce
Stir the salted caramel sauce until it becomes smooth and easy to pour.
If the sauce is very thick, warm it gently just until pourable, then allow it to cool before using.
Drizzle a small amount of salted caramel sauce over the vanilla cream in each cup.
The caramel adds a rich, buttery sweetness that complements the tart cinnamon apples and creamy vanilla filling.
For a more dramatic layered appearance, allow a little caramel to settle near the sides of the cup.
Reserve some of the caramel sauce for mixing with the apples and for the final garnish.
Step 13: Add the Cinnamon Apple Topping
Once the cooked apples have cooled completely, spoon them generously over the vanilla cream and caramel layers.
Distribute the apple pieces evenly so each cup contains a satisfying amount of fruit.
If the apple filling contains a thick cinnamon syrup, drizzle a little of it over the apples for additional flavor.
Gently spread the apple mixture into an even layer without pressing it down into the cream.
The warm golden-brown color of the cinnamon apples creates a beautiful contrast with the pale vanilla pudding and crumbly cookie base.
Step 14: Finish with Salted Caramel
Drizzle the remaining salted caramel sauce over the apple topping.
Use a spoon to distribute it evenly across the surface.
The caramel should coat the apple pieces lightly, creating a glossy, appetizing finish.
For an extra decorative touch, sprinkle a small pinch of ground cinnamon over the top.
You can also add a little crushed vanilla wafer around the edges for additional texture.
If desired, finish each dessert cup with a small swirl of whipped cream just before serving.
The completed cups should display three distinct layers: golden vanilla wafer crumbs, creamy vanilla filling, and glossy caramel-coated cinnamon apples.
Step 15: Chill the Dessert Cups
Carefully cover each dessert cup with a fitted lid or plastic wrap.
Place the cups in the refrigerator for at least 2 hours before serving.
This chilling period allows the vanilla filling to become firmer and helps the flavors blend beautifully.
As the dessert rests, the cookie crumbs will absorb a little moisture from the cream, creating a texture similar to a soft cookie crust.
The cinnamon apples will also develop a more balanced flavor as their sweetness combines with the salted caramel.
For the best presentation, avoid shaking or tilting the containers while they chill.
Step 16: Serve and Enjoy
Remove the dessert cups from the refrigerator shortly before serving.
If desired, add a final drizzle of salted caramel sauce or a small swirl of whipped cream.
Serve each cup with a dessert spoon so everyone can enjoy all three delicious layers in every bite.
These Caramel Apple Dessert Cups are especially enjoyable when served chilled, allowing the creamy vanilla filling to contrast with the rich caramel apples and tender cookie crust.
They make a beautiful addition to holiday dessert tables, family celebrations, potlucks, autumn gatherings, and special homemade dessert spreads.
Helpful Tips for Perfect Caramel Apple Dessert Cups
Choose firm apples: Granny Smith apples are an excellent choice because they maintain their shape during cooking and provide a pleasant tartness that balances the sweet filling.
Cut the apples evenly: Small, uniform apple cubes cook at the same rate and create a more attractive topping.
Do not overcook the fruit: Cook the apples until tender but still slightly firm. Overcooked apples can become mushy and affect the finished texture.
Cool the apples completely: Adding warm fruit to the vanilla filling may cause the cream to soften and the dessert layers to lose their definition.
Use cold heavy cream: Well-chilled cream whips more easily and creates a light, stable filling.
Fold the cream gently: Gentle folding keeps the vanilla pudding mixture fluffy and prevents it from becoming overly dense.
Use thick caramel sauce: A rich, slightly thick salted caramel sauce helps create attractive layers without making the dessert watery.
Keep the cups refrigerated: These desserts contain dairy ingredients and should remain chilled until serving.
Use clear containers: Transparent cups showcase the beautiful layers and make the desserts especially appealing for parties.
Delicious Variations
Caramel Apple Cheesecake Dessert Cups
For a cheesecake-inspired filling, beat 4 ounces of softened cream cheese until smooth and fold it into the prepared vanilla pudding before adding the whipped cream.
The cream cheese adds a rich, slightly tangy flavor that pairs beautifully with the caramel apples.
Caramel Apple Graham Cracker Cups
Replace the crushed vanilla wafers with graham cracker crumbs.
The graham crackers create a lightly toasted, honey-flavored base that works wonderfully with cinnamon apples and creamy vanilla filling.
Caramel Apple Pecan Dessert Cups
Sprinkle 1/2 cup of finely chopped toasted pecans between the vanilla cream and caramel apple layers.
The nuts add a delicious crunch and a warm, nutty flavor that makes the dessert feel especially festive.
Cinnamon Cookie Caramel Apple Cups
Use crushed cinnamon cookies or spiced biscuits instead of vanilla wafers.
This variation enhances the warm cinnamon flavor and gives the dessert a stronger autumn-inspired character.
Extra-Creamy Caramel Apple Cups
For an even richer filling, fold an additional 1/2 cup of whipped cream into the prepared pudding mixture.
This creates a lighter, mousse-like consistency that contrasts beautifully with the sweet caramelized apples.
Serving Suggestions
These Caramel Apple Dessert Cups are delicious on their own, but they can also be presented in several creative ways.
For an autumn dessert table, arrange the cups on a wooden serving tray surrounded by fresh apples, cinnamon sticks, and small decorative napkins.
For family celebrations, prepare the desserts in clear cups with fitted lids so guests can enjoy them conveniently.
For a more elegant presentation, use small glass dessert bowls and finish each serving with whipped cream, finely crushed cookies, and a delicate drizzle of caramel.
You can also create smaller portions in mini dessert cups for buffets, holiday gatherings, or parties where several desserts are being served.
Because the desserts are individually portioned, they are easy to distribute and require no slicing or additional plating.
Make-Ahead and Storage Instructions
One of the greatest advantages of this recipe is that it can be prepared ahead of time.
The cinnamon apple filling can be cooked up to 2 days in advance and stored in an airtight container in the refrigerator.
The vanilla cream can also be prepared several hours before assembling the dessert cups.
For the best texture and presentation, assemble the cups a few hours before serving and refrigerate them until thoroughly chilled.
If you prefer a crunchier cookie base, assemble the dessert closer to serving time.
Store completed dessert cups in airtight containers in the refrigerator at 40°F (4°C) or below.
For the best quality, enjoy them within 2–3 days.
Because the filling contains whipped cream and pudding, freezing is not recommended, as thawing may change the smooth texture and cause some moisture separation.
Do not leave the dessert cups at room temperature for longer than 2 hours, or longer than 1 hour when temperatures exceed 90°F (32°C).
Recipe Information
Preparation Time: 25 minutes
Cooking Time: 10–15 minutes
Chilling Time: At least 2 hours
Total Time: Approximately 2 hours 40 minutes
Servings: 8–10 dessert cups, depending on container size
Difficulty: Easy
Cooking Method: Stovetop preparation and refrigeration
Best Served: Chilled
Main Flavors: Cinnamon apples, vanilla cream, buttery cookies, and salted caramel
Conclusion
Caramel Apple Dessert Cups are a wonderful example of how simple, familiar ingredients can be transformed into a beautiful and memorable homemade dessert. With their golden vanilla wafer crust, silky vanilla cream, tender cinnamon-spiced apples, and luxurious salted caramel topping, these individual treats offer a delicious balance of flavor and texture in every spoonful.
The tartness of the Granny Smith apples complements the sweetness of the brown sugar and caramel, while the rich vanilla filling adds a smooth, delicate contrast. The buttery cookie crumbs complete the dessert with a satisfying texture that makes each bite especially enjoyable.
What makes this recipe even more appealing is its convenience. There is no complicated baking process, no need for elaborate decorating techniques, and no difficult preparation involved. With a little attention to the layers and enough time for chilling, you can create an impressive dessert that looks beautiful and tastes wonderfully homemade.
These dessert cups are perfect for sharing with loved ones during family dinners, autumn celebrations, holidays, or any occasion that calls for something sweet and comforting. Their individual presentation makes them practical for gatherings, while their classic caramel apple flavor gives them a timeless appeal.
Whether you are a longtime fan of caramel apple desserts or trying this delicious combination for the first time, these creamy dessert cups are sure to bring warmth, sweetness, and a little extra joy to the table.