ADVERTISEMENT
Apple Pie Filling
Introduction
There is something truly special about the warm, comforting aroma of homemade apple pie filling simmering gently on the stove. The combination of tender apples, sweet cinnamon, rich butter, and a beautifully thickened golden sauce brings the familiar flavors of a traditional homemade apple pie straight into your kitchen.
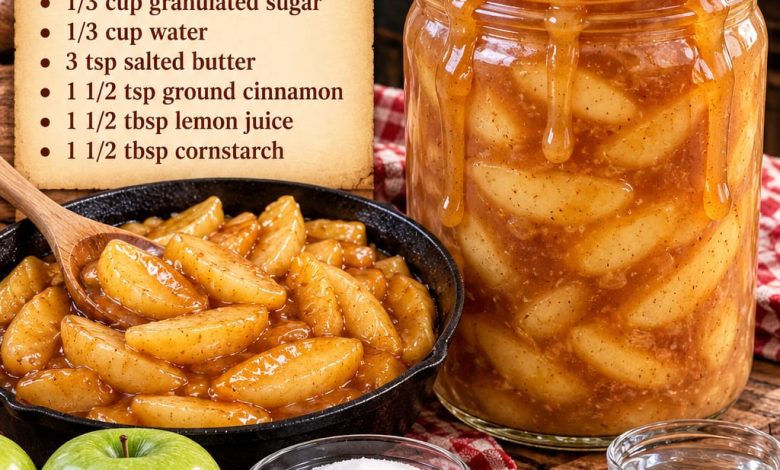
This Homemade Apple Pie Filling is a delicious, versatile recipe that transforms a handful of everyday ingredients into a wonderfully flavorful fruit filling. With its tender slices of Granny Smith apples, delicate sweetness, and rich cinnamon-spiced syrup, it is perfect for creating a wide variety of homemade desserts.
What makes this recipe especially wonderful is the beautiful balance between the natural tartness of Granny Smith apples and the sweetness of granulated sugar. As the apples cook, they soften gently while maintaining their shape, allowing every slice to become coated in a smooth, glossy sauce infused with cinnamon and butter.
A small amount of fresh lemon juice brightens the flavor and helps balance the sweetness, while cornstarch thickens the cooking liquid into a luscious sauce that clings beautifully to every apple slice.
Unlike some complicated fruit fillings that require long preparation times, this homemade apple pie filling comes together easily in one saucepan. It requires only a few simple steps and can be prepared ahead of time for convenient baking and dessert making.
ADVERTISEMENT
Whether you plan to use it in a traditional apple pie, spoon it over pancakes, layer it into cheesecake cups, or serve it warm with vanilla ice cream, this recipe is a wonderful addition to any home cook’s collection.
The result is a rich, aromatic, golden apple filling that tastes homemade, comforting, and absolutely delicious.
Ingredients
For the Homemade Apple Pie Filling
6 Granny Smith apples, peeled, cored, and sliced
1/3 cup granulated sugar
1/3 cup water
ADVERTISEMENT
3 teaspoons salted butter
1 1/2 teaspoons ground cinnamon
1 1/2 tablespoons fresh lemon juice
1 1/2 tablespoons cornstarch
Optional Ingredients for Additional Flavor
1/4 teaspoon ground nutmeg
ADVERTISEMENT
1 teaspoon pure vanilla extract
1 tablespoon light brown sugar for extra caramel flavor
A small pinch of ground cloves
These optional ingredients can be added according to personal preference, but the original recipe is delicious with the seven main ingredients alone.
Preparation Steps
Step 1: Choose the Right Apples
Begin by selecting 6 fresh, firm Granny Smith apples.
ADVERTISEMENT
Granny Smith apples are especially suitable for homemade pie filling because they have a naturally tart flavor and a firm texture that holds up well during cooking.
Their refreshing acidity balances the sweetness of the sugar and creates a filling that tastes rich without becoming overwhelmingly sweet.
Choose apples that feel firm when gently pressed and have smooth, healthy-looking skins.
Avoid apples that are bruised, unusually soft, or beginning to wrinkle.
Fresh, firm apples produce the best texture and help the filling maintain attractive, recognizable slices after cooking.
Step 2: Wash and Peel the Apples
Place the apples in a large bowl or colander.
Rinse them thoroughly under cool running water, gently rubbing the surfaces to remove any dirt.
Dry the apples with a clean kitchen towel.
Using a vegetable peeler or a sharp paring knife, carefully remove the skins from each apple.
ADVERTISEMENT
Peeling creates a smoother, more traditional apple pie filling because the cooked fruit becomes tender without pieces of skin separating from the flesh.
Place the peeled apples on a clean cutting board.
Step 3: Core and Slice the Apples
Cut each peeled apple into quarters.
Remove the core, seeds, and tough center portions using a sharp knife.
Slice the apple quarters into evenly sized wedges approximately 1/4 inch thick.
Keeping the slices relatively uniform is important because it allows the apples to cook at the same rate.
If some pieces are much thicker than others, the thinner slices may become overly soft before the larger pieces are tender.
For a chunkier filling, you can cut the apples into slightly thicker slices, although they may require a few additional minutes of cooking.
Place the sliced apples in a large bowl and set them aside.
Step 4: Add the Lemon Juice
Drizzle the fresh lemon juice over the sliced apples.
Using a large spoon, gently toss the apples until they are lightly coated.
The lemon juice helps slow the browning that naturally occurs when freshly cut apples are exposed to air.
It also provides a pleasant brightness that balances the sugar and warm cinnamon.
Set the apples aside while preparing the sweet cooking syrup.
Step 5: Melt the Salted Butter
Place a large, heavy-bottomed skillet or saucepan over medium-low heat.
Add the 3 teaspoons of salted butter.
Allow the butter to melt slowly, stirring occasionally.
As the butter melts, it will create a rich, fragrant base for the apple filling.
Avoid overheating the butter because it can brown or burn quickly.
Once melted, reduce the heat slightly if necessary.
Step 6: Add the Sugar and Cinnamon
Sprinkle the granulated sugar into the saucepan with the melted butter.
Add the ground cinnamon.
Using a wooden spoon or heat-resistant spatula, stir gently until the ingredients are combined.
The sugar may not dissolve immediately, which is completely normal.
As the mixture heats and additional liquid is added, the sugar will gradually dissolve into a sweet cinnamon-flavored syrup.
If you are using optional nutmeg or ground cloves, add them at this stage.
The aroma of cinnamon and butter will begin filling the kitchen, creating the familiar fragrance associated with homemade apple desserts.
Step 7: Prepare the Cornstarch Mixture
In a small bowl, combine the cornstarch with approximately 2 tablespoons of the measured water.
Whisk until the cornstarch dissolves completely and forms a smooth slurry.
Make sure there are no visible lumps.
This step helps prevent the cornstarch from clumping when it is added to the hot liquid.
Set the cornstarch slurry aside temporarily.
Use the remaining measured water in the next step.
Step 8: Create the Cinnamon Syrup
Pour the remaining water into the saucepan containing the butter, sugar, and cinnamon.
Stir continuously until the sugar begins dissolving.
Bring the mixture to a gentle simmer over medium-low heat.
As the ingredients warm together, they will form a lightly golden, aromatic liquid.
Continue stirring for approximately 2–3 minutes.
The mixture should become smooth and fragrant, but it does not need to thicken significantly at this stage.
Avoid allowing the syrup to boil aggressively because the sugar can concentrate too quickly.
Step 9: Add the Sliced Apples
Carefully transfer the prepared apple slices into the saucepan.
Stir gently to coat the apples with the warm cinnamon syrup.
Use a large spoon or spatula to distribute the apples evenly throughout the pan.
As the apples begin cooking, they will release some of their natural juices.
These juices will combine with the sugar, butter, cinnamon, and water to create a flavorful cooking liquid.
Make sure the apples are evenly coated without stirring too aggressively.
Step 10: Simmer the Apples Until Tender
Reduce the heat to medium-low.
Cover the saucepan loosely with a lid and allow the apples to cook for approximately 8–12 minutes, stirring gently every few minutes.
The exact cooking time depends on the thickness of the apple slices and their natural firmness.
As they cook, the apples will begin softening and developing a beautiful golden appearance.
The cinnamon syrup will coat the slices and become increasingly fragrant.
Check the texture by carefully piercing a thick apple slice with a fork.
The apples should be tender enough to pierce easily but still firm enough to maintain their shape.
Avoid cooking them until they completely fall apart.
For traditional apple pie filling, slightly tender apple slices provide the best final texture because they can continue softening when used in baked desserts.
Step 11: Add the Cornstarch Slurry
Once the apples are nearly tender, stir the reserved cornstarch mixture again.
Cornstarch can settle at the bottom of the bowl while standing, so give it a quick whisk before adding.
Slowly pour the slurry into the simmering apple mixture while stirring gently.
Make sure the cornstarch is distributed throughout the cooking liquid.
Continue stirring carefully to prevent lumps from forming.
The sauce will gradually begin thickening as the cornstarch heats.
Step 12: Thicken the Apple Pie Filling
Allow the mixture to simmer gently for another 1–3 minutes, stirring occasionally.
As the cornstarch activates, the liquid will transform into a smooth, glossy sauce.
The finished filling should be thick enough to coat the apple slices while still remaining easy to spoon.
If the sauce seems too thick, add a small splash of water and stir until the desired consistency is reached.
If the filling seems too thin, allow it to simmer slightly longer, remembering that it will thicken further as it cools.
Avoid overcooking the apples during this stage.
The goal is to achieve tender slices surrounded by a rich cinnamon sauce.
Step 13: Adjust the Flavor
Taste a small spoonful of the filling after allowing it to cool enough to eat safely.
If you prefer a sweeter apple filling, stir in a little extra sugar while the mixture is still warm.
For a stronger cinnamon flavor, add a small additional pinch of ground cinnamon.
If you enjoy a more pronounced tartness, a few extra drops of lemon juice can brighten the flavor.
For an optional finishing touch, stir in the pure vanilla extract after removing the saucepan from the heat.
The final flavor should have a pleasant balance of sweet apples, warm cinnamon, buttery richness, and gentle tartness.
Step 14: Allow the Filling to Cool
Remove the saucepan from the heat.
Allow the apple pie filling to cool for approximately 10–15 minutes.
As the mixture cools, the sauce will continue thickening and coating the apple slices more evenly.
For faster cooling, transfer the filling to a shallow, heat-safe container.
If you are preparing the filling for a pie or pastry, allow it to cool completely before using, especially if the recipe requires a cold filling.
Adding hot filling directly to delicate pie dough can soften the butter in the crust and affect the final texture.
Step 15: Transfer to Storage Containers
Once the filling has cooled enough to handle safely, transfer it into clean, food-safe containers or glass jars.
Leave a little space at the top of each container.
Use a spoon to distribute the cinnamon sauce evenly among the apple slices.
If using glass jars, remember that these are refrigerator-storage containers, not shelf-stable canned preserves.
The recipe has not been formulated or tested for safe home canning.
Cover the containers and refrigerate promptly.
Step 16: Serve or Use in Your Favorite Desserts
Your homemade Apple Pie Filling is now ready to enjoy.
For a traditional apple pie, spoon the cooled filling into your prepared pie crust and bake according to your chosen pie recipe.
For a simple dessert, serve a generous spoonful of warm apple filling over vanilla ice cream.
You can also use it as a topping for pancakes, waffles, French toast, oatmeal, cheesecake, pound cake, or homemade biscuits.
Its smooth cinnamon sauce and tender apple slices make it a delicious addition to many sweet dishes.
Helpful Tips for Perfect Apple Pie Filling
Use firm apples. Granny Smith apples maintain their shape better than many softer varieties and provide a pleasant tartness.
Cut the apples evenly. Uniform slices cook more consistently and create a more attractive filling.
Do not overcook the apples. Slightly firm pieces provide the best texture, particularly when the filling will be baked again inside a pie.
Use fresh lemon juice. The lemon juice brightens the flavor and helps slow browning.
Dissolve the cornstarch in cool water. Preparing a smooth slurry before adding it to hot liquid helps prevent lumps.
Simmer gently. Cooking over moderate heat allows the apples to soften without becoming mushy.
Adjust the consistency carefully. The filling naturally thickens as it cools, so avoid adding too much cornstarch.
Let the filling cool before baking. A cooled filling is easier to handle and less likely to soften an unbaked pastry crust.
Store properly. Keep the prepared filling refrigerated and use clean utensils when serving.
Delicious Ways to Use Homemade Apple Pie Filling
1. Classic Homemade Apple Pie
One of the most traditional ways to enjoy this recipe is inside a flaky, buttery pie crust.
Spoon the cooled apple filling into a prepared bottom crust.
Cover with a top crust or decorative lattice.
Brush the pastry with an egg wash and bake until the crust is golden brown and the filling is bubbling.
Since the apples are already partially cooked, watch the crust carefully and follow a suitable recipe for the size of your pie.
Allow the baked pie to cool before slicing so the filling can set.
2. Apple Pie Cheesecake Cups
Create individual desserts by layering crushed graham crackers, sweetened cream cheese filling, and chilled apple pie filling.
Finish with whipped cream and a small sprinkle of cinnamon.
These dessert cups are excellent for parties because they can be prepared in advance and served in individual portions.
3. Caramel Apple Pancakes
Prepare your favorite fluffy pancakes.
Warm a few spoonfuls of apple pie filling in a small saucepan.
Spoon the warm apples generously over the pancakes.
Finish with a drizzle of caramel sauce or maple syrup.
This creates a comforting breakfast filled with warm apple and cinnamon flavor.
4. Apple Pie French Toast
Cook thick slices of French toast until golden brown.
Spoon warm apple pie filling over the toast.
Add a light dusting of powdered sugar and a drizzle of maple syrup.
The combination of soft French toast and cinnamon apples makes a delicious weekend breakfast.
5. Apple Crumble Dessert
Transfer the apple pie filling into a lightly greased baking dish.
Prepare a crumble topping using oats, flour, brown sugar, cinnamon, and cold butter.
Sprinkle the topping evenly over the apples.
Bake until the crumble becomes golden and crisp.
Serve warm with vanilla ice cream.
6. Apple Pie Hand Pies
Cut prepared pie dough into small circles or rectangles.
Place a spoonful of cooled apple filling in the center of each piece.
Fold the dough over and seal the edges with a fork.
Brush with egg wash and bake until golden.
These little pastries make convenient individual desserts.
7. Apple Cinnamon Oatmeal
Prepare a warm bowl of oatmeal using milk or water.
Stir in a spoonful of apple pie filling.
Add a small pinch of cinnamon and a few chopped walnuts.
The apples provide natural fruit flavor and turn ordinary oatmeal into a comforting breakfast.
8. Vanilla Ice Cream Topping
Warm a small portion of apple pie filling until gently heated.
Spoon it over a bowl of vanilla ice cream.
The contrast between the warm cinnamon apples and cold, creamy ice cream creates a wonderfully satisfying dessert.
For extra indulgence, finish with a drizzle of caramel sauce.
Recipe Variations
Brown Sugar Apple Pie Filling
Replace part or all of the granulated sugar with light brown sugar.
Brown sugar adds a subtle molasses flavor and creates a slightly deeper, caramel-like sweetness.
This variation is especially delicious in apple crisps, cobblers, and cinnamon desserts.
Apple Cinnamon Vanilla Filling
Add 1 teaspoon of pure vanilla extract after removing the filling from the heat.
The vanilla adds a soft, comforting aroma that complements the cinnamon and butter.
Spiced Apple Pie Filling
Add a small pinch of nutmeg, ginger, or ground cloves.
These spices create a warmer, more traditional autumn-inspired flavor.
Use them sparingly so they do not overpower the natural taste of the apples.
Caramel Apple Pie Filling
Stir a few tablespoons of thick caramel sauce into the finished filling.
The caramel adds richness and a buttery sweetness that pairs beautifully with tart Granny Smith apples.
Mixed Apple Pie Filling
For a different balance of flavors, use a combination of Granny Smith and Honeycrisp apples.
The Granny Smith apples provide tartness, while the Honeycrisp apples contribute extra sweetness.
Choose firm apples that can withstand gentle cooking.
Make-Ahead Instructions
This homemade apple pie filling is an excellent recipe to prepare in advance.
If you are planning to bake a pie the following day, prepare the filling according to the instructions and allow it to cool.
Transfer it into an airtight container and refrigerate.
When you are ready to bake, use the cooled filling directly in your prepared pastry.
For desserts such as cheesecake cups, parfaits, or fruit tarts, the filling can also be prepared ahead and kept chilled until assembly.
The flavor often becomes even more balanced after the apples have rested in the cinnamon sauce.
Storage and Reheating Instructions
Refrigerator Storage
Allow the filling to cool slightly, transfer it to shallow, airtight containers, and refrigerate within 2 hours.
Store at 40°F (4°C) or below for approximately 3–4 days.
Use clean utensils when removing portions from the container.
Freezer Storage
Apple pie filling can also be frozen.
Allow the filling to cool completely in the refrigerator.
Transfer it into freezer-safe containers or heavy-duty freezer bags, leaving sufficient room for expansion.
Label the containers with the preparation date.
For the best flavor and texture, use frozen filling within approximately 3 months.
Thawing
Transfer the frozen filling to the refrigerator and allow it to thaw overnight.
Once thawed, stir gently to redistribute the sauce.
The filling may become slightly softer after freezing, but it will still work well in baked desserts.
Reheating
Place the desired amount of apple pie filling in a small saucepan.
Warm over medium-low heat, stirring gently.
If the sauce is very thick, add a teaspoon or two of water to loosen it.
Continue warming until evenly heated.
Serve over pancakes, waffles, French toast, oatmeal, or ice cream.
Important Storage Note
Although the apple filling looks beautiful in glass jars, this recipe is intended for refrigeration or freezing only.
It should not be stored at room temperature in sealed jars unless a separate, scientifically tested canning recipe and processing method are followed.
Recipe Information
Preparation Time: 15–20 minutes
Cooking Time: 15–20 minutes
Total Time: Approximately 35–40 minutes
Yield: Approximately 4–5 cups, depending on apple size and reduction
Difficulty: Easy
Cooking Method: Stovetop
Best Served: Warm or cooled, depending on the dessert
Main Ingredients: Granny Smith apples, cinnamon, sugar, butter, lemon juice, and cornstarch
Conclusion
Homemade Apple Pie Filling is one of those simple, timeless recipes that can transform everyday ingredients into something truly comforting and delicious. With its tender Granny Smith apple slices, rich buttery cinnamon sauce, gentle sweetness, and beautiful golden color, this filling captures the familiar flavor of traditional homemade apple pie in every spoonful.
What makes this recipe so special is its versatility. It can be used to create a classic baked apple pie, sweet hand pies, homemade apple crumble, creamy cheesecake desserts, or warm breakfast toppings. A single batch opens the door to countless delicious possibilities, making it a wonderful recipe to keep in your collection.
The combination of tart apples, sweet sugar, fragrant cinnamon, and fresh lemon juice creates a beautiful balance of flavors. The apples soften gently while maintaining their shape, and the cornstarch transforms the cooking liquid into a smooth, glossy sauce that coats every slice.
Another wonderful advantage of this recipe is how easily it can be prepared ahead of time. Having homemade apple pie filling ready in the refrigerator or freezer makes it simple to prepare a comforting dessert whenever the occasion arises.
Whether you are baking for a family celebration, preparing holiday desserts, planning a cozy weekend breakfast, or simply craving something warm and sweet, this apple pie filling is sure to bring a welcoming homemade touch to your kitchen.
Its familiar cinnamon aroma, rich apple flavor, and comforting sweetness make it a recipe worth preparing throughout the year, especially during the beautiful autumn and winter seasons.
From the first spoonful to the last, this homemade apple pie filling offers everything that makes classic apple desserts so memorable: tender fruit, warm spices, buttery richness, and the comforting taste of something made with care.