ADVERTISEMENT
Samoa Cheesecake
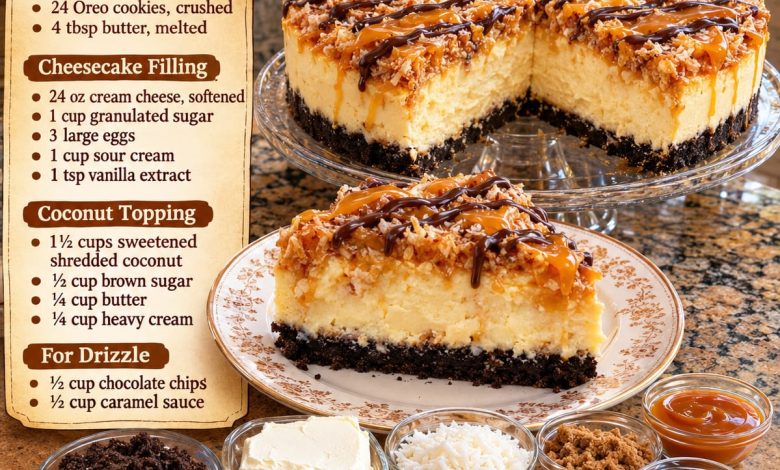
Samoa Cheesecake is a rich, creamy, and irresistible dessert inspired by the classic combination of chocolate, caramel, and toasted coconut. Featuring a crunchy chocolate cookie crust, a smooth vanilla cheesecake filling, a buttery coconut-caramel topping, and beautiful drizzles of melted chocolate and caramel, this homemade cheesecake delivers an unforgettable flavor in every bite.
The combination of textures makes this dessert especially delicious. The chocolate cookie crust provides a rich, slightly crunchy base, while the cheesecake filling is wonderfully smooth and creamy. On top, golden toasted coconut coated in homemade caramel adds a sweet, chewy finish that pairs perfectly with the chocolate drizzle.
Perfect for home cooking, this decadent dessert is ideal for birthdays, holidays, family gatherings, dinner parties, or any occasion that calls for something special. At deesviral, we love sharing homemade desserts that look impressive but are made with simple, familiar ingredients. This Samoa Cheesecake is a wonderful example of a bakery-style treat you can create in your own kitchen.
Ingredients
For the Chocolate Cookie Crust
24 Oreo cookies, finely crushed
4 tablespoons (56 g) unsalted butter, melted
ADVERTISEMENT
For the Cheesecake Filling
24 oz (680 g) cream cheese, softened to room temperature
1 cup (200 g) granulated sugar
3 large eggs, at room temperature
1 cup (240 g) sour cream, at room temperature
1 teaspoon pure vanilla extract
ADVERTISEMENT
For the Coconut Caramel Topping
1½ cups (120 g) sweetened shredded coconut
½ cup (100 g) packed brown sugar
¼ cup (56 g) unsalted butter
¼ cup (60 ml) heavy cream
For the Chocolate and Caramel Drizzle
½ cup (85 g) semisweet chocolate chips
ADVERTISEMENT
½ cup (120 ml) caramel sauce
1 teaspoon coconut oil or neutral vegetable oil (optional, for smoother melted chocolate)
Instructions
Step 1: Prepare the Oven and Baking Pan
Preheat your oven to 325°F (163°C).
Lightly grease the sides of a 9-inch springform pan with butter or nonstick cooking spray.
Line the bottom of the pan with a circle of parchment paper to make removing the cheesecake easier after chilling.
ADVERTISEMENT
For a water bath, wrap the outside bottom and sides of the springform pan with two layers of heavy-duty aluminum foil to help prevent water from entering.
Set the prepared pan aside while you make the crust.
Step 2: Make the Chocolate Cookie Crust
Place the Oreo cookies, including their cream filling, into a food processor.
Pulse until the cookies become fine, evenly sized crumbs.
Transfer the crumbs to a medium mixing bowl and pour in the melted butter.
Mix until the crumbs are fully coated and resemble damp sand.
Pour the mixture into the prepared springform pan.
Using the bottom of a measuring cup or a flat-bottomed glass, press the crumbs firmly and evenly across the bottom of the pan.
Bake the crust for approximately 8–10 minutes.
ADVERTISEMENT
Remove it from the oven and let it cool while preparing the cheesecake filling.
Keep the oven temperature at 325°F (163°C).
Step 3: Beat the Cream Cheese
Place the softened cream cheese in a large mixing bowl.
Using an electric hand mixer or stand mixer fitted with the paddle attachment, beat the cream cheese on medium-low speed for approximately 2 minutes, or until smooth and creamy.
Scrape down the sides and bottom of the bowl with a rubber spatula to make sure there are no lumps.
Using room-temperature cream cheese is important because cold cream cheese can create a lumpy batter.
Step 4: Add the Sugar and Sour Cream
Add the granulated sugar to the smooth cream cheese.
Beat on low speed until the sugar is fully incorporated.
Add the sour cream and vanilla extract.
Continue mixing gently until the filling becomes smooth, thick, and creamy.
Avoid mixing at high speed because too much air in the batter can cause the cheesecake to rise excessively and crack as it cools.
Step 5: Add the Eggs
Add the eggs one at a time, mixing on low speed after each addition.
Mix only until each egg is incorporated before adding the next one.
After adding the final egg, scrape down the bowl and gently stir the batter with a spatula to ensure everything is evenly combined.
The finished cheesecake filling should be silky, smooth, and free of visible lumps.
Step 6: Assemble the Cheesecake
Pour the cheesecake filling over the cooled chocolate cookie crust.
Use a spatula to spread the filling evenly.
Gently tap the springform pan on the countertop a few times to release large trapped air bubbles.
Smooth the surface so the cheesecake bakes evenly and has a beautiful finished appearance.
Step 7: Prepare the Water Bath
Place the wrapped springform pan inside a larger roasting pan.
Carefully pour hot water into the roasting pan until it reaches approximately 1 inch up the outside of the springform pan.
The water bath helps the cheesecake bake gently and evenly, reducing the chance of cracks while maintaining a creamy texture.
If you prefer not to place the cheesecake directly in water, you can put a separate pan of hot water on the oven rack below, although the results may be slightly different.
Step 8: Bake the Cheesecake
Carefully transfer the roasting pan to the preheated oven.
Bake for approximately 60–75 minutes.
The cheesecake is ready when the outer edges appear set, but the center still has a slight wobble when the pan is gently moved.
The middle should not look liquid or overly loose.
Avoid opening the oven repeatedly, as sudden temperature changes can affect the cheesecake’s texture.
Step 9: Cool the Cheesecake Slowly
Once the cheesecake has finished baking, turn off the oven.
Leave the cheesecake inside with the oven door slightly open for approximately 1 hour.
This gradual cooling process helps prevent sudden temperature changes that can cause the surface to crack.
Carefully remove the cheesecake from the water bath and place it on a wire rack.
Allow it to cool completely at room temperature.
Cover and refrigerate for at least 6 hours, preferably overnight, until fully chilled and firm.
Step 10: Toast the Coconut
While the cheesecake chills, prepare the coconut topping.
Place the sweetened shredded coconut in a large, dry skillet over medium-low heat.
Cook for approximately 4–7 minutes, stirring frequently, until the coconut turns lightly golden and develops a delicious toasted aroma.
Watch carefully because coconut can brown quickly.
Once toasted, transfer it immediately to a plate and allow it to cool.
Toasting the coconut adds a deeper, nuttier flavor that makes the topping especially delicious.
Step 11: Prepare the Caramel Mixture
In a medium saucepan over medium-low heat, combine the brown sugar, butter, and heavy cream.
Stir continuously until the butter melts and the sugar begins to dissolve.
Bring the mixture to a gentle simmer and cook for approximately 3–5 minutes, stirring frequently.
The mixture should become smooth, glossy, and slightly thickened.
Remove the saucepan from the heat and allow the caramel mixture to cool for a few minutes.
It will continue to thicken slightly as it cools.
Step 12: Make the Coconut Caramel Topping
Add the toasted coconut to the warm caramel mixture.
Stir gently until all the coconut is evenly coated.
The mixture should be thick, sticky, and easy to spread.
Allow it to cool until just warm or room temperature before placing it over the chilled cheesecake.
This helps prevent the cheesecake filling from softening.
Step 13: Add the Coconut Topping
Remove the chilled cheesecake from the refrigerator.
Carefully release the springform ring and transfer the cheesecake to a serving plate or cake stand.
Spoon the coconut caramel topping over the surface.
Using an offset spatula or the back of a spoon, gently spread the topping into an even layer.
Allow some of the caramel to reach the edges for a beautiful bakery-style presentation.
Step 14: Melt the Chocolate
Place the chocolate chips in a microwave-safe bowl.
Microwave in 20-second intervals, stirring well after each interval, until the chocolate is smooth and melted.
Alternatively, melt the chocolate in a heatproof bowl over a saucepan of gently simmering water.
If desired, stir in 1 teaspoon of coconut oil or neutral vegetable oil to create a smoother consistency for drizzling.
Let the chocolate cool slightly before decorating.
Step 15: Decorate with Chocolate and Caramel
Transfer the melted chocolate to a small piping bag or resealable plastic bag with a tiny corner snipped off.
Drizzle the chocolate back and forth across the coconut topping in thin, decorative lines.
Warm the prepared caramel sauce slightly, if needed, until it reaches a pourable consistency.
Drizzle the caramel over the cheesecake, allowing a few ribbons to flow gently down the sides.
For an extra-special presentation, alternate the chocolate and caramel drizzles to create a beautiful layered pattern.
Step 16: Chill and Serve
Place the decorated cheesecake in the refrigerator for approximately 20–30 minutes to allow the toppings to set slightly.
When ready to serve, use a sharp knife dipped in hot water and wiped dry to cut clean slices.
Wipe the knife between cuts for neat, professional-looking portions.
Serve chilled and enjoy the delicious combination of creamy cheesecake, toasted coconut, caramel, and chocolate.
Tips for Making the Perfect Samoa Cheesecake
Use room-temperature ingredients: Softened cream cheese, room-temperature eggs, and sour cream blend more smoothly and help create a silky cheesecake filling.
Avoid overmixing: Once the eggs are added, mix gently and only until combined. Excessive mixing introduces air, which can contribute to cracking.
Bake at a low temperature: Baking cheesecake slowly helps create a smooth, creamy texture without drying out the edges.
Use a water bath: A water bath provides gentle, even heat and helps prevent the cheesecake from cracking.
Toast the coconut carefully: Stir frequently and remove the coconut from the skillet as soon as it becomes golden. Overtoasted coconut can develop a bitter flavor.
Cool the caramel before topping: Adding very hot caramel to a chilled cheesecake may soften its surface.
Chill overnight: Allowing the cheesecake to rest overnight produces a firmer texture and makes it easier to slice beautifully.
Use a hot knife for slicing: A clean, warm knife helps create neat slices that show the distinct chocolate crust, creamy filling, and coconut topping.
Delicious Samoa Cheesecake Variations
Extra Chocolate Samoa Cheesecake
For an even richer chocolate flavor, add ¼ cup of melted and cooled semisweet chocolate to the cheesecake filling before incorporating the eggs.
You can also increase the chocolate drizzle slightly for a more decadent dessert.
Salted Caramel Samoa Cheesecake
Sprinkle a small pinch of flaky sea salt over the caramel topping.
The salt balances the sweetness and enhances the buttery caramel flavor.
Mini Samoa Cheesecakes
Prepare individual cheesecakes using a muffin tin lined with paper liners.
Divide the chocolate crust mixture among the liners, press down, and add the cheesecake filling.
Bake at 325°F (163°C) for approximately 18–23 minutes, until the centers are nearly set.
Cool and refrigerate before adding the coconut caramel topping and chocolate drizzle.
Samoa Cheesecake Bars
Use a parchment-lined 9 × 13-inch baking pan to create cheesecake bars instead of a round cake.
The thinner cheesecake layer will bake faster, so begin checking for doneness after approximately 30 minutes.
After chilling, add the toppings and slice into squares.
These bars are especially convenient for parties and potlucks.
Serving Suggestions
Samoa Cheesecake is a wonderfully rich dessert that pairs beautifully with simple accompaniments.
Serve each slice with freshly brewed coffee, cappuccino, or a warm cup of tea to balance the sweetness.
For an elegant dinner-party presentation, add a small dollop of lightly sweetened whipped cream beside each slice.
Fresh strawberries or raspberries also provide a refreshing contrast to the rich chocolate and caramel flavors.
For special celebrations, serve the cheesecake on a decorative cake stand and drizzle a little additional caramel sauce over each slice just before serving.
Make-Ahead Instructions
Samoa Cheesecake is an excellent make-ahead dessert because it requires several hours of chilling.
You can prepare and bake the cheesecake one or two days before serving.
After it has cooled completely, cover it tightly and store it in the refrigerator.
The toasted coconut and caramel topping can also be prepared ahead of time and refrigerated separately.
Before decorating, allow the coconut mixture to soften slightly so it spreads easily.
For the best presentation, add the coconut topping, chocolate drizzle, and caramel drizzle on the day you plan to serve the cheesecake.
This helps preserve the attractive appearance of the toppings.
Storage and Freezing Instructions
Refrigerator: Store leftover cheesecake in an airtight container in the refrigerator for up to 4–5 days.
Freezer: For best results, freeze the cheesecake without the coconut topping and drizzle. Wrap the fully chilled cheesecake tightly in plastic wrap, followed by aluminum foil, and freeze for up to 2 months for optimal quality.
Thawing: Transfer the frozen cheesecake to the refrigerator and allow it to thaw overnight before decorating and serving.
Serving Temperature: This cheesecake tastes best chilled. Allowing individual slices to rest at room temperature for 10–15 minutes before eating can make the filling slightly softer and creamier.
Recipe Information
Prep Time: 30 minutes
Bake Time: 60–75 minutes
Cooling Time: Approximately 2 hours
Chilling Time: At least 6 hours, preferably overnight
Total Time: Approximately 9½–10 hours, including chilling
Servings: 12–14 slices
Course: Dessert
Cuisine: American-inspired
Cooking Method: Oven-baked
Difficulty: Intermediate
Why You’ll Love This Samoa Cheesecake
There are so many reasons this dessert deserves a place in your homemade recipe collection.
The chocolate cookie crust adds a rich, crunchy foundation that perfectly complements the smooth vanilla cheesecake filling.
The toasted coconut topping creates a wonderful combination of chewy texture and nutty flavor, while the homemade caramel provides buttery sweetness.
The final chocolate and caramel drizzles make the cheesecake look like a beautiful dessert from a professional bakery.
Another advantage is that the cheesecake can be prepared ahead of time, making it ideal for holidays, birthdays, and family celebrations.
With every bite, you get the perfect combination of chocolate, caramel, coconut, and creamy cheesecake.
Conclusion
Samoa Cheesecake is a truly indulgent dessert that combines a crunchy chocolate cookie crust, rich and creamy cheesecake, golden toasted coconut, buttery caramel, and smooth chocolate drizzle.
Whether you’re making it for a special celebration or simply treating your family to something delicious, this homemade cheesecake is sure to impress.
Are you a bigger fan of the creamy cheesecake filling or the chocolate-caramel coconut topping?