ADVERTISEMENT
Lemon Cream Dessert Bars
Introduction
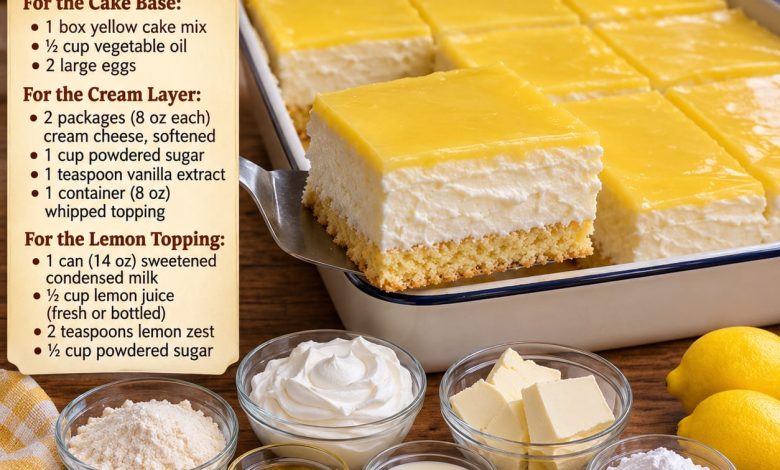
Bright, creamy, and bursting with refreshing citrus flavor, these Lemon Cream Dessert Bars are the perfect treat for anyone who loves sweet and tangy desserts. Made with a soft yellow cake base, a rich cream cheese filling, and a smooth lemon topping, these homemade bars offer three delicious layers in every bite.
The combination of fluffy cake, velvety cream cheese, and vibrant lemon creates a dessert that feels light and refreshing while still being wonderfully indulgent. Their beautiful yellow and white layers make them especially appealing for spring celebrations, summer parties, Easter gatherings, family dinners, and holiday dessert tables.
Best of all, this recipe starts with a convenient boxed cake mix, making preparation simple without sacrificing homemade flavor. Whether you’re baking for a special occasion or preparing a sweet weekend treat, these creamy lemon bars are sure to become a family favorite.
Recipe Information
Prep Time: 25 minutes
Bake Time: 18–22 minutes
Chilling Time: 4–6 hours
Total Time: Approximately 5 hours
Servings: 12–16 bars
Difficulty: Easy
Cooking Method: Baked base with chilled cream layers
Ingredients
For the Cake Base
- 1 box (approximately 15.25 oz) yellow cake mix
- ½ cup vegetable oil
- 2 large eggs, room temperature
For the Cream Cheese Layer
- 2 packages (8 oz each) cream cheese, softened
- 1 cup powdered sugar
- 1 teaspoon vanilla extract
- 1 container (8 oz) whipped topping, thawed
For the Lemon Topping
- 1 can (14 oz) sweetened condensed milk
- ½ cup fresh lemon juice
- 2 teaspoons freshly grated lemon zest
- ½ cup powdered sugar
Optional Garnishes
- Fresh lemon zest
- Thin lemon slices
- Whipped cream
- Fresh raspberries or blueberries
- A light dusting of powdered sugar
Preparation Steps
Step 1: Preheat the Oven
Preheat your oven to 350°F (175°C).
ADVERTISEMENT
Lightly grease a 9×13-inch baking dish with nonstick cooking spray or a small amount of butter.
For easier removal and cleaner slices, line the baking dish with parchment paper, leaving some overhang along the sides.
This will allow you to lift the finished dessert from the pan once it has chilled completely.
Step 2: Prepare the Cake Base
In a large mixing bowl, combine the yellow cake mix, vegetable oil, and eggs.
Using a wooden spoon or electric mixer on low speed, mix until the ingredients are fully incorporated.
ADVERTISEMENT
The mixture will be thicker than traditional cake batter, resembling a soft cookie dough.
Avoid adding the water or other ingredients listed on the cake mix box. For this recipe, only the ingredients listed above are needed.
Step 3: Press the Dough into the Pan
Transfer the cake mixture to the prepared baking dish.
Using a spatula or lightly greased fingertips, press the dough evenly across the bottom of the pan.
Make sure the dough reaches all four corners and forms a smooth, level layer.
ADVERTISEMENT
An even base helps the finished dessert bars bake uniformly and makes them easier to cut.
Step 4: Bake the Cake Base
Place the baking dish in the preheated oven.
Bake for approximately 18–22 minutes, or until the edges are lightly golden and the center is set.
The base should remain soft and tender rather than becoming overly dry or crispy.
Remove the pan from the oven and place it on a wire rack.
ADVERTISEMENT
Allow the cake base to cool completely before adding the cream cheese filling.
This step is important because a warm cake base could cause the cream layer to soften or melt.
Step 5: Prepare the Cream Cheese Filling
Place the softened cream cheese in a large mixing bowl.
Using an electric hand mixer, beat on medium speed for approximately 2–3 minutes until smooth, creamy, and free of lumps.
Gradually add the powdered sugar, mixing until completely incorporated.
Pour in the vanilla extract and continue beating until the mixture becomes silky and well combined.
Scrape down the sides of the bowl as needed.
Step 6: Fold in the Whipped Topping
Add the thawed whipped topping to the cream cheese mixture.
Using a rubber spatula, gently fold the whipped topping into the cream cheese.
ADVERTISEMENT
Use slow, sweeping motions to preserve the airy texture.
Continue folding until the filling is smooth, fluffy, and evenly blended.
The finished cream cheese mixture should be thick enough to spread but soft enough to create a beautiful, even layer.
Step 7: Spread the Cream Layer
Once the cake base has cooled completely, spoon the prepared cream cheese filling over the top.
Use an offset spatula to spread the mixture evenly from corner to corner.
Smooth the surface carefully to create a neat, thick layer.
Place the baking dish in the refrigerator for approximately 30 minutes while preparing the lemon topping.
This brief chilling period helps the cream cheese layer firm up before the lemon mixture is added.
Step 8: Prepare the Lemon Topping
In a medium mixing bowl, pour in the sweetened condensed milk.
Add the fresh lemon juice, lemon zest, and powdered sugar.
Using a whisk or electric hand mixer on low speed, mix for approximately 2 minutes until completely smooth.
The lemon juice will react with the sweetened condensed milk, gradually creating a thicker, creamier mixture.
Fresh lemon juice provides the brightest citrus flavor, while lemon zest adds natural lemon aroma.
Step 9: Adjust the Lemon Flavor
Taste a small amount of the lemon topping.
If you prefer a stronger lemon flavor, add a little extra finely grated lemon zest.
For a sweeter topping, the included powdered sugar helps balance the tartness of the lemon juice.
The goal is to achieve a delicious balance of creamy sweetness and refreshing citrus flavor.
Allow the topping to rest in the refrigerator for about 15–20 minutes to thicken slightly.
Step 10: Add the Lemon Topping
Remove the chilled dessert from the refrigerator.
Carefully pour the lemon topping over the cream cheese layer.
Use a spatula to spread it evenly across the surface, making sure it reaches all the edges.
Work gently to avoid mixing the lemon topping into the cream cheese layer underneath.
The finished dessert should have three distinct layers: a golden cake base, a thick white cream cheese center, and a glossy yellow lemon topping.
Step 11: Chill Until Firm
Cover the baking dish loosely with plastic wrap or a fitted lid.
Refrigerate for at least 4–6 hours, preferably overnight.
The chilling process allows the creamy layers to become firmer and helps the lemon flavor develop.
For the cleanest slices, allow the dessert to chill thoroughly before cutting.
Important: This lemon-condensed milk topping is naturally soft and creamy. It will not become as firm as a baked lemon curd. If you need perfectly structured bars for transporting or serving at a party, a stabilized lemon topping is recommended.
Step 12: Cut into Dessert Bars
Once the dessert has chilled completely, remove it from the refrigerator.
If you used parchment paper, gently lift the dessert from the pan and place it on a cutting board.
Using a sharp knife, cut into 12–16 evenly sized squares.
For professional-looking slices, dip the knife into warm water and wipe it dry between cuts.
This helps reveal the beautiful layers without smearing the cream cheese filling.
Step 13: Garnish and Serve
Arrange the lemon cream dessert bars on a serving platter.
For a fresh presentation, garnish with a little grated lemon zest, whipped cream, or fresh berries.
Serve chilled for the best flavor and texture.
Enjoy the perfect combination of sweet cake, smooth cream cheese, and refreshing lemon!
Tips for Perfect Lemon Cream Dessert Bars
Use room-temperature cream cheese: Softened cream cheese blends more easily and creates a smooth filling without lumps.
Cool the cake base completely: Adding the cream filling to a warm base can cause the layers to become runny.
Use fresh lemon juice: Freshly squeezed lemon juice gives the topping a bright, natural citrus flavor.
Avoid overbaking the base: The cake layer should remain soft and slightly dense rather than dry.
Fold the whipped topping gently: Gentle folding keeps the cream cheese layer light and fluffy.
Chill overnight when possible: Extra chilling time helps the layers hold together and makes slicing easier.
Use a sharp knife: Cleaning the knife between cuts produces attractive, well-defined dessert bars.
Delicious Recipe Variations
Strawberry Lemon Cream Bars
Add a thin layer of strawberry preserves between the cake base and cream cheese filling.
The strawberry flavor pairs beautifully with the refreshing lemon topping.
Garnish with fresh strawberry slices before serving.
Blueberry Lemon Cream Bars
Fold ½ cup of fresh blueberries into the cream cheese layer before spreading it over the cake base.
The combination of blueberries and lemon creates a delicious spring and summer dessert.
Coconut Lemon Cream Bars
Add ½ cup of sweetened shredded coconut to the cream cheese filling.
Sprinkle toasted coconut over the lemon topping before serving for extra flavor and texture.
Raspberry Lemon Cream Bars
Swirl a few tablespoons of raspberry preserves into the lemon topping before chilling.
This creates a beautiful pink and yellow marbled appearance.
Extra Lemony Dessert Bars
For a more intense citrus flavor, add an additional teaspoon of lemon zest to the cream cheese mixture.
You can also replace the vanilla extract with a small amount of lemon extract for a stronger lemon aroma.
Serving Suggestions
Lemon Cream Dessert Bars are perfect for a variety of celebrations and gatherings.
Their refreshing flavor makes them especially delicious during spring and summer, but they are also a wonderful addition to Easter brunch, birthday parties, baby showers, and family celebrations.
Serve them chilled with fresh strawberries, blueberries, or raspberries.
For a more elegant dessert presentation, add a small swirl of whipped cream and a thin slice of fresh lemon to each bar.
These dessert bars also pair wonderfully with iced tea, lemonade, freshly brewed coffee, or a warm cup of tea.
Make-Ahead Instructions
One of the best things about this recipe is that it can be prepared in advance.
For the best results, make the dessert the evening before your gathering and refrigerate it overnight.
This gives the cream cheese filling and lemon topping plenty of time to chill and develop their flavors.
You can also bake the cake base one day ahead, allow it to cool completely, and store it covered in the refrigerator.
Prepare the remaining layers the following day.
Keep the dessert refrigerated until ready to serve.
Storage and Freezing
Refrigerator Storage
Store leftover Lemon Cream Dessert Bars in an airtight container in the refrigerator for up to 3–4 days.
If stacking the bars, place parchment paper between layers to prevent sticking.
Freezer Storage
These bars can be frozen, although the creamy topping may become slightly softer after thawing.
For the best quality, freeze individual portions in airtight, freezer-safe containers for up to 1 month.
Thawing
Transfer frozen dessert bars to the refrigerator and allow them to thaw overnight.
Serve chilled once completely thawed.
Avoid leaving the bars at room temperature for extended periods because the cream cheese filling and whipped topping are perishable.
Frequently Asked Questions
Can I use lemon cake mix instead of yellow cake mix?
Yes! Lemon cake mix is a delicious alternative that adds even more citrus flavor to the dessert.
Can I use bottled lemon juice?
Yes, bottled lemon juice works, but freshly squeezed lemon juice generally provides a brighter and fresher flavor.
Can I make these bars without whipped topping?
You can substitute stabilized homemade whipped cream for the prepared whipped topping. Regular whipped cream may not hold its shape as well.
Why is my lemon topping too soft?
The topping may need additional chilling time. However, the combination of condensed milk and lemon juice naturally creates a soft filling rather than a firm custard. For a firmer topping, use an appropriate stabilizer or a cooked lemon curd recipe.
Can I prepare this dessert two days ahead?
Yes. Keep it covered in the refrigerator until serving. The flavor often improves after the layers have had time to chill together.
Conclusion
These Lemon Cream Dessert Bars are a wonderful combination of soft yellow cake, fluffy cream cheese filling, and sweet-tart lemon topping. Their bright flavor, creamy texture, and beautiful layers make them a delicious choice for family gatherings, holidays, and special occasions.
Easy to prepare and perfect for making ahead, this refreshing dessert is sure to impress anyone who loves lemon treats.