ADVERTISEMENT
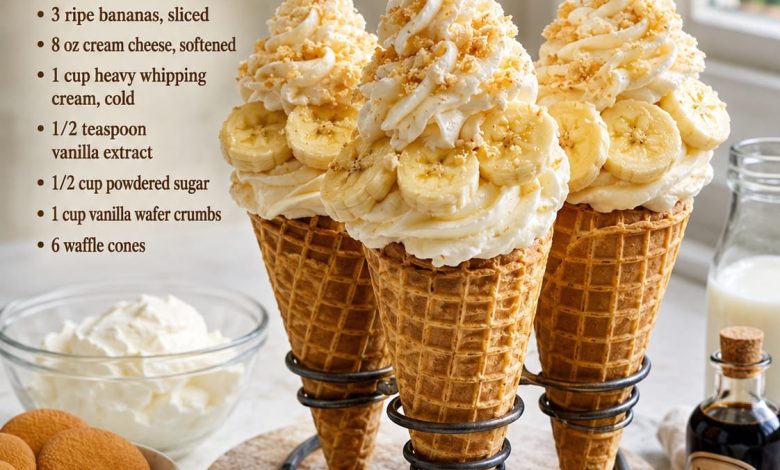
Banana Pudding Cheesecake Cones
Introduction
Banana Pudding Cheesecake Cones are a creamy, sweet, and beautiful no-bake dessert made with crispy waffle cones, smooth cheesecake filling, fresh banana slices, and crunchy vanilla wafer crumbs. This recipe combines the classic comfort of banana pudding with the richness of cheesecake, all served in a fun cone-style presentation.
These dessert cones are perfect for parties, family gatherings, birthdays, summer treats, or any time you want a creative dessert that looks impressive but is simple to make. Each bite gives you a delicious mix of creamy filling, fresh banana flavor, buttery cookie crumbs, and a crisp waffle cone.
Ingredients
3 ripe bananas, sliced
8 oz cream cheese, softened
1 cup heavy whipping cream, cold
ADVERTISEMENT
1/2 teaspoon vanilla extract
1/2 cup powdered sugar
1 cup vanilla wafer crumbs
6 waffle cones
Extra banana slices, for topping
ADVERTISEMENT
Extra vanilla wafer crumbs, for garnish
Optional: whipped cream for decorating
Optional: caramel drizzle or white chocolate drizzle for extra sweetness
Preparation Steps
- Start by preparing the cheesecake filling. Place the softened cream cheese in a large mixing bowl and beat it until smooth and creamy.
- Add the powdered sugar and vanilla extract to the cream cheese. Continue mixing until the sugar is fully blended and the mixture becomes soft and smooth.
- In a separate cold bowl, pour in the heavy whipping cream. Whip it until stiff peaks form. This will help make the cheesecake filling light, fluffy, and stable.
- Gently fold the whipped cream into the cream cheese mixture. Mix slowly with a spatula until everything is combined and creamy. Do not overmix, so the filling stays airy.
- Place the cheesecake filling in the refrigerator for about 15 to 20 minutes to firm up slightly before filling the cones.
- Prepare the bananas by peeling and slicing them into thin rounds. Keep a few nice slices aside for decorating the top of the cones.
- Place the vanilla wafers in a food processor and pulse until they become fine crumbs. You can also crush them in a sealed bag using a rolling pin.
- Take each waffle cone and spoon a small amount of vanilla wafer crumbs into the bottom.
- Add a layer of cheesecake filling inside the cone. You can use a spoon or a piping bag for a cleaner and more decorative look.
- Add a few banana slices over the cheesecake filling.
- Continue layering with more cheesecake filling, banana slices, and vanilla wafer crumbs until the cone is full.
- Pipe or spoon a generous swirl of cheesecake filling on top of each cone.
- Decorate the top with fresh banana slices and sprinkle vanilla wafer crumbs over the cream.
- If desired, add a light drizzle of caramel or white chocolate for an extra dessert-shop finish.
- Place the finished cones in a cone holder, cupcake stand, or tall glasses to keep them upright.
- Chill the cones for 20 to 30 minutes before serving. This helps the filling set and makes the dessert easier to enjoy.
Serving Suggestion
Banana Pudding Cheesecake Cones are best served chilled and freshly prepared. They are perfect for dessert tables because they are easy to hold and look beautiful when arranged together.
For the best texture, fill the waffle cones close to serving time so they stay crisp. You can prepare the cheesecake filling and crumbs ahead of time, then assemble the cones when ready to serve.
ADVERTISEMENT
Conclusion
Banana Pudding Cheesecake Cones are a fun and delicious twist on classic banana pudding. The creamy cheesecake filling, fresh bananas, crunchy vanilla wafer crumbs, and crispy waffle cones create a dessert that is rich, refreshing, and full of homemade flavor.
Would you serve these cones with extra banana slices or a caramel drizzle on top?