ADVERTISEMENT
Boston Cream Pie Cheesecake
Introduction
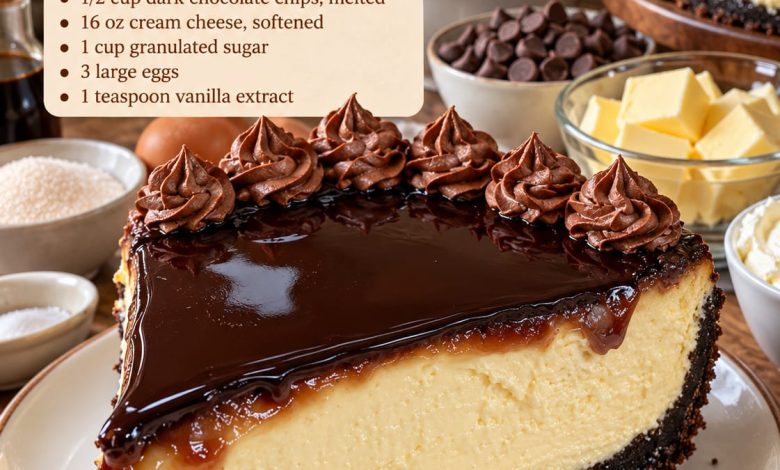
Boston Cream Pie Cheesecake is a rich and elegant dessert that brings together the creamy luxury of classic cheesecake and the irresistible chocolate-and-vanilla flavors associated with Boston cream pie. With a buttery crumb crust, a thick vanilla cheesecake center, and a glossy layer of chocolate ganache, every slice delivers a beautiful combination of creamy, crunchy, and silky textures.
Despite its impressive appearance, this cheesecake is made with familiar ingredients and straightforward techniques. Cream cheese creates the smooth and velvety filling, vanilla adds warmth and depth, and a generous chocolate topping provides the rich finish that makes this dessert especially memorable.
This is an excellent dessert for birthdays, holidays, family celebrations, dinner parties, or any occasion when you want something that looks bakery-worthy but can still be made in your own kitchen. Because cheesecake benefits from plenty of chilling time, it is also an ideal make-ahead dessert.
Ingredients
For the Crust
2 cups graham cracker crumbs
1/2 cup unsalted butter, melted
ADVERTISEMENT
2 tablespoons granulated sugar
1/2 cup dark chocolate chips, melted
For the Cheesecake Filling
16 ounces cream cheese, softened
1 cup granulated sugar
3 large eggs, room temperature
ADVERTISEMENT
1 teaspoon vanilla extract
1/2 cup sour cream
1/4 cup heavy cream
For the Chocolate Ganache
1 cup semisweet or dark chocolate chips
1/2 cup heavy whipping cream
ADVERTISEMENT
1 tablespoon unsalted butter, optional
For the Chocolate Decoration
1/2 cup heavy whipping cream
1/2 cup semisweet chocolate chips, melted and cooled
2 tablespoons powdered sugar
Preparation
Step 1: Prepare the Pan and Oven
Preheat your oven to 325°F (165°C).
ADVERTISEMENT
Lightly grease a 9-inch springform pan. For easier removal, place a round piece of parchment paper on the bottom of the pan.
If you plan to bake the cheesecake in a water bath, tightly wrap the outside of the springform pan with two layers of heavy-duty aluminum foil to prevent water from entering.
Step 2: Make the Crust
Place the graham cracker crumbs in a medium mixing bowl.
Add the granulated sugar and melted butter, then stir until all of the crumbs are evenly moistened.
Add the melted dark chocolate and mix again. The chocolate adds a deeper flavor and helps create a rich base that pairs beautifully with the vanilla cheesecake.
Transfer the crumb mixture to the prepared springform pan.
Press it firmly and evenly across the bottom. You can use the bottom of a measuring cup or drinking glass to create a compact, level crust.
Bake for approximately 8–10 minutes.
Remove from the oven and allow the crust to cool slightly while you prepare the filling.
ADVERTISEMENT
Step 3: Prepare the Cream Cheese
Place the softened cream cheese in a large mixing bowl.
Using an electric mixer on medium-low speed, beat for approximately 1–2 minutes until smooth and creamy.
It is important to use room-temperature cream cheese because cold cream cheese is more difficult to blend and can leave small lumps in the finished filling.
Step 4: Add the Sugar
Gradually add the granulated sugar to the cream cheese.
Continue beating on medium-low speed until smooth and evenly combined.
Scrape down the sides and bottom of the mixing bowl with a spatula to make sure no unmixed cream cheese remains.
Avoid beating the mixture excessively. Incorporating too much air can cause cheesecake to rise dramatically in the oven and then crack as it cools.
Step 5: Add the Eggs
Add the eggs one at a time, mixing on low speed after each addition.
Wait until each egg is mostly incorporated before adding the next.
After the final egg has been mixed in, add the vanilla extract, sour cream, and heavy cream.
Mix briefly until the filling becomes smooth and uniform.
The finished batter should be creamy and pourable without being overly thin.
Step 6: Fill the Cheesecake
Pour the cheesecake filling over the prepared crust.
Use a spatula to smooth the surface.
Gently tap the springform pan against the countertop a few times to release any large air bubbles trapped inside the filling.
Step 7: Prepare the Water Bath
Place the wrapped springform pan inside a larger roasting pan.
Carefully pour hot water into the roasting pan until it reaches approximately halfway up the outside of the springform pan.
The water bath creates gentle, moist heat around the cheesecake, helping the filling bake evenly and reducing the risk of large cracks.
If you prefer not to use a traditional water bath, you can place a separate pan of hot water on the lower oven rack instead.
Step 8: Bake the Cheesecake
Carefully transfer everything to the preheated oven.
Bake for approximately 55–70 minutes.
The cheesecake is ready when the outer edges appear set but the center still has a slight wobble when the pan is gently moved.
Do not wait until the entire cheesecake becomes completely firm in the oven. The center will continue setting as it cools.
Step 9: Cool Slowly
Turn off the oven and leave the cheesecake inside with the oven door slightly open for approximately 45–60 minutes.
This gradual cooling process helps reduce sudden temperature changes that can cause cracking.
Remove the cheesecake from the oven and water bath.
Allow it to cool completely at room temperature.
Once cooled, cover the pan and refrigerate the cheesecake for at least 6 hours, preferably overnight.
Preparing the Chocolate Ganache
Once the cheesecake is completely chilled, prepare the chocolate topping.
Place the chocolate chips in a heatproof bowl.
Pour the heavy cream into a small saucepan and warm over medium-low heat until steaming. Do not allow it to boil vigorously.
Pour the hot cream over the chocolate.
Allow the mixture to sit undisturbed for approximately 2–3 minutes.
Slowly stir from the center outward until the chocolate and cream combine into a smooth, glossy ganache.
For additional shine and richness, stir in one tablespoon of butter.
Allow the ganache to cool for several minutes until slightly thickened but still pourable.
Adding the Chocolate Topping
Remove the chilled cheesecake from the springform pan and transfer it carefully to a serving plate or cake stand.
Pour the chocolate ganache over the center of the cheesecake.
Using an offset spatula or the back of a spoon, gently spread the ganache toward the edges.
For a dramatic presentation, allow a small amount of chocolate to naturally drip down the sides.
Return the cheesecake to the refrigerator for approximately 30 minutes so the ganache can set.
Optional Chocolate Cream Decoration
For an extra-special bakery-style presentation, prepare a simple chocolate whipped cream.
Whip the cold heavy cream with the powdered sugar until soft peaks form.
Gradually fold in the cooled melted chocolate and continue whipping until the mixture is firm enough to hold its shape.
Transfer the chocolate cream to a piping bag fitted with a star tip.
Pipe decorative swirls around the outer edge of the cheesecake.
Keep the finished cheesecake refrigerated until serving.
How to Serve
For the cleanest slices, use a long, sharp knife.
Dip the knife into hot water, wipe it dry, and make one clean cut through the cheesecake.
Repeat the process between every slice.
This simple technique creates beautiful layers and prevents the creamy filling and chocolate topping from sticking excessively to the knife.
Allow individual slices to sit at room temperature for approximately 10–15 minutes before eating if you prefer an especially soft and creamy texture.
Tips for the Perfect Cheesecake
Always use softened, room-temperature cream cheese. This is one of the most important steps for achieving a smooth filling.
Mix the eggs on low speed and avoid overbeating the batter.
Do not overbake the cheesecake. A slight wobble in the center is exactly what you want when removing it from the oven.
Allow the cheesecake to cool gradually before refrigerating.
For the best flavor and texture, chill it overnight before adding the final decorations and serving.
Use good-quality chocolate for the ganache because chocolate is one of the dominant flavors in this dessert.
Delicious Variations
For a stronger chocolate flavor, replace the graham cracker crumbs with chocolate cookie crumbs.
For an even more traditional Boston cream-inspired version, spread a thin layer of vanilla pastry cream over the chilled cheesecake before adding the chocolate ganache.
You can also add fresh strawberries or raspberries when serving. Their slightly tart flavor provides a refreshing contrast to the rich cheesecake and chocolate.
For a sweeter presentation, decorate the top with chocolate curls, mini chocolate chips, or additional piped chocolate cream.
Storage
Store Boston Cream Pie Cheesecake covered in the refrigerator.
It will keep well for approximately 4–5 days when properly refrigerated.
Avoid leaving the cheesecake at room temperature for extended periods because it contains cream cheese, eggs, and heavy cream.
Individual slices can also be frozen. Wrap each chilled slice tightly in plastic wrap, place it inside a freezer-safe container, and freeze for up to one month.
Thaw frozen cheesecake overnight in the refrigerator before serving.
Make-Ahead Instructions
This cheesecake is particularly well suited to making ahead.
Prepare and bake the cheesecake one day before serving. Allow it to cool completely and refrigerate overnight.
The following day, prepare the chocolate ganache, decorate the cheesecake, and refrigerate again until serving time.
Allowing the cheesecake to chill overnight not only makes preparation easier but also gives the filling enough time to develop its smooth, dense, and creamy texture.
Conclusion
Boston Cream Pie Cheesecake combines several beloved dessert flavors in one spectacular slice. A buttery chocolate-enhanced crust provides the foundation, the thick vanilla cheesecake filling brings irresistible creaminess, and the glossy chocolate ganache adds a rich finishing layer.
The contrast between the crumbly crust, silky cheesecake, and smooth chocolate topping makes every bite feel indulgent and special. Although it looks like an elaborate bakery dessert, careful preparation and plenty of chilling time make it completely achievable at home.
Whether you prepare it for a birthday, holiday dinner, family celebration, or simply because you are craving something wonderfully rich, Boston Cream Pie Cheesecake is a dessert designed to make an impression.
Serve each slice chilled with its glossy chocolate topping and creamy vanilla center on full display. Would you enjoy your Boston Cream Pie Cheesecake with extra chocolate ganache, fresh berries, or a dollop of whipped cream?