ADVERTISEMENT
No-Bake Chocolate Coconut Cheesecake
Introduction
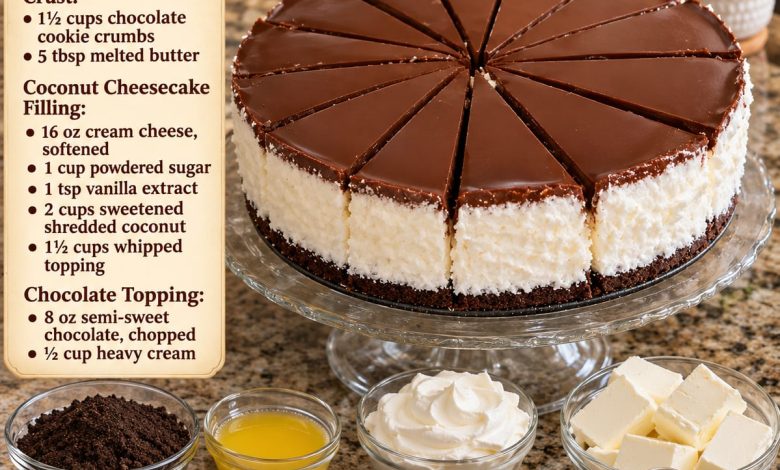
If you love the irresistible combination of rich chocolate and sweet coconut, this No-Bake Chocolate Coconut Cheesecake is the perfect dessert for you! Featuring a buttery chocolate cookie crust, a thick and creamy coconut cheesecake filling, and a smooth layer of chocolate ganache, this homemade treat is sure to impress.
Every bite offers a delicious balance of flavors and textures. The crunchy chocolate base contrasts beautifully with the fluffy coconut filling, while the silky chocolate topping adds a rich, indulgent finish.
Best of all, this cheesecake requires no oven, making it an excellent choice for family gatherings, birthday celebrations, holiday parties, or any occasion when you want an impressive dessert without complicated baking.
Recipe Information
Prep Time: 25 minutes
Chilling Time: 6 hours or overnight
Total Time: Approximately 6 hours 25 minutes
Servings: 10–12 slices
Difficulty: Easy
Method: No-Bake
Ingredients
For the Chocolate Cookie Crust
- 1½ cups chocolate cookie crumbs
- 5 tablespoons unsalted butter, melted
For the Coconut Cheesecake Filling
- 16 oz (2 packages) cream cheese, softened
- 1 cup powdered sugar
- 1 teaspoon vanilla extract
- 2 cups sweetened shredded coconut
- 1½ cups whipped topping, thawed
For the Chocolate Ganache Topping
- 8 oz semisweet chocolate, finely chopped
- ½ cup heavy whipping cream
Optional Garnishes
- Toasted coconut flakes
- Chocolate curls or shavings
- Mini chocolate chips
- Whipped cream
Preparation Steps
Step 1: Prepare the Cheesecake Pan
Lightly grease the bottom and sides of a 9-inch springform pan.
ADVERTISEMENT
Line the bottom with parchment paper to make removing the finished cheesecake easier.
A springform pan is ideal because it allows you to release the sides without damaging the delicate cheesecake layers.
Set the prepared pan aside while making the chocolate crust.
Step 2: Make the Chocolate Cookie Crumbs
Place chocolate sandwich cookies or chocolate wafer cookies into a food processor.
Pulse until the cookies become fine, even crumbs.
ADVERTISEMENT
If you don’t have a food processor, place the cookies in a resealable plastic bag and crush them using a rolling pin.
Measure 1½ cups of crumbs for the crust.
Step 3: Combine the Crust Ingredients
Transfer the chocolate cookie crumbs to a medium mixing bowl.
Pour in the melted butter and stir until all the crumbs are evenly coated.
The mixture should resemble damp sand and hold together when pressed between your fingers.
ADVERTISEMENT
If the mixture seems too dry, add a small additional amount of melted butter.
Step 4: Form the Chocolate Crust
Pour the crumb mixture into the prepared springform pan.
Using the bottom of a measuring cup or a flat-bottomed glass, firmly press the crumbs into an even layer across the bottom.
Make sure the crust is compact, especially around the edges, to prevent it from crumbling when sliced.
Refrigerate the crust for approximately 20–30 minutes while preparing the coconut cheesecake filling.
ADVERTISEMENT
This chilling period helps the butter firm up and keeps the crust sturdy.
Step 5: Beat the Cream Cheese
In a large mixing bowl, add the softened cream cheese.
Using an electric hand mixer, beat on medium speed for approximately 2–3 minutes until completely smooth and creamy.
Add the powdered sugar gradually, mixing until fully incorporated.
Scrape down the sides of the bowl as needed to ensure there are no lumps.
Using properly softened cream cheese is important for creating a smooth and creamy filling.
Step 6: Add the Vanilla and Coconut
Pour the vanilla extract into the cream cheese mixture and beat briefly to combine.
Add the sweetened shredded coconut.
Using a spatula, fold the coconut evenly into the cream cheese mixture.
ADVERTISEMENT
The shredded coconut gives the cheesecake its signature tropical flavor and slightly chewy texture.
Continue stirring until the coconut is evenly distributed throughout the filling.
Step 7: Fold in the Whipped Topping
Add the thawed whipped topping to the coconut cream cheese mixture.
Using a rubber spatula, gently fold the whipped topping into the filling with slow, sweeping motions.
Avoid vigorous mixing, as this can deflate the whipped topping and make the cheesecake denser.
Continue folding until the filling becomes light, fluffy, and evenly blended.
The finished mixture should be thick, creamy, and easy to spread.
Step 8: Assemble the Cheesecake
Remove the chilled chocolate cookie crust from the refrigerator.
Spoon the coconut cheesecake filling over the crust.
Use an offset spatula or the back of a spoon to spread the filling evenly across the pan.
Gently press the filling toward the edges to eliminate large air pockets.
Smooth the top to create a flat, even surface for the chocolate ganache.
Step 9: Chill the Coconut Cheesecake Layer
Cover the springform pan loosely with plastic wrap.
Place it in the refrigerator for approximately 2–3 hours, or until the coconut cheesecake filling becomes noticeably firm.
This step helps the filling hold its shape when the chocolate topping is added.
For the best results, avoid rushing the chilling process.
Step 10: Prepare the Chocolate Ganache
Place the finely chopped semisweet chocolate in a heatproof bowl.
In a small saucepan, heat the heavy whipping cream over medium-low heat until it begins to steam and small bubbles appear around the edges.
Do not allow the cream to boil vigorously.
Immediately pour the hot cream over the chopped chocolate.
Allow the mixture to sit undisturbed for 2–3 minutes so the chocolate can soften.
Then gently stir from the center outward until the chocolate melts completely and the ganache becomes smooth, glossy, and silky.
Step 11: Cool the Chocolate Ganache
Allow the chocolate ganache to cool for approximately 10–15 minutes, stirring occasionally.
It should remain pourable but no longer feel hot.
Adding overly hot ganache directly to the cheesecake could soften the creamy coconut layer and disturb its smooth appearance.
Step 12: Add the Chocolate Topping
Remove the chilled cheesecake from the refrigerator.
Slowly pour the cooled chocolate ganache over the coconut filling.
Use an offset spatula to spread the ganache into a smooth, even layer, allowing it to reach the edges.
Gently tap the pan on the countertop once or twice to remove any trapped air bubbles.
The dark chocolate topping creates a beautiful contrast with the white coconut cheesecake filling.
Step 13: Refrigerate Until Fully Set
Return the cheesecake to the refrigerator.
Chill for another 3–4 hours, or preferably overnight, until the filling and ganache are completely firm.
Overnight chilling is especially helpful because it allows the layers to set properly and makes slicing easier.
Keep the cheesecake covered to protect it from absorbing refrigerator odors.
Step 14: Remove from the Pan
Once the cheesecake is fully chilled, carefully run a thin knife around the inside edge of the springform pan.
Slowly release the springform ring and lift it away.
Transfer the cheesecake to a cake stand or serving platter.
For a beautiful presentation, leave the chocolate ganache smooth or decorate with toasted coconut flakes and chocolate curls.
Step 15: Slice and Serve
Use a sharp knife dipped in hot water and wiped dry to cut the cheesecake into clean slices.
Wipe the blade between each cut to reveal the distinct layers of chocolate crust, creamy coconut filling, and rich chocolate ganache.
Serve the cheesecake chilled for the best flavor and texture.
Enjoy every delicious bite!
Tips for the Perfect No-Bake Chocolate Coconut Cheesecake
Use room-temperature cream cheese: Softened cream cheese blends smoothly with powdered sugar and prevents lumps.
Choose sweetened shredded coconut: Sweetened coconut adds moisture and sweetness while giving the filling a pleasant texture.
Don’t overmix the whipped topping: Gentle folding keeps the cheesecake light and creamy.
Press the crust firmly: A well-packed chocolate crust holds together better when the cheesecake is sliced.
Cool the ganache before pouring: Warm, not hot, ganache helps preserve the smooth coconut layer underneath.
Allow enough chilling time: Refrigerating overnight produces the best consistency and cleanest slices.
Use good-quality chocolate: Quality semisweet chocolate creates a rich and smooth ganache topping.
Delicious Recipe Variations
Almond Joy-Inspired Coconut Cheesecake
Add ½ cup of chopped toasted almonds to the coconut filling for a nutty variation inspired by classic chocolate-coconut candy.
For extra flavor, sprinkle additional toasted almonds over the chocolate ganache.
White Chocolate Coconut Cheesecake
Replace the semisweet chocolate ganache with white chocolate ganache for a sweeter, creamier dessert.
Use approximately 8 oz white chocolate and ¼ cup heavy cream for a thick topping.
Dark Chocolate Coconut Cheesecake
Use dark chocolate instead of semisweet chocolate for a more intense chocolate flavor that balances the sweetness of the coconut filling.
Toasted Coconut Cheesecake
Lightly toast some of the shredded coconut in a dry skillet over low heat until golden brown.
Allow it to cool completely, then sprinkle it over the finished cheesecake for extra crunch and a deeper coconut flavor.
Chocolate Coconut Cheesecake Cups
Divide the chocolate cookie crust and coconut filling among individual dessert glasses.
Top each serving with chocolate ganache and refrigerate until firm.
These individual portions are perfect for parties, celebrations, and dessert buffets.
Serving Suggestions
This No-Bake Chocolate Coconut Cheesecake is delicious served on its own, but a few simple additions can make it even more special.
Serve each slice with a small dollop of whipped cream, fresh raspberries, or a sprinkle of toasted coconut.
For chocolate lovers, add a drizzle of warm chocolate sauce or a few chocolate curls.
The cheesecake also pairs wonderfully with freshly brewed coffee, cappuccino, or a cold glass of milk.
For a beautiful presentation, place individual slices on white dessert plates to highlight the contrasting chocolate and coconut layers.
Make-Ahead Instructions
This cheesecake is an excellent make-ahead dessert because it needs several hours of chilling.
Prepare the crust and coconut filling the day before your gathering, then add the chocolate ganache once the filling is firm.
Refrigerate overnight until completely set.
You can also make the entire cheesecake one day in advance and keep it covered in the refrigerator.
Decorate shortly before serving for the freshest appearance.
Storage and Freezing
Refrigerator Storage
Store leftover cheesecake in an airtight container or cover the springform pan tightly with plastic wrap.
Keep refrigerated for up to 4 days.
Because the filling contains cream cheese and whipped topping, avoid leaving the cheesecake at room temperature for extended periods.
Freezer Storage
To freeze, chill the cheesecake until firm, then wrap it tightly in plastic wrap followed by aluminum foil.
Freeze for up to 2 months for the best texture.
For convenient individual servings, slice the cheesecake before freezing and wrap each portion separately.
Thawing Instructions
Transfer frozen cheesecake to the refrigerator and allow it to thaw overnight.
Avoid thawing at room temperature for long periods, as this may affect the creamy texture.
Serve chilled after thawing.
Frequently Asked Questions
Can I make this cheesecake without a springform pan?
Yes. You can use a deep 9-inch pie dish or a square baking dish lined with parchment paper. A springform pan simply makes removing and presenting the cheesecake easier.
Can I use homemade whipped cream instead of whipped topping?
Yes, but homemade whipped cream is less stable unless it is stabilized. For a cheesecake that needs to hold its shape for several days, stabilized whipped cream or prepared whipped topping is recommended.
Can I use unsweetened coconut?
Yes. Unsweetened shredded coconut can be used, although the filling will be less sweet. You may need to add a little extra powdered sugar according to your taste.
Why is my cheesecake filling too soft?
The filling may need more chilling time, or the whipped topping may have been overmixed. For the best results, use full-fat cream cheese, fold gently, and refrigerate overnight.
Can I prepare this dessert two days ahead?
Absolutely. This cheesecake can be prepared up to two days in advance and stored covered in the refrigerator until serving.
Conclusion
This No-Bake Chocolate Coconut Cheesecake is a rich, creamy, and irresistible dessert that combines a crunchy chocolate cookie crust, fluffy coconut cheesecake filling, and silky chocolate ganache. Its beautiful layers and delicious flavor make it perfect for holidays, birthdays, family gatherings, and special celebrations.
Simple to prepare and wonderfully indulgent, it’s a dessert that chocolate and coconut lovers will want to make again and again.