ADVERTISEMENT
No Bake Pumpkin Pie
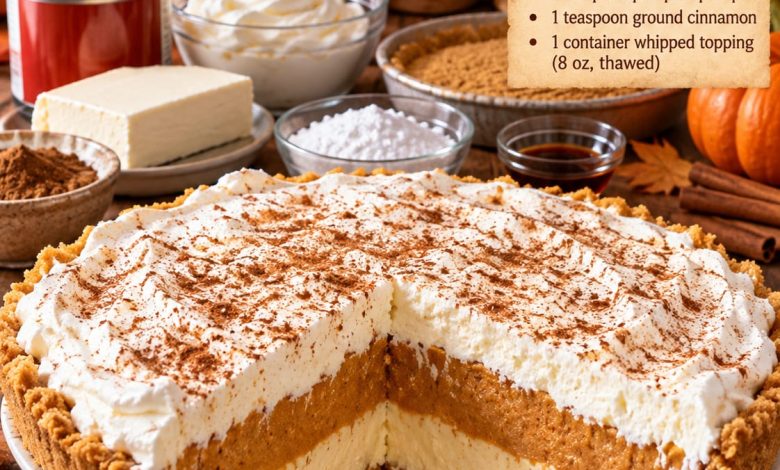
No Bake Pumpkin Pie is a creamy, warmly spiced dessert that delivers all the cozy flavor of traditional pumpkin pie without turning on the oven. A crisp graham cracker crust holds a rich cream cheese layer, a smooth pumpkin filling flavored with cinnamon and pumpkin pie spice, and a generous cloud of whipped topping. Each bite is cool, creamy, lightly spiced, and perfectly suited to fall.
This easy dessert is especially convenient for Thanksgiving, autumn gatherings, family dinners, potlucks, or any occasion when oven space is limited. Because the pie needs time to chill, it is also an excellent make-ahead dessert. Prepare it several hours or even a day before serving, refrigerate it, and bring it to the table when dessert time arrives.
Ingredients
For the Graham Cracker Crust
1 9-inch prepared graham cracker crust
Or, for a homemade crust:
1 1/2 cups graham cracker crumbs
ADVERTISEMENT
1/3 cup granulated sugar
6 tablespoons unsalted butter, melted
Pinch of salt
For the Cream Cheese Layer
8 ounces cream cheese, softened to room temperature
1/2 cup powdered sugar
ADVERTISEMENT
1 teaspoon pure vanilla extract
1 cup whipped topping, thawed
For the Pumpkin Layer
1 can (15 ounces) pure pumpkin puree
1/2 cup powdered sugar
1 teaspoon pumpkin pie spice
ADVERTISEMENT
1 teaspoon ground cinnamon
1/4 teaspoon ground nutmeg
1/2 teaspoon pure vanilla extract
1 1/2 cups whipped topping, thawed
For the Topping
Remaining whipped topping from an 8-ounce container
ADVERTISEMENT
Ground cinnamon or pumpkin pie spice, for dusting
Crushed graham crackers, optional
Chopped pecans, optional
Preparation
1. Prepare the Graham Cracker Crust
If you are using a prepared 9-inch graham cracker crust, simply remove the packaging and set the crust aside while preparing the filling.
For a homemade no-bake crust, place the graham cracker crumbs in a medium mixing bowl.
Add the granulated sugar and a small pinch of salt.
Pour in the melted butter and stir until all the crumbs are evenly moistened. The mixture should resemble damp sand and hold together when pressed between your fingers.
Transfer the mixture to a 9-inch pie dish.
Use the bottom of a measuring cup or drinking glass to press the crumbs firmly across the bottom and up the sides of the dish.
ADVERTISEMENT
Refrigerate the crust for approximately 30 minutes while preparing the fillings. Chilling helps the butter firm up and gives the crust enough structure to hold the creamy layers.
2. Soften the Cream Cheese
Before preparing the cream cheese layer, make sure the cream cheese has softened completely to room temperature.
This is important for achieving a smooth filling without small lumps.
Place the softened cream cheese in a large mixing bowl and beat it with an electric mixer for approximately 1–2 minutes until smooth and creamy.
Scrape down the sides and bottom of the bowl as needed.
3. Prepare the Cream Cheese Layer
Add 1/2 cup powdered sugar and the vanilla extract to the softened cream cheese.
Beat until completely incorporated and smooth.
Add 1 cup of thawed whipped topping.
Using a spatula, gently fold the whipped topping into the cream cheese mixture until the filling becomes light and fluffy.
Avoid aggressive mixing at this stage because you want to preserve the airy texture of the whipped topping.
4. Add the First Layer to the Crust
Remove the chilled graham cracker crust from the refrigerator.
Spoon the cream cheese mixture into the bottom of the crust.
Using an offset spatula or the back of a spoon, spread it carefully into an even layer.
Take your time around the edges so the layer remains neat and level.
Return the crust to the refrigerator while preparing the pumpkin filling.
5. Prepare the Pumpkin Filling
Place the pumpkin puree in a clean mixing bowl.
Make sure you are using pure pumpkin puree rather than pumpkin pie filling, which already contains additional sugar and spices.
Add the powdered sugar, pumpkin pie spice, ground cinnamon, nutmeg, and vanilla extract.
Mix until everything is thoroughly combined and the pumpkin mixture looks smooth.
Taste the filling and adjust the spices slightly if desired. If you enjoy a stronger fall spice flavor, add another small pinch of cinnamon or pumpkin pie spice.
6. Fold in the Whipped Topping
Add 1 1/2 cups of thawed whipped topping to the pumpkin mixture.
Gently fold it in with a spatula.
Continue folding until no obvious white streaks remain and the mixture becomes lighter, fluffier, and creamier.
Do not beat the mixture vigorously. Gentle folding gives the pumpkin layer a mousse-like texture once chilled.
7. Assemble the Pumpkin Layer
Remove the pie from the refrigerator.
Carefully spoon the pumpkin mixture over the chilled cream cheese layer.
Begin in the center and gradually work toward the edges to avoid disturbing the layer underneath.
Smooth the pumpkin filling with a spatula until the surface is relatively even.
At this point, you should have a graham cracker crust on the bottom, followed by a pale cream cheese layer and a beautiful orange pumpkin layer.
8. Add the Whipped Topping
Spread the remaining whipped topping over the pumpkin layer.
You can smooth the surface completely or create soft swirls with the back of a spoon for a more rustic homemade appearance.
For an attractive finish, leave some gentle peaks and swirls across the top.
Sprinkle lightly with cinnamon or pumpkin pie spice.
If desired, add crushed graham crackers or finely chopped pecans around the edge.
9. Chill the Pie
Cover the pie carefully without pressing the covering directly against the whipped topping.
Refrigerate for at least 6 hours.
For the firmest texture and cleanest slices, refrigerate the pie overnight.
The chilling period is essential because it allows the cream cheese and pumpkin layers to firm up while giving the flavors time to blend together.
Do not rush this step if you want beautiful, defined layers when slicing.
10. Slice and Serve
When ready to serve, remove the pie from the refrigerator.
Use a sharp knife to cut the pie into slices.
For cleaner cuts, wipe the knife between each slice.
Serve immediately while the pie is cold and creamy.
Add another small spoonful of whipped cream to each serving if desired and finish with a light dusting of cinnamon.
Tips for the Perfect No Bake Pumpkin Pie
Use full-fat cream cheese for the richest texture and best structure.
Always soften the cream cheese before mixing. Cold cream cheese is much more likely to create lumps.
Use pure pumpkin puree rather than pumpkin pie filling so you can control the sweetness and spices yourself.
Make sure the whipped topping is completely thawed before folding it into the filling.
Fold rather than aggressively beat the whipped topping into the pumpkin and cream cheese mixtures. This keeps the filling light and airy.
Give the pie plenty of refrigeration time. Overnight chilling produces especially neat slices and a firmer texture.
Keep the pie refrigerated until shortly before serving because the filling becomes softer as it warms.
Optional Flavor Variations
For a stronger spice flavor, add a small pinch of ground ginger and cloves to the pumpkin mixture.
For extra crunch, sprinkle chopped toasted pecans between the pumpkin and whipped cream layers.
You can also drizzle a small amount of caramel sauce over individual slices before serving. Salted caramel works especially well with pumpkin and cinnamon.
For chocolate lovers, sprinkle mini chocolate chips over the whipped topping or use a chocolate cookie crumb crust instead of graham crackers.
Another delicious option is to add a little maple syrup to the pumpkin mixture for a warm maple-pumpkin flavor.
Serving Suggestions
No Bake Pumpkin Pie is best served thoroughly chilled.
For a classic presentation, add a generous swirl of whipped cream and a light sprinkle of cinnamon to each slice.
A drizzle of caramel sauce makes the dessert richer, while toasted pecans provide a pleasant crunchy contrast.
Serve it alongside hot coffee, tea, or apple cider for a cozy fall dessert.
Because the pie is cool and creamy rather than warm and dense, it is especially enjoyable after a large holiday meal.
Make-Ahead Instructions
This pie is an excellent dessert to prepare in advance.
Assemble the entire pie the evening before serving, cover it carefully, and refrigerate overnight.
The following day, add any final garnishes just before bringing it to the table.
If you are using crushed graham crackers or nuts as a topping, adding them shortly before serving will help preserve their texture.
Storage
Keep leftover No Bake Pumpkin Pie covered in the refrigerator.
For the best flavor and texture, enjoy it within 3–4 days.
Do not leave the pie at room temperature for extended periods because it contains cream cheese and whipped topping.
For individual servings, place slices in airtight containers and keep refrigerated until ready to enjoy.
Conclusion
No Bake Pumpkin Pie is a simple way to enjoy the familiar flavors of fall in a cool, creamy dessert. The buttery graham cracker crust provides just enough crunch, the smooth cream cheese layer adds richness, and the pumpkin filling brings together cinnamon, vanilla, nutmeg, and warm pumpkin pie spices.
Best of all, there is no traditional pie baking required. Prepare it ahead, give it plenty of time to chill, and you will have a beautiful layered dessert ready for Thanksgiving, fall celebrations, family gatherings, or an easy weekend treat.
With its creamy layers, warm seasonal spices, and fluffy whipped topping, this No Bake Pumpkin Pie brings classic pumpkin flavor to the table in an easy and refreshing way.
Would you serve this No Bake Pumpkin Pie with extra whipped cream or a drizzle of salted caramel?