ADVERTISEMENT
Old-Fashioned Homemade Cornbread
Introduction
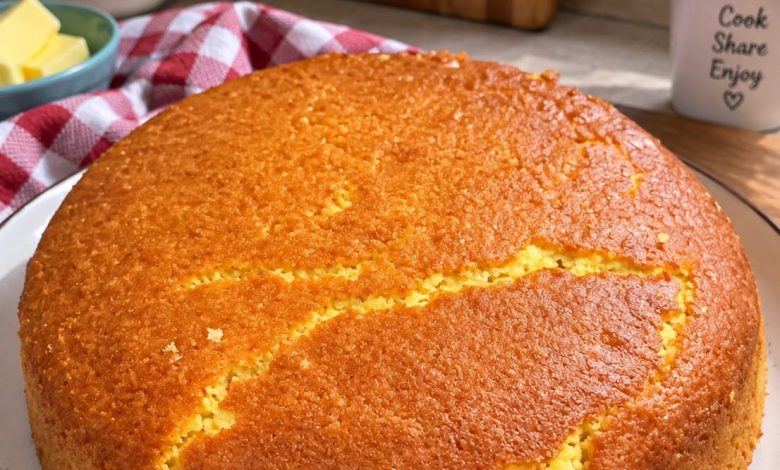
Few recipes bring the warmth and comfort of home cooking to the table quite like Old-Fashioned Homemade Cornbread. With its beautifully golden crust, tender yellow center, subtle corn flavor, and rich buttery finish, this simple bread has been a beloved addition to family meals for generations.
Homemade cornbread is wonderfully versatile. It can be served alongside chili, beans, soups, stews, barbecue, fried chicken, or a traditional Sunday dinner. It’s equally delicious while still warm from the oven with nothing more than a generous pat of butter and perhaps a drizzle of honey.
The key to great cornbread is keeping the preparation simple and avoiding overmixing the batter. A combination of cornmeal and flour gives the bread structure while preserving its characteristic corn texture, and buttermilk adds moisture and a gentle tang. Baked until deeply golden, the result is a rustic homemade cornbread that’s crisp around the edges yet soft and tender inside.
Ingredients
For the Cornbread
- 1 1/2 cups (180 g) yellow cornmeal
- 1 cup (125 g) all-purpose flour
- 1/4 cup (50 g) granulated sugar
- 1 tablespoon baking powder
- 1/2 teaspoon baking soda
- 3/4 teaspoon salt
- 2 large eggs, room temperature
- 1 1/2 cups (360 ml) buttermilk
- 1/2 cup (113 g) unsalted butter, melted
- 2 tablespoons vegetable oil
For the Pan
- 1 tablespoon butter or vegetable oil
Optional for Serving
- Softened butter
- Honey
- Maple syrup
- Fruit preserves
Preparation
1. Preheat the Oven
Preheat your oven to 400°F (200°C).
Grease a 9-inch round baking pan or cast-iron skillet generously with butter or vegetable oil.
ADVERTISEMENT
If you’re using a cast-iron skillet, place the greased skillet in the oven for about 5 minutes while you prepare the batter. Starting with a hot skillet helps create a beautifully crisp and golden bottom crust.
2. Combine the Dry Ingredients
In a large mixing bowl, add the yellow cornmeal, all-purpose flour, granulated sugar, baking powder, baking soda, and salt.
Whisk everything together until thoroughly combined.
This step distributes the leavening agents evenly throughout the flour and cornmeal, helping the cornbread rise consistently rather than developing dense areas.
3. Prepare the Wet Ingredients
In a separate medium bowl, crack in the eggs and whisk them until smooth.
ADVERTISEMENT
Pour in the buttermilk and whisk again.
Slowly add the melted butter while continuing to stir, followed by the vegetable oil.
The combination of butter and oil works especially well here. Butter contributes rich flavor, while oil helps the cornbread remain soft and moist even after it cools.
4. Make the Cornbread Batter
Create a small well in the center of the dry ingredients.
Pour the wet mixture into the bowl.
ADVERTISEMENT
Using a spatula or wooden spoon, gently fold the ingredients together until just combined.
The batter may contain a few small lumps, and that’s perfectly fine.
Avoid mixing until completely smooth. Overmixing can develop too much gluten in the flour and produce tough cornbread rather than the tender crumb you’re looking for.
5. Let the Batter Rest Briefly
Allow the batter to sit for approximately 5 minutes.
This short resting period gives the cornmeal time to begin absorbing moisture from the buttermilk.
ADVERTISEMENT
It also helps produce a softer, more cohesive interior once the cornbread is baked.
6. Transfer to the Pan
Carefully remove the hot skillet from the oven if you’re using cast iron.
Pour the cornbread batter into the prepared pan.
You should hear a slight sizzle if the pan is properly heated. This immediately begins forming the crust around the bottom and edges.
Use a spatula to gently spread the batter into an even layer.
Don’t press or stir the batter once it’s in the pan.
7. Bake Until Golden
Place the cornbread on the center rack of the preheated oven.
Bake for approximately 22–30 minutes, depending on the depth and material of your baking pan.
The cornbread is ready when the top is beautifully golden brown and the edges have begun pulling slightly away from the sides.
ADVERTISEMENT
Insert a toothpick into the center. It should come out clean or with only a few moist crumbs attached.
8. Add a Buttery Finish
Remove the cornbread from the oven.
While it’s still hot, brush the top lightly with melted butter.
The warm surface will immediately absorb some of the butter, adding richness while creating a soft, glossy finish.
For an especially buttery cornbread, repeat with another light brushing after several minutes.
9. Let It Rest
Allow the cornbread to cool in the pan for approximately 10–15 minutes.
This resting time helps the crumb set properly and makes the bread easier to slice without crumbling excessively.
Serve it warm for the best texture and flavor.
What Makes Great Cornbread?
The ideal cornbread should have a beautifully browned exterior with a moist, tender interior.
Cornmeal is responsible for its characteristic flavor and slightly rustic texture, while flour helps keep the loaf together.
Buttermilk is particularly useful because its acidity works with the baking soda to help the bread rise while also providing tenderness and subtle tanginess.
The melted butter adds unmistakable homemade flavor, and the small amount of vegetable oil helps maintain moisture.
The result should be substantial enough to hold a generous pat of butter without being dry or overly dense.
Sweet or Savory?
Cornbread recipes vary significantly depending on family tradition and region.
Some people prefer completely savory cornbread with little or no sugar. Others enjoy a slightly sweeter version, particularly when serving it with butter and honey.
The 1/4 cup of sugar in this recipe provides gentle sweetness without turning the cornbread into cake.
If you prefer traditional savory cornbread, reduce the sugar to 1 tablespoon or leave it out completely.
For a noticeably sweeter version, increase the sugar to approximately 1/3 cup.
Serving Suggestions
Old-Fashioned Homemade Cornbread is best served slightly warm.
Cut it into generous wedges or squares and place softened butter on the table so everyone can add as much as they like.
For a sweet-and-savory combination, drizzle warm cornbread with honey.
For dinner, serve it alongside beef chili, chicken soup, vegetable soup, slow-cooked beans, collard greens, barbecue ribs, pulled pork, or roasted chicken.
Cornbread is also excellent for soaking up flavorful sauces and gravy from hearty stews.
For breakfast, warm a leftover slice, spread it with butter, and add honey, maple syrup, or fruit preserves.
Delicious Variations
Once you have the basic recipe, cornbread is incredibly easy to customize.
For cheddar cornbread, fold about 1 cup of shredded sharp cheddar cheese into the batter.
For jalapeño cornbread, add one finely diced jalapeño and a little shredded cheddar.
For corn kernel cornbread, fold approximately 1 cup of drained corn kernels into the batter.
For a richer version, add a few tablespoons of sour cream to the wet ingredients.
You can also combine cheddar, corn, and jalapeño for a hearty Southwestern-style variation that’s particularly good with chili.
Tips for Perfect Cornbread
Make sure your baking powder and baking soda are fresh. Old leavening agents can prevent the cornbread from rising properly.
Don’t overmix the batter. Stop as soon as you no longer see large pockets of dry flour.
For the best crust, bake the batter in a preheated cast-iron skillet.
Use real buttermilk when possible, as it provides both flavor and tenderness.
Avoid overbaking. Cornbread continues cooking slightly from residual heat after it leaves the oven, so remove it as soon as the center is set.
And for the richest flavor, brush the top with butter while it’s still warm.
Make-Ahead Instructions
Cornbread can easily be baked earlier in the day.
Once completely cool, cover it tightly to prevent it from drying out.
Before serving, warm the cornbread in a 300°F (150°C) oven for approximately 10 minutes.
Brush the top with a little melted butter after reheating to restore that fresh-from-the-oven flavor.
Storage and Reheating
Store leftover cornbread in an airtight container at room temperature for approximately 2 days.
For longer storage, refrigerate it for up to 5 days.
To reheat individual slices, microwave them briefly or warm them in a skillet with a small amount of butter.
For several servings, wrap the cornbread loosely in foil and heat it in a 325°F (165°C) oven until warm.
Cornbread also freezes well. Wrap individual portions securely and freeze them for up to 2 months. Thaw at room temperature or overnight in the refrigerator before reheating.
What to Do With Leftover Cornbread
Leftover cornbread doesn’t need to go to waste.
Crumble it and use it as the base for traditional cornbread dressing or stuffing.
You can also toast cubes of cornbread until crisp and use them as croutons for soups or salads.
Another old-fashioned option is to crumble cornbread into a bowl or glass and serve it with cold milk or buttermilk.
Even slightly dry cornbread can be transformed into a delicious breakfast by warming it in a skillet with butter and serving it with honey.
Conclusion
Old-Fashioned Homemade Cornbread is proof that some of the most memorable recipes are also the simplest. With basic pantry ingredients, cornmeal, buttermilk, eggs, and plenty of buttery flavor, you can create a beautifully golden bread with crisp edges and a soft, tender center.
It’s the kind of dependable recipe that belongs beside a bowl of chili on a cold evening, next to barbecue at a family gathering, or simply on a plate while still warm with butter slowly melting into the crumb.
Whether you prefer your cornbread savory, slightly sweet, topped with honey, or served alongside a hearty home-cooked meal, this classic recipe delivers the comforting flavor that has kept homemade cornbread on family tables for generations.